The electric trike proposed in this article will bring a lot of joy to children and adults.
Thomas Edison once said a phrase that could become the slogan of any self-taught inventor: "In order to invent, you need a good imagination and a lot of junk."
The electric trike offered in this article is no exception. It will bring a lot of joy to children, and adults, and making it is not as difficult as it seems. How this miracle of technology looks like in action can be seen in the video.
And how to do it - read below
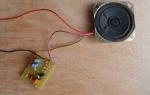
For the trike you will need an old Amigo scooter. In addition to its lower part, lawn mower parts, a couple of wooden planks and a bicycle handlebar will come in handy. And also - 4 rechargeable batteries (12 or 24 volts) and a powerful switch. The higher the voltage, the faster the trike will go. Lawnmower batteries can be used. Two batteries will be charged at the same time and will provide 75 minutes of continuous driving on smooth asphalt. Naturally, grass, gravel road, uneven terrain will reduce this time.
Manufacturing process
Step #1: Getting Started
First we need a chassis from an old scooter. We remove everything except the aluminum frame, engine and front wheel.


Step #2: Wheels
The original wheels from the scooter are small, they should be replaced with larger ones, with a diameter of 50 cm from an old lawn mower. In order to attach them to the scooter's chassis, you need to drill additional holes in the trunnion, about a centimeter from the end of each axle. Then fasten with screws. The more wheels you use, the faster the speed will be.


Step #3: Wiring
For electrical wiring, use automotive wire with plugs as follows:
- One wire with a black battery clamp - into the battery compartment to the black wire coming from the motor.
- One wire with a red battery clip - to the battery compartment of the terminal or to the switch.
- One wire on the other side of the transition - to the red wire coming out of the motor.
- There is one more crossover wire with a red clip on one end and a black clip on the other end. This wire is not required if you are using only one battery.


If you are using one battery then simply connect the red clip to the positive battery terminal and the black clip to the negative battery terminal. If you are using 2 batteries, connect the hook with the red clip coming from the switch to the positive pole of the battery, and the black clip of the jumper wire to the other terminal of one battery. A hook with a red clip on the other end of the jumper wire goes to the positive terminal of the other battery. A hook with a black clip will go from the motor to the other terminal of the same battery.
The above wiring should work in all cases, but if for some reason your trike runs in reverse, simply switch the red and black clamps coming from the trike to reverse the motor.
Step #4: Finishing the Job
There is little work left: the seat from the lawn mower and the steering wheel from the bicycle are fixed to the chassis with the help of bolts (the steering column of the scooter is fully sized). The battery is installed in a wooden box and fastened with screws to the back of the trike. Ahead, for greater convenience, you can fix two boards of a suitable size - they put their feet on them while riding. The switch is fixed between the seat and the steering column.


Step #5: A Few Tips
The trike is not equipped with brakes, but if you feel the need for them, then the design can be improved.
In order to increase the speed, you can add an additional battery.
It was very convenient to use solar panels to move the trike. For example, make something like an awning over the seat and place the batteries on it. The only catch is that the price of them is quite high, but this option should not be discounted.
But no matter what batteries your trike runs on, it will bring great pleasure to both children and adults.
This is a truly spectacular sport, drifting videos are gaining hundreds of thousands of views on YouTube.

As a rule, drifting on a bicycle is done while rolling down a hill; a car is most often used to climb back. This bike resembles a children's tricycle, but its main difference is the lowered seat. The following signs are also distinguished:
- Small front wheel and 6 times smaller than its rear;
- There are no rubber tires on the rear wheels;
- There is a drift trike with an engine.
The pedals of such a bike are practically not used, since with their help you will accelerate to a maximum of 25 km / h, and to perform tricks you need to go at least 60 km / h. You don't need to turn around and back out.
Drift trike with a motor is an expensive pleasure, its price reaches 2 thousand dollars. In this case, the engine, as a rule, has a power of 6.5 hp. Save will not work, it will affect the quality of the model. The only way out is to assemble the bike yourself.
At the same time, the legislation does not require registering a trike as a vehicle, because it is still a bicycle.
In order to assemble a drift trike with your own hands, you will need an old tricycle, which will not be a pity to disassemble. The first thing to do is to prepare the drawings. Be careful, it depends on them how safe it will be for you to drift on a bike.
Blueprints

On the drawings, it is necessary to draw all the details and calculate their exact size. You can do it yourself or find a ready-made scheme on the Internet. Do not avoid viewing several dozen drawings. Focus on the parts you have.
After you have made a drawing, you can begin to assemble a trike with your own hands.
Take an old bike. Get rid of the pipe under the seat and the upper fenders above the rear wheels. Be careful: do it wrong - you will have to look for new material for your vehicle. Attach a fairly dense board to the lower wings. For the frame, select strong pipes with a diameter of 3 centimeters. Bend them in the form of arcs and fasten them together. To assemble the frame, you will need special tools, in particular a pipe bender and welding.
Make the rear wheels out of wood or remove them from some cart.
The seat can be made from a tire or part of a plastic garden chair. The main thing is that you are comfortable.
You can assemble yourself and a trike with a motor, for this, use the motor kart.
There is no need to buy new spare parts, use used ones, this will practically not affect the quality, but it will help to reduce costs.
And remember, riding in crowded places and on the roadway, you put at risk not only yourself, but also those around you. Approach the choice of places for drifting with extreme caution.
How to make a trike
The question - how to make a trike with your own hands arose unexpectedly, after a trip to the Maloyaroslavets 2011 motto festival. It turns out that making a trike with your own hands is not so difficult. The most difficult thing is to register this miracle of motorcycle construction! However, if you do not register, then ... everything is easier ...
Initially, there was no clear concept of how to make a Trike with your own hands and what to do with it.
Three options were invented for how to make a Trike with your own hands.
The first option is to make a Trike from Zaporozhets. "Constipation" was found. But the option somehow didn’t take root ... It was a pity for “Constipation” and in general ...
The second option is to make a Trike using the old Zhiguli (Kopeyka). Planned to take the engine, instruments and rear axle. But at the last moment, the owner of the Zhiguli, having learned that the car would be cut, refused to sell it.
The third option is to make a Trike from an old Ural motorcycle and a Moscow bridge.
In the end, we chose this option because of the cheapness.
The search for the "Moskvichevsky" bridge took some time. Turns out it's a deficit. In the end, we found a man who sold used spare parts from 412 Muscovites. His garage was being demolished, and he decided not to throw away the spare parts, but to sell them. Together with the bridge, they also bought the master brake cylinder from Moskvich and all sorts of little things. They brought all this to the garage and began to fold the “puzzle”, so that it would turn out like in the picture - two wheels in the back, one in front. 
Attaching the "Moskvichevsky" bridge to the frame of the "Ural" so that the suspension is not rigid is possible - the task is not simple and it can be solved in different ways. You can put it like a Zhiguli on traction, or you can put it on springs from the same Moskvich, as they did in Irbit when tricycles were produced. We decided to do it like a Zhiguli. 

We bought a set of rods and bolts for them, and welded fasteners from a 6x6 square pipe, sawing off one of the pipe walls. Then they tried to install car shock absorbers, but then they abandoned this idea. 

We put the engine from the Urals. The frame had to be cut, welded and lengthened. The frame of the Urals was lengthened from improvised material (metal corner and pipes).
From the very beginning, we decided that we would not formalize the Trike and generally register it somehow. Therefore, we didn’t really worry about the choice or design calculations. Collected "Trike" just to ride through the forests and fields.
The question arose about how to make a cardan transmission. We thought about making a transfer using “CV joints, like on front-wheel drive vehicles. But we realized that in the garage on our knees, we won’t weld the cardan like that. Then we decided to use an old-style cardan with large slots. We had two Ural cardans. We decided to try to insert these splines of the Ural cardan into the sleeve that is inserted into the gearbox (attached on the other side of the cardan). A cardan with large slots entered the sleeve on the second cardan, it turned out like on the VAZ classic - a transmission to the rear axle of two cardans. And there is no problem of cardan skew due to the mixing of the axle gearbox to the center. 

The cardan out of the box stands almost exactly (the rubber clutch was left), and the second cardan goes to the bridge at a slight angle. The first cardan is mounted on a rubber clutch with an outboard bearing from the classics, which performs the same role in the car - it holds the cardan.
The diameter of the bearing is larger than the diameter of the Ural cardan, so we took a silent block from the Ural shock absorber, which is inserted into the upper part of the shock absorber, cut it lengthwise, put it on the cardan and, together with the cardan, hammered it into the clutch bearing. Now the cardan was spinning with the bearing and the clutch was attached to the frame. On the second cardan, a cross was welded from the Moscow cardan, well, here I had to try hard so that everything was in the center.
That's practically all. The rest is as standard! Front fork, fender, six volt electrical, axle brake discs and hydraulics are all original. They also attached the master brake cylinder to the frame and made a drive to the brake pedal, well, this is already quite simple.


Three years ago I bought a trailer for a bicycle, on which I took my son for a walk. In principle, the trailer suited me with the exception of:
- The trailer is quite low. And although it has a small flag on it to make it more visible, drivers in traffic may not see it.
- Since the child is at a distance of one meter from me, it is not clear what he is doing. You have to constantly turn your head, which is not very good while driving.
During a trip to Europe, I saw a large number of cargo bikes on the streets that were used for. At first I thought about buying a cargo bike. But the price turned out to be too high and I decided to assemble the tricycle myself. Since this was my first self-assembled bike, during the assembly of the trike there were many situations that had to be solved by trial and error. But in the end, I managed to make a cargo trike with my own hands. After searching the internet for something to guide me, I settled on a Christiania tricycle. So, let's try to make a cargo tricycle on our own!
Step 1: Search for an unwanted bike.

I took an old bicycle as a base and cut it in half along the black line. The bike must have! Aluminum frame bikes will not fit. You can check the frame with a magnet.
Step 2: Trike frame assembly.

Let's start assembling a homemade trike by creating a front frame. I decided to make it bigger - 100 cm by 100 cm in size. As it turned out later, the size was not quite optimal. The photo shows a trike frame welded from steel pipes and the back of an old bicycle.
Step 3: Wheels for the trike.

Now we have to install the front wheels directly on the frame. If you look at the Christiania tricycle, you will notice that the wheel axle is not located in the middle, but a little closer to the front of the frame. In addition, I wanted the steering wheel to be adjustable in height. Therefore, only two steel pipes were welded to the rear of the frame, where the handlebar is mounted.

On Christiania tricycles, the wheel axle is slightly forward, but it remains behind the head tube. First, I installed the axle in front of the head tube. A few months later, I had to position the axle like the original trike, which made it much easier to control the bike.

It is better to use 20-inch wheels in the front. Thus, we lower the center of gravity and improve the control of the trike on and . But at the same time, a problem arises - the usual head pipe does not fit, because there is simply not enough space between the ground and the cradle. Therefore, its use will have to be abandoned. Tapered roller bearings, which are used in automobiles, can be used instead of the head tube.
Setting the wheels at a slight angle allows you to improve the control of the bike.

Step 4: Testing the front frame.

The front frame for a homemade trike looks pretty good.
Step 5: Welding the components of the homemade cargo bike.

Weld the head tube to the front of the frame.
Step 6: The back of the homemade tricycle.

Next, we will start assembling the rear of the cargo bike. The head tube from the old bike, welded to the steel pipe, is in turn welded to the back of the bike. You can see in the photo above that the angle at which the steel tube connects to the head tube is different from the angle on the original bike. This was my second mistake that I made.

At this stage, a homemade cargo trike looks good. But once I tried to ride it, I found myself almost unable to turn in either direction. After thinking a little about the reasons for this, I realized that most likely the problem arises from the angle of the head pipe.
After riding this tricycle for a bit, I realized that the worst possible angle was chosen. On a Christiania bike, the angle is 9.5°, which is the opposite of the standard castor angle on a bike.
In addition, by law, a pedal-operated vehicle with a width of more than 80 cm requires a permit. Based on these considerations, I had to slightly reduce the size of the tricycle.

Consequently, the front frame had to be cut, downsized, and another head tube taken from another old bike.

It came out just great!

Step 7: Strengthening the back of the trike.

But the back end doesn't look strong enough. Therefore, it is necessary to make another steel pipe with fastening.
Step 8: The handlebar of the trike.

The steering wheel consists of three pipes connected at an angle of 90 degrees. curved, not straight. This will save space and allow you to sit more upright.
Step 9: Brakes.

To install the brakes that I took from another old bike, I had to bolt a plate with holes to the frame.

Step 10: Finishing the frame.


There are two other improvements that can be made:

Step 11: Brake adapter.

But there was one more issue that needed to be resolved - the control of two front brakes with a single handle. While talking with a friend, he found an interesting solution - an adapter that redistributes the force from one handle simultaneously to two brakes.
You can not make an adapter for the front wheel brakes yourself, but simply buy a “double brake lever”. It is quite cheap and allows you to control two brakes at the same time.
Step 12: Installing the bassinet.

And the last thing to add is a cradle for transporting a child and things.

Choose the size of the bassinet according to your needs. The chosen size of the cradle suits me quite well, since I need to transport two children and luggage. Sometimes four children with their things can be in the cradle. If you don't need that much space, you can make it smaller. Because even with a small headwind, a large cradle will create tangible aerodynamic drag. You can first make a layout out of cardboard. And only after he completely suits you, go to the tree.
You will also need to install others.
Step 13: Adjustable steering damper.

The last thing that needs improvement on this great homemade cargo trike is the addition of an adjustable steering damper. Since it is quite expensive, I made it myself from a spring and a screw tie. I am completely satisfied with his work.
Step 14: Some drawings of a homemade trike.

M 1 \u003d (D 1 + D 2) / 2.3;

The dimensions in the drawings correspond to the actual dimensions of my cargo bike.
We hope that you will be able to make a tricycle cargo bike with your own hands. Perhaps you will be able to make your own improvements to the design of the bike. Good luck!