Our little princess, my beloved niece, is approaching her first birthday in her life. For her mom's (my little sister's) birthday in February, the kids smashed our baby's favorite musical toy, a glass ball of teddy bears. And I did not let the musical mechanism be thrown out of it with the expectation that I would come up with something. And so I decided to make a box. Girls love boxes. I am a girl myself and I know :) While our Sonechka is little, mother will collect treasures beloved by girls in the form of beads, rings and bracelets.
One of my hobbies is handmade boxes, and for a long time that I have been doing this, I have already accumulated a lot of all sorts of materials.
So. We need a cookie or candy tin. You can also buy just a tin can. You can now find any cans in needlework stores. I found tin cans at a tea and coffee shop. Just banks. But this time I got a can of cookies from the Spartak confectionery factory. She is big. 22 cm in diameter and 7.5 cm in height.
Metal putty, acrylic primer, acrylic varnish, PVA glue, brushes, decoupage rice card with notes (rice card can be replaced with a decoupage napkin), scissors, musical mechanism. We will also need a glue gun and a glue stick. I love working with rice pads and cards. Under the influence of glue, they do not tear or deform. And they have a nice texture. Everything else will be selected in the course of work. Sometimes at the very beginning I do not know what I will get as a result. That is, usually at the very beginning there is some theory, but very often something changes in the process of work.
But in my bank there is one significant minus. The surface of the lid is not smooth. Cookies are squeezed out on it. Therefore, I took a car putty for metal and leveled the whole thing. There is no photo of the process, since there was no one to photograph, besides, the putty stinks extremely sharply and unpleasantly. When the putty has dried, it must be sanded. I deliberately did not sand to perfect evenness and smoothness.
Then we cover our entire future box with primer in one, and preferably in two layers. The second layer is applied only after the first layer has dried thoroughly. I think it is not necessary to explain what the soil is for.

So everything dried up. It's time for our napkin. First glue the lid. We remember the lessons of labor in elementary school. We cut out a circle with a diameter equal to the diameter of the top of the lid plus the height of the lid plus a couple of centimeters, just in case. We apply glue to the lid with a brush and carefully apply our circle to the top of the lid, level it so that there are no wrinkles. Very careful not to tear. Unfortunately, there is no photo of the process, since there was no one to photograph. We leveled it on the upper part, now we take the lid in our hands and carefully, wetting it in glue, glue the card to the side walls of the lid with a brush. In the same way, it pastes over the lower part of our future box. It's easier here. You need a strip of height from the locking rim to the bottom plus the height to the bottom. I have plus 5 mm to the main length. And a circle. We put our box on the map and outline it with a pencil. Let's dry.


I was dry for several hours. The adhesive must dry completely before applying the varnish. Otherwise, the varnish will stick to your hands. I bought wood varnish from a hardware store. Special varnishes for decoupage let me down more than once. They are expensive and stick to hands in the finished product. So I went and bought varnish from a hardware store. I don't like gloss, so when choosing a varnish, I settled on a varnish that has a matte surface.

So, the next step is to apply varnish. Lacquer must be applied strictly according to the instructions. In two layers. Dry each layer thoroughly.

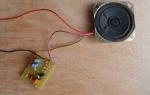
Here you go. Dried up. Now the fun begins. At the very beginning, I forgot to make a hole for the musical mechanism, so I had to make a hole after applying the varnish. Make the hole very carefully. I neglected safety precautions and stuck a screwdriver in my finger right into the wreath. Filling the hole with peroxide and barely stopping the blood, I proceeded to attach the musical mechanism. Due to the fact that I was slightly injured, I forgot to take a photo of this process. Then it turned out that the key that a familiar watchmaker picked up for me was very large and ugly. And then, with the help of my charm, I persuaded a familiar turner to make me a small key made of brass. Here he is handsome.

So. Now let's start working on the interior decoration. First of all, you need to finish the walls, the bottom and hide the mechanism. We take cardboard and cut out the details. Somewhere long ago I dug up a very cool pressed cardboard 3 mm thick. From it I cut out the details that I will hide the mechanism. The bottom and sidewall were cut out of cardboard with a density of 300 g / m2. We cut out the same details only with an allowance from velvet. Here are the details. We take glue stick and velvet. I really like to glue the fabric to the cardboard with a glue stick. I buy expensive pencils from Kohinoor or Erich Krause. But now, as luck would have it, I did not find either one or the other and again bought the most expensive glue stick from a German manufacturer in a hardware store. I took it at my own peril and risk, but it justified itself. So, we apply glue to the cardboard and apply velvet. Let dry and glue the seam allowances. Something like this.

sidewall

This is a mechanism box.

back side

bottom

Using a glue gun, we fix the velvet details inside the box. Here it is in finished form.

Next, we make a drawer for small things. Initially, I wanted to make a box that would be like a continuation of the box for the mechanism. But when I tried everything on, I realized that it was some kind of garbage and decided to make a drawer separately. I cut out a circle sector (cover) and a wall of thick cardboard. I pasted them together at a distance of 4 mm from each other so that the structure was bent. Trimmed the velvet around the edge. I sewed the edges of the velvet with a needle and thread. And secured everything inside the box. Everything seemed pale to me, and with the help of a glue gun I fixed the brown satin cord at the joints. Beads as a stopper so that the lid does not fall through.

Glue on both sides. Bends.

Sew the edges

I looked at the result and decided to add another branch. And to make it interesting (I'm making a box for a girl), instead of a lid, I made an imitation of a bag tightened with a satin cord. Everything is attached with a glue gun. Here you go. It seems to be nothing.

Here it is with the bag


Now you need to decorate the outer part of the box. I honestly and for a long time and in different places looked for the braid that I needed, but did not find it. And so I bought what I had in order to do what would suit me. Organza ribbon, satin cord and velvet stripe. I took an organza ribbon and glued a velvet strip on it with an iron and glue tape. I glued all this beauty to the box with a glue gun. Something is missing. Pale. Then I glued the satin cord along the edge of the velvet ribbon with a glue gun. From velvet and organza ribbon, I made a bow and attached it next to the key. Thus, I hid the junction of the braid and hid the key a little.
In the music box, almost at the very bottom, moments of bygone days are quietly sleeping. The once popular accessory is now gathering dust in museums or on mezzanines filled with all sorts of rubbish. So it could have been further, if the designers had not decided to revive the music box, making it a real luxury item. Let's talk about the brightest specimens in our review.

Starting from November, all the screens of the country are filled with a cheerful Santa Claus with a bottle of Coca-Cola in his hands. From year to year, advertising practically does not change, so the main character becomes almost familiar, and in the supermarket, the hand itself reaches for a fizzy drink. Now he has migrated to the lid of the music box. Such Santa Claus, of course, will not bring Coca-Cola, but it will please you with music.

The main thing is a roof over your head. As it turned out, this truth is relevant not only for people, but also for music boxes.

This music box is made to order. The designer not only chooses the melody that the client likes, but also creates figurines-portraits of the birthday or family members of the customer.

Antique stylized music box in the form of a medallion. Designers say that one such gift can win the heart of a girl.

If the capricious charmer remained indifferent to the singing heart, you can try to give her a music box in the form of a carousel. But first you should ask: does the girl love music or is the best gift for her in the jewelry department.

What progress has been made! Manufacturers came up with a music box for the Ipad. To put it into action, you need to download a special application on your iPad, and you can enjoy the melodies.

A music box created especially for the anniversary of the Beatles. However, the cover of the product speaks very eloquently about this. As for the repertoire of the box, it consists exclusively of the songs of the legendary band.

Kids will love this box for sure. Designers periodically change the main characters of the box. One thing remains unchanged - the nature of the product.

Music box for those who write music. Create melodies, fix them on a special card and enjoy the result.

Designers offer to create such a box with songs on their own: paint it in your favorite color, add all kinds of figures, inscriptions and give it to a dear person. After all, the best gifts, as you know, are made by hand. If you can’t make a music box on your own, you can give it to a birthday person. I'm sure anyone will love this gift.
Well, why else would I want to buy a music box? Then I saw a review, there I saw a mechanism - the puzzle came together and here it is on my table in a pretty box.
On Aliexpress, you could buy a ready-made design, but then the toad woke up and began to choke me. Give more than 3 c.u. for a music box? If only it will be made of gold with diamonds ( ok, fianites)...
It was decided to buy a musical mechanism and make a box on our own.
Cost at the time of purchase: $2.9
The mechanism was packed in such a way that at first I thought that the seller had made a mistake and sent me the music box already in some kind of case. But when I unwrapped the package, it turned out that the main volume was the packaging material. For what? ATTENTION: so that the cardboard box with a bow does not wrinkle.
The mechanism itself is metal - it is unlikely that something will happen to it, even if you step on it. Even the protruding part of the handle is very durable.

Everything is extremely simple. We take the mechanism, select or make the box ourselves, install the mechanism into the box with bolts ... STOP! Where are the promised bolts?
I remembered about the bolts a week later, when I climbed again to look at the description of the seller's goods. He has a mechanism in the photographs with 3 bolts for fastening, but it came to me without them. Where are my bolts???

I had to sculpt on double-sided tape to the bottom of the box. And since my husband had a period called: " What else can be glued with two-phase glue?", then the mechanism was planted on it for reliability. Is there a lot of glue left? It doesn't matter ... now we will seal the box tightly!
On my question: " Why did you seal the box?"There was no answer, the husband just shrugged his shoulders and smiled. I had to sigh languidly, shake my head and try out the mechanism in action in the new case from the old Raketa watch.
I had to make a hole in the box for the handle. The Chinese Dremel easily coped with this task ( feedback will be). But why the husband needed to make a second hole - again remained a mystery. The sound was exactly the same without it.
DESCRIPTION.
The mechanism and body are metal except for the plastic gears and the inner drum. The knob rotates in both directions, but the sound only gives the correct direction.
Mechanism size 4.4 x 3.4 x 2 cm + rotating handle.

The handle has a movable tip for easy rotation.
The seller sent the order in random order and out of 6 melodies I got the 002B drum with music - "The Finale of Swan Lake".
There is a possibility that you can ask the seller to send a specific drum, but for this you need to know all their numbers and sounds. I was satisfied with the choice of the seller.
The sound will be loud if the mechanism is installed on a hard surface. In the box, the sound is doubled. If the music box is turned in the kitchen, then it will be heard even in the room.
The melody is pleasant, the spelling noticed only one thing at the end, but maybe it should be so. The faster you turn the knob, the faster the melody plays and vice versa: the slower you turn, the slower the drum rotates.

FOR A CHILD.
I bought the mechanism for various reasons:
- I wanted to.
- Child development.
What can develop the music box mechanism in a child:
- Logic and ingenuity - where and how to rotate so that the melody sounds.
- Rumor - pleasant melodies with the right notes.
- Feeling beautiful - Swan Lake and the music from it is a classic.
- Fine motor skills - the handle is small and you need to hold it firmly with your fingers.
- Sense of beat (rhythm) - rotating faster or slower sets the pace.
- Fantasy, imagination - if you make the body together.
CONCLUSION.
I was satisfied with the mechanism and the child liked the music box. The money spent is not worth it. There was an idea to make a music box in the style of decoration with pasta and cereals, coffee beans, quilling or appliqués...
When I calmed down my raging fantasy, I realized that the child would not let the design live long and the most reasonable version of the music box would be just a tightly sealed square watch box.
I wish you happy shopping!
AliExpress is a wholesale online hypermarket. The subtleties of Ali, his pros and cons, our endless orders (accessories, microcircuits, appliances, toys, for myself, etc.) in a photo report from a shopaholic.
Pay for purchases on Ali
So it's time to talk about what was inside my box, cut out of plywood with a jigsaw. At the heart of everything was a circuit diagram on the controller, powered by 2 Krona batteries (9 + 9 V). I recorded the music on a 16-32 MB SD card. Moreover, the box played a new melody every time it was opened. Let's start in order!
Element base of the contents of the box
The core of the circuit is the Atmega16 microcontroller, 40-pin, which just controls the playback of melodies. It has a DIP case so that it can be easily inserted and removed from the socket located on the board. The picture of Atmega16 is as follows:
Another equally important microcircuit is the LM4860M 1 W, 16-pin audio amplifier, from the outputs of which the amplified signal goes to an 8-ohm speaker. I took the execution of this microcircuit in the SO16 package.
You will also need 2 microcircuits - a voltage converter: 7805 in the TO-220 package, the output of which is a constant voltage of +5 V, and IRU1117-33 in the SOT-223 package, with a constant output voltage of +3.3 V, from which the SD- map. The image of these chips is below:


To run the controller, you need a 16 MHz crystal oscillator. A 16-32 MB SD card, now it is difficult to get such a small flash card, but earlier they came with some camera models in the kit. All resistors and capacitors are SMD for surface mounting.
Schematic diagram of a music box
The electrical circuit of the box looks like this:

As you can see, out of 40 legs of the microcontroller, only 18 are used. Pins 5 to 8 - exchange with the SD card, 9th - to reset the controller, 10 - power supply + 5V, 11.31 - ground, 33-40 - through a divider to an audio amplifier. The Atmega16 microcontroller needs to be flashed, but not on the board itself, but on a special device connected to the computer via RS-232. The exchange with the computer goes through the SPI interface of the controller (pins 5-8). The firmware is downloaded using the PonyProg computer program. The firmware itself (Music_box_16.hex) and a screenshot of the installed fuses in PonyProg (PonyProg_Mega16_Fuses.bmp) are in the attached archive. Also in it you will find technical descriptions (datasheets) for the used microcircuits and microcontroller.
PCB layout
I did the layout of the tracks on the printed circuit board in the Sprint Layout4 program. Accordingly, the shkatulka.lay file is in the archive. A board with dimensions of 130x70 mm made of one-sided foil-coated getinaks. All SMD resistors and capacitors, the LM4860M chip, IRU1117-33 chip are placed on the side of the tracks, and the microcontroller, SD card slot, electrolytic capacitors, the 7805 chip are placed on the other side. The PCB drawing is shown below:

To etch the board, I used the old "iron method" and ferric chloride. Then I soldered all the elements, the speaker, the power button and the power supply from two 9 V batteries remained outside the board. Unfortunately, at that time I didn’t have a camera at hand, and I didn’t have such a goal (to capture my work), so I don’t have the opportunity to show the montage I received, and I won’t disassemble the non-separable box. Then I left myself the opportunity only to change the batteries, and rewrite the USB flash drive.

Recording melodies for the box
The SD card needs to be formatted in FAT16. The melodies that you want to be played by the box should be prepared. The total number of melodies is up to 100. Playing time is 1 minute. The audio format is .wav PCM 16 kHz 8 bit mono. Name the files - “ring_00.wav”, “ring_01.wav”, etc.
Archive.7z for download:
Stuffing for a box(5.8 MiB, 281 hits)
OK it's all over Now! Collect, run and enjoy!
P.S. Don't forget to subscribe to the newsletter (-> on the right in the sidebar)!
To do this, you will need the following materials and tools
Saw in the form of a tape for the machine;
- Machine for grinding;
- Electric drill
- Cutter
- counterbore
- Music: (which you like).
Additional materials:
Toy wooden xylophone;
- The remains of a tree, preferably a fruit tree or walnut;
- Means for pasting of products from rubber and a tree;
- Threaded screws for fixing drywall;
- dowel rod;
- Corresponding to axes metal washers;
- Beeswax with orange oil.

Before drilling holes, you need to turn the surface of the cylinder into a stave, to do this, draw one line after another around the entire circumference, and 4 lines perpendicularly. Install the drum in the frame to make it easier to determine the center axle.

Here you will need a sheet of plywood. Make gears using a computer program, print, glue them to wood material and cut them with a saw on a machine. If the material is made of fibers of alternating directions, then this will provide good strength.

2. Make hammers
Hammers will also require wood material, the length of which should match the xylophone.
It is necessary to make guides. To do this, use the link under the photo to the Inkscape file, print it and stick it on the guides. For cams, take 3 mm birch plywood, for hammers and axles, cherry trimmings 1 cm wide.
 |
 |

Attention! Hidden text will be available after registration or authorization on the site.
3. Other details
You'll need a base to support the instrument, and keep the notes clear with a hammer drum so they don't bounce. To drive, make a lever handle.
4. Ready-made musical homemade
Pay attention to the miraculous effect of beeswax (see photos before and after).