Burr processing (G. Fedotov)
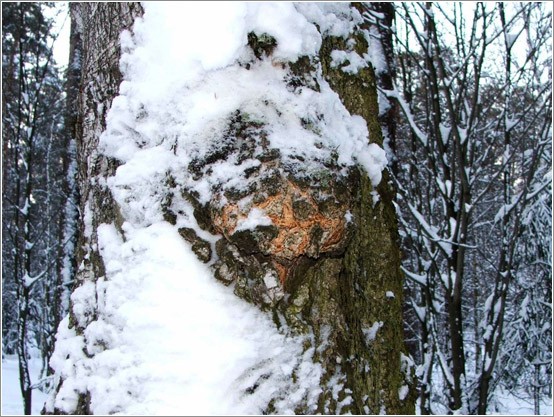
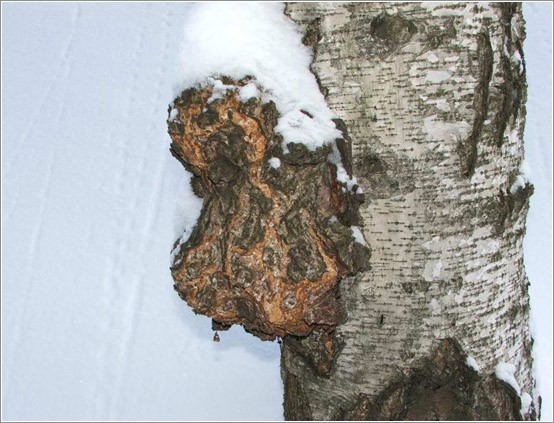
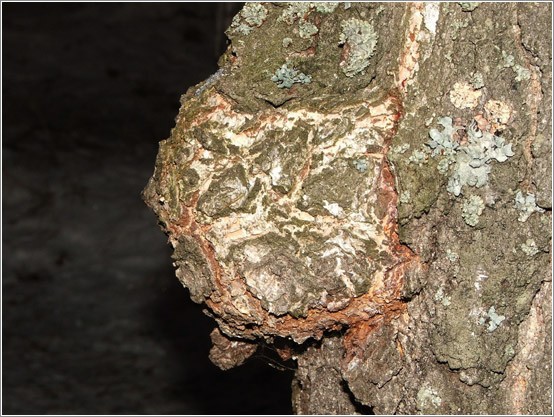
On the trunks of birches, high above the ground or at the very root, you can sometimes find spherical tree outgrowths covered with brown rough bark. These are mouthguards.
The beauty of birch burl wood was not immediately revealed to man. At first, he appreciated only its extraordinary strength. A small burr with a piece of the trunk and with a hollowed out cavity turned in the hands of a craftsman into a durable and convenient bucket or ladle. A bowl or brother was hollowed out of a larger burl. But in such products, the peculiar pattern of the burl remained undisclosed. The wood was only roughly processed. Only much later, when they learned how to saw caps into thin plates and polish, they began to appreciate it as an excellent decorative material. At the beginning of the 19th century, Russian cabinetmakers began to use burl along with valuable wood for decorative furniture. At the same time, the first caskets and snuff boxes appeared, made entirely of burls. Some artfully crafted items were literally worth their weight in gold. Caps were often combined with other materials - most often they were encrusted with mother-of-pearl, boxwood and ivory.
The recognized center for processing birch burls is the former Vyatka province, now the Kirov region. Vyatka craftsmen have participated in international exhibitions many times.

Kirov region A product made of a burl. Vase "Wave". Auth. M. Mertsalova
The masters of the Zvenigorod district of the Moscow region had their own special technology for processing the burl. But after the Great Patriotic War, this kind of craft faded away.
Relatively recently, the production of products from burl appeared in Bashkiria, which is famous for its reserves of burl birch. In the spring, as soon as the snow melts, burr harvesters are sent to the mountain forests of the south of Bashkiria. They carefully cut off the growths from birch trunks, then the saw cut is thickly smeared with paraffin, oil paint or lime so that harmful microbes do not get into the tree so that it does not wither and die. After a few years, a cap may grow on it again. Burl wood has been observed to grow twice or three times faster than normal birch wood. The procurers and the cut of the burl itself are lubricated so that it does not crack before the start of processing.

A burl growing on a tree trunk is called a stem burl, and at the root - a capo root. The kapo root is more common in the forest than the stem burl, and reaches one and a half meters in diameter. By their shape, the mouthguards are divided into circular, encircling the trunk, and lateral, growing on the side.
Burrs are found not only on birch, but also on aspen, alder, oak, linden, willow and spruce. But they have no industrial value, although they can be used to make various decorative gizmos.
Very often, mouth guards are confused with other growths - with the so-called suvel. Suvel is more common on birch than burl, and on the cut has a wavy twisted texture similar to that of Karelian birch. You can distinguish a burl from a suveli by the "dormant" buds, which are located in large numbers on the surface of a real burl and are small hemispherical tubercles. From some tubercles, thin twigs - "awakened" buds, can sprout.
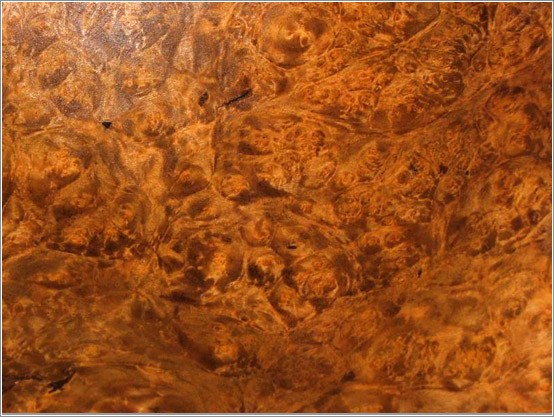
On the cut, the textured pattern of the burl is a complex interweaving of annual layers that shimmer when the angle of illumination changes. In a good burl, the cut shows the annual layers and dormant buds as many concentric circles and dark brown dots. The more such dots with concentric circles, the livelier and more decorative the drawing. There are usually more dormant buds in the stem burl, so the texture on its cut is more beautiful than that of the capo root, and its wood is more appreciated by craftsmen.
Sometimes the texture of the burl has such a bizarre pattern that with some imagination in the chaotic interweaving of wood fibers one can discern images of fantastic animals and landscapes. It is impossible to find even two pieces of burl with the same pattern, so joinery that has the same shape is still not alike. Each of them is unique.
It is impossible to cut the burl from the trees standing on the root by yourself: not knowing all the subtleties of this matter, you can destroy the tree. Unauthorized cutting of the burl is fined on an equal basis with felling of the forest. But if you are interested in processing burl, you can cut it from fallen trees at the warehouse of the nearest timber industry enterprise - with the permission of the storekeeper, of course.
Start processing the cap by sawing it into plates, selecting their thickness depending on the size of the intended product. The beauty of the texture pattern largely depends on successful sawing. Over time, you will learn from the shape of the burl, from the location of the dormant buds, to immediately determine how best to cut it to reveal the hidden beauty. Try to cut the burl so that the cutting plane cuts across the maximum number of dormant buds.
Usually on a fresh cut, the texture pattern of the burl is pale and unobtrusive. To make it manifest, burl wood is steamed. The easiest way is to boil the workpieces over low heat for two to three hours. But the best result is obtained by steaming wood in sawdust. Wet the sawdust and put them on the bottom of the pan with a layer of about 20 mm, put a layer of blanks on top, cover it with a new layer of sawdust, etc. Now put the pan in the oven for two to three hours. As a result of steaming, tree sap is removed from the burl, from the uneven drying of which the wood could subsequently warp and crack. At the same time, the blanks are colored with natural dyes contained in the burl, and acquire many shades - from golden amber to dark chocolate.
After steaming, dry the drip for several hours in an oven, and if it is not there, then simply in the air, but for at least a week.
Now you can cut, grind and glue various products from blanks - some of them are shown in the figures.
Products made of burl are most often covered with alcohol shellac varnish. Its film is sufficiently resistant and gives a warm yellowish color with a soft sheen. You can also use nitro varnishes - they have a more intense shine and make the texture pattern clearer and more contrasting. Before coating, you need to thoroughly grind the surface of the product with sandpaper - first coarse, then fine.
What are caps and suvelis, how do they differ? How and where to procure them? How to quickly and efficiently dry outgrowths at home?
Cap
So, first, let's define some concepts.
Cap(he is " witch broom") Is a benign formation on a tree, which is a bunch of thin twigs growing from a tear-shaped (most often) outgrowth. When cross-sectioned, it has a texture with pronounced cores of knots. It is difficult to process due to a strongly curled texture and a huge number of knots. , durable, excellent sanding and polishing.
Separate numerous areas have a pearlescent sheen. It is not of great industrial importance, but it is highly prized because of its beauty. If it is used in industry, it is only in the form of veneer for finishing furniture (mainly caps of exotic tree species are used), as well as for the production of small items such as caskets, cigarette cases, women's hairpins, small jewelry (burls of birch). The use of burrs on knife handles is considered good taste and is also appreciated by woodcarvers for its unique texture.
You cannot find two identical pieces of burl - even the halves of the sawn burl have a different pattern, so the build-up is so heterogeneous. It grows on many trees (linden, alder, birch, maple, oak, etc.), but the most valuable and beautiful is birch (from those growing in our latitudes). The growth is usually small, at most the size of a volleyball or the size of a large plate.
It makes no sense to cut some kind of pattern on the burl, since the texture clogs everything.
The photo shows a birch burl. Unfortunately, I could not get a cut of a birch burl (I took these pictures near the police station, and, as you know, they wouldn't have given me anything to cut there ... But I contrived and found an ash burl; in texture, most burls are similar and differ only in color and size of knot cores).


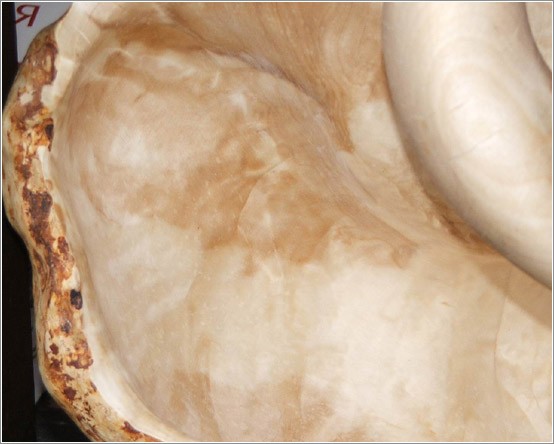
(swil) - as the name implies, the build-up got its name because of its structure. "Twisted structure"
That's putting it mildly. Suvel is a drop-shaped or spherical outgrowth on a tree (there is also an annular variety that covers the tree trunk around the perimeter), usually grows 2-3 times faster than the tree itself. When sawn, it has a texture similar in pattern to marble and mother-of-pearl (this is the main sign of difference from mouth guard; in the future, do not confuse suvel and cap). The presence of mother-of-pearl stains on the sanded wood creates a beautiful iridescent, glowing picture from the inside. The swill is as poorly processed as the burl, but not as hard. The size varies from the size of a nut to 1.5 meters in height (I saw one myself on a birch) and up to 2 meters in diameter (a ring-shaped suvel that completely covered the trunk of the tree).
In the Vatican, there is a font much more than a meter in diameter, cut from a single piece of suveli. I myself once sat in an armchair cut out of a suveli. It perfectly holds fine carvings, but it is not recommended to cut the suvel. Better to sand and varnish (soak in oil). The product will only benefit from this.
The most valuable is the root or butt sweep. The presence of dark veins and clearly pronounced twisted annual rings. This is a fairytale. BEAUTIFUL, that says it all. The barrel suvel has a finer texture and a more subtle "frosty" pattern. And lighter wood. In terms of strength, the butt gouge slightly surpasses the barrel gouge due to the peculiarity of the structure of the tree trunk. Suvel is durable, beautiful, easy to polish and grind. Well dried and processed, it begins to "glow" from the inside (with proper impregnation with oils, the tree becomes similar to amber and even a little transparent). Usually has a color from pale yellow or pinkish brown to very ocher brown. It all depends on the conditions and drying time. The cap has the same colors.


As you can see, the suvel does not look like a burl at all.
- this is a mushroom (not to be confused with a tinder fungus) and we do not need it for our purposes.

Blank
Where to look for growths ... Naturally in the forest. BUT! There are no definite places of growth, they grow spontaneously, and the most beautiful growths will be found by the most eyed and persistent. This activity is akin to a mushroom hunt - who is more and more about e gal forest, that and more got it.
We cut off the build-up. We do this with a sharp saw. Otherwise, you will be tortured to saw, and the tree will begin to shaggy. We do not peel off the bark.
I highlight in red:
- If the outgrowth is a "trunk-embracing" or kapokroot, then it is more correct to refrain from cutting it - the tree may die. It is advisable to acquire such burls and twigs during legal logging, when the tree is still doomed.
- It is advisable to cut down the growths in the dry season, ideally at the end of August, early September, before the start of sap flow.
- Do not forget to cover the cut on the tree with oil paint or wax, or something similar.
Drying
So how to dry? By the "steaming" method. I must say right away that this method is suitable for small pieces of wood: about half a soccer ball or a small piece of wood.
- We take an unnecessary pan (bucket), and throw a piece of wood there. The pan should be taken exactly unnecessary, since a very tricky broth is formed during the cooking process, which is then very troublesome to wash. It is better to clean a piece of wood from any rags of birch bark and other fragile and dangling particles - they will fall off anyway.
I consider birch growth as the most accessible and beautiful. The rest of the growths are boiled using the same technology. The log is properly cleaned of any debris and fragile particles. We pour water. It is convenient to do this with a faceted glass (it contains 250 ml). The water should cover the piece of wood about a centimeter or two. The tree, of course, floats up, but we press it to the bottom and we will see everything. Pour water no matter what, cold or hot - it will still boil. You can throw a piece of wood into a saucepan, no matter how much you pity, the volume of an individual piece of wood is important, and not the total volume of devesina.
- We take table salt, which is not a pity. We don't cook soup. Pour 2 large tablespoons per liter of water
with a top of salt. It is possible and more, no matter how sorry, it's okay, it's impossible to overdo it. The main thing is that the water is sickly salty. You can use pure sea water (just clean, otherwise it will smell disgusting of mud). The salt will draw juices out of the tree, but the tree will not saturate. - We find sawdust of resinous wood species. Spruce, pine, the easiest to get. We take the saw: and forward. We need two powerful handfuls of sawdust (we rake the sawdust with both hands). It was sawdust, not shavings from a simple hand planer. The shavings will come from an electric planer (you can get it at the nearest sawmill or cut it yourself). I always use them. They are quite small and can usually be obtained in large quantities and easily. The more resin in the sawdust, the better. And the finer the sawdust, the better. We fall asleep in a saucepan. The sawdust will give the suveli a pleasant ocher color. From pale pink-yellow to ocher-brown. And also see O Wood will add strength and texture to the wood.
- When the water boils, we reduce the heat and leave it boiling for 6-8 hours, you can do more, as long as you have enough patience. If the saucepan is large, then you can not diminish the flame, let the water boil and bubble. But you need to look so that the water does not boil away completely. Salt, sawdust, temperature and time will do the trick. We add water as needed. During the cooking process, a red "broth" is formed. And scale. It is better to remove scale immediately. It is very difficult to wash.
- It took 6-8 hours (depending on the size of the piece of wood). We take out the piece of wood. We wash under running water from sawdust. Water from the pan
we dump it out for uselessness, but you can leave it the next time, if you have somewhere to store it. But pouring out the water is easier. We throw in the build-up
on the closet, wrapping nothing. For a day or two, let it cool down. - We repeat the cooking and drying process 2-4 times, depending on the volume of the wood. You can use a pressure cooker to speed up the process. The time is reduced to 4-6 hours.
- At the last cooking, you need to quickly peel off the bark while the tree is hot. Although she herself should fall off by this time. Carefully!!! Hot!!! Use gloves!
- We throw it on the closet for a week or two. The tree is basically dry, but let the remaining moisture go away. The tree will "" rivet "to the atmosphere. After final drying, the tree will look like a bone, and it can be cut, sawed, polished. There will be no foreign smell. It will smell only of wood.
- In the process of accelerated drying of wood, it must be remembered that small cracks can be reflected, and therefore it is necessary to give
allowance for their removal in subsequent processing. - Let me remind you once again that large pieces cannot be dried like this. Cracked. Necessarily. Checked.
- After the tree has finally gotten used to the atmosphere, we make a product from it. Saturate the suvel and the cap, preferably with oil, and if
there is a desire, then wax too. The tree will show its texture, "sparkle", as they say, to manifest all of its inner beauty.
If you have any questions or any clarifications about the above technology, I will answer as much as possible.
Cap, suvel. Harvesting, drying, properties.
The author of this material is a great specialist in the artistic processing of wood (and not only wood), already familiar to us from Sergei from the Moscow region. Today Sergey will reveal to his readers the secret of quick drying of such rare and interesting materials as burl and suvel. The information is very rare and useful. We read ...
So first, let's define some concepts.
CAP - (aka a witch's broom) is a benign formation on a tree, which is a bunch of thin branches growing from a teardrop-shaped (most often) growth. In cross-section, it has a texture with pronounced knot cores. It is difficult to process due to the highly curled texture and a huge number of knots. Extremely beautiful, durable, excellent sanding and polishing.
Separate numerous areas have a pearlescent sheen. It is not of great industrial importance, but it is highly prized because of its beauty. If it is used in industry, it is only in the form of veneer for finishing furniture (mainly caps of exotic tree species are used), as well as the production of small products such as caskets, cigarette cases, women's hairpins, small jewelry (burls of birch). Use on knife handles is considered good taste and is also prized by woodcarvers for its unique texture.
It is impossible to find two identical pieces of burl, even the halves of the sawn burl have a different pattern, the growth is so heterogeneous. It grows on many trees (linden, alder, birch, maple, oak, etc.), but the most valuable and beautiful is birch (from those growing in our latitudes). The growth is usually small, at most the size of a volleyball ball or the size of a large plate.
It makes no sense to cut some kind of pattern on the burl, since the texture clogs everything.
The photo shows a birch burl. Unfortunately, I could not get a cut of a birch burl (I took these pictures next to the police station and as you understand, they would not have given me anything to cut it ... But I contrived and found ash burls, most burls are similar in texture and differ only the color and size of the cores of the knots.


SUVEL - (aka swil) As the name implies, the build-up got its name because of its structure (twisted structure, that's putting it mildly). Suvel is a drop-shaped or spherical outgrowth on a tree (there is also an annular variety that covers the tree trunk around the perimeter), usually grows 2-3 times faster than the tree itself. When sawn, it has a texture similar in pattern to marble and mother-of-pearl (this is the main sign of difference from KAPA, in the future, do not confuse suvel and burls).
The presence of mother-of-pearl streaks on the sanded wood creates a beautiful iridescent, glowing picture from the inside. The swill is as poorly processed as the burl, but not as hard. The size varies from walnut up to 1.5 meters in height (I myself saw this on a birch) and up to 2 meters in diameter (ring suvel, completely covering the tree trunk). In the Vatican, there is a font much more than a meter in diameter, cut from a single piece of suveli. I myself once sat in an armchair cut out of a suveli. It perfectly holds fine carvings, but it is not recommended to cut the suvel. Better to sand and varnish (soak in oil). The product will only benefit from this.
The most valuable is the root or butt sweep. The presence of dark veins and clearly pronounced twisted annual rings. This is a fairytale. BEAUTIFUL, that says it all. The barrel suvel has a finer texture and a more subtle "frosty" pattern. And lighter wood. In terms of strength, the butt gouge slightly surpasses the barrel gouge due to the peculiarity of the structure of the tree trunk. Suvel is durable, beautiful, easy to polish and grind. Well dried and processed, it begins to "glow" from the inside (with proper impregnation with oils, the tree becomes similar to amber and even a little transparent). Usually pale yellow to pinkish brown to very ocher brown in color. It all depends on the conditions and drying time. The cap has the same colors.
Photos:


As you can see, the cap does not look like a suvel at all.
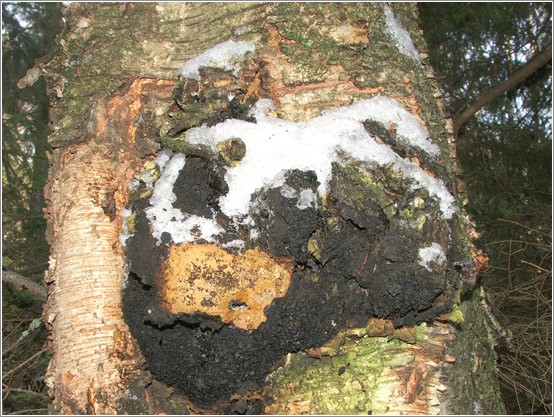
CHAGA is a mushroom (not to be confused with a tinder fungus !!!) and we do not need it for our purposes.
So how to dry. I must say right away that the "steaming" method is suitable for small pieces of wood. About half a soccer ball or a small piece of wood.
1. We cut off the build-up. We do this with a sharp saw. Otherwise, you will be tortured to saw, and the tree will begin to shaggy. We do not peel off the bark. Do not forget to cover the cut on the tree with oil paint or wax, or something similar.
IT IS POSSIBLE TO SEDUCE THE GROWTH IN THE DRY TIME OF THE YEAR, IDEALLY - AT THE END OF AUGUST, IN THE BEGINNING OF SEPTEMBER, BEFORE THE BEGINNING OF THE SOCULATION.
2. Take an unnecessary pot (bucket), and throw a piece of wood there. The pot is unnecessary, since a very tricky broth is formed during the cooking process, which is then very troublesome to wash. It is better to clean the piece of wood from any rags of birch bark and other fragile and dangling particles. will fall off anyway.
I consider birch growth as the most accessible and beautiful, the rest of the growths are cooked using the same technology. The log is properly cleaned of any debris and fragile particles. We pour water. It is convenient to do this with a faceted glass (it contains 250 ml). The water should cover the piece of wood about a centimeter or two. The tree naturally pops up, but we press it to the bottom and we will see everything. It doesn't matter what water you pour, cold or hot, it will boil anyway. You can throw a piece of wood into a saucepan, no matter how much you pity, the volume of an individual piece of wood is important and not the total volume of wood.
3. We take table salt, which is not a pity. We don't cook soup. Pour 2 large tablespoons with a top of salt into a liter of water (who will count the glasses of water ??? Huh?). It is possible and more, no matter how sorry, it's okay, it's impossible to overdo it.
The main thing is that the water is sickly salty. You can use pure sea water (just clean, otherwise it will smell disgusting of mud).
The salt will draw juices out of the tree, but the tree will not saturate.
4. Find sawdust of resinous wood species. Spruce, pine, the easiest to get. We take the saw: and forward. We need two powerful handfuls of sawdust (we rake the sawdust with both hands). It was sawdust, not shavings from a simple hand planer.
The shavings will come from an electric planer (you can get it at the nearest sawmill or cut it yourself). I always use them. They are quite small and usually plentiful and easy to obtain. The more resin in the sawdust, the better. And the finer the sawdust, the better. We fall asleep in a saucepan. A saucepan and a larger one could be taken! The sawdust will give the suveli a pleasant ocher color. From pale pink-yellow to ocher-brown. Resins will also add strength and texture to the wood.
5. When the water boils, reduce the heat and leave it boiling for 6-8 hours, you can do more, as long as you have enough patience.
If the saucepan is large, then you can not diminish the flame, let the water boil and bubble. But you need to look so that the water does not boil away completely. Salt, sawdust, temperature and time will do the trick. We add water as needed. During the cooking process, a red "broth" is formed. And scale. It is better to remove scale immediately. It is very difficult to wash.
6. 6-8 hours have passed (depending on the size of the piece of wood). We take out the piece of wood. We wash under running water from sawdust. We throw out the water from the pan for uselessness, but you can leave it for the next time, if there is somewhere to store it. But pouring out the water is easier. We throw the build-up on the cabinet with nothing to wrap it up. For a day or two, let it cool down.
7 We repeat the cooking and drying process 2-4 times, depending on the volume of the wood.
You can use a pressure cooker to speed up the process. The time is reduced to 4-6 hours.
8. At the last cooking, you need to quickly peel off the bark while the wood is hot. Although she herself should fall off by this time. Carefully!!! Hot!!! use gloves!
9. We put it on the closet for a week or two. The tree is basically dry, but let the remaining moisture go away.
The tree will get used to the atmosphere. After final drying, the wood will look like bone, and it can be cut, sawed, and sanded. There will be no foreign smell. Will only smell like wood.
10. In the process of accelerated drying of wood, it should be remembered that small cracks can form, and therefore allowance should be given for their removal in subsequent processing.
11. Where to look for growths ... Naturally in the forest. BUT! there are no definite places of growth, they grow spontaneously, and the largest and most beautiful growths will be found by the most eyed and persistent. This activity is akin to hunting for mushrooms, who more and further ran around the forest got more and more.
Look like that's it. Let me remind you once again that large pieces cannot be dried like this. Cracked. Necessarily. Checked.
12. After the tree has finally gotten used to the atmosphere, you can start working with the blank. It is desirable to impregnate the suvel and caps with oil, and if you wish, then with wax too. The tree will show the texture, "play" as they say, all the inner beauty will manifest itself.
If you have any questions or any clarifications about the above technology, I will answer as much as possible.
For this I finish, your Serjant.
The cap is also called "witch's broom" - it is a small formation on a tree, of a benign nature. Basically it looks like a drop, from which thin twigs grow, gathering in a bunch. In the cross section, you can see a structure of catchy knots. The mouthguard processing is not easy, although it is still amenable to grinding and polishing. As a result of the work it looks very attractive.
Some areas of the birch burl can give off mother-of-pearl. In industry, it is not of particular value, but it is quite expensive due to its beauty and uniqueness.
Sometimes a burl can be used as a veneer for finishing furniture, but more often it is a burl of exotic trees. But from a birch burl they make beautiful caskets, women's small jewelry or hairpins, cigarette cases.
Birch burl has a high-quality texture, so a knife with a wooden handle is very beautiful and expensive.
Two identical burls cannot be found in nature, even the halves differ from each other. They can be seen on many different trees. In our latitudes, the birch burl is very much appreciated. It grows not large, the maximum diameter is the same as that of a large plate.
Due to the dense texture, it is difficult to make any pattern on the burl, and it makes no sense.

In order for the birch burl to be used for its intended purpose in the future, it is very important to assemble it correctly. To do this, we will familiarize you with detailed instructions:

Correct processing of birch burls
Very often, when sawing a burl, a unique and inimitable pattern is formed, which the master does not want to change. In other cases, the burl after sawing is processed:
- Large mouth guards are almost always sawn, since several items can be made from it at once. The cap is divided into several plates, the thickness of each depends on which item is planned to be made.
- To make an excellent drawing in the future, you should think about the cutting angle in advance. The more sleepers on the cut, the better.
- When the burl is fresh, the pattern appears weak, but cutting is much easier.
- That the drawing has manifested itself in full beauty, before making the object, the cap should be steamed well.
- You can steam the drip at home, fine sawdust is suitable for this. For the procedure, take the container of the required size (it is recommended to use the old pan, since the dyes that will appear cannot be washed off). Sawdust is spread in a generous layer on the bottom, a cap is placed on top. It is impossible to lay tightly, there must be a gap of at least 0.5 centimeters. Sawdust is poured on top in a thin layer.
- The laid out drip is poured into the pan with well salted water (mainly the bottom layer). The water should not completely cover the workpieces, but only touch them slightly. Salt is taken with the calculation of 1 tbsp. l. for 1 liter of water. If there is a little more, it doesn't matter.
- The prepared burl is covered with a lid and put on a small fire. As soon as the mixture boils, it is scolded for about 10 hours, and the mouthpiece is allowed to steam well. To avoid trouble, they look into the container every hour, add water if necessary.
- As time passes, the container is removed from the heat and left to cool.
- After cooling, the workpieces are washed under running water and left to dry. So that they dry out evenly, they should be turned over every few hours. The drying period lasts about 3-4 days.
- When the workpieces are completely dry, they are again steamed according to the above scheme, dried again. The procedure is repeated up to three times.
- If after steaming the bark has not completely fallen off, it is carefully removed by hand.
- The drying procedure is preferable to be carried out outdoors. The first day is turned over quite often, on the third day 1-2 times will be enough.
- It is great if it is possible to carry out the final drying in a special oven several times.
- If the burl is very large (larger than a basketball), this type of treatment will not work. The drying or steaming process can lead to cracks and other damage.
- Digested as basically sliced. Whole birch growths are treated like an ordinary tree - by sanding and varnishing.
- Upon evaporation, the burl plates acquire the shade of the secreted components, it can be very diverse (yellow with a golden tint, brown, etc.).
- After processing, subsequent procedures can be carried out, for example, varnishing or painting.
- Before varnishing, the surface is well sanded with coarse emery, then fine. Wipe off wood dust with a soft cloth.
- The drawing will appear in all its glory if the cap is treated with wax.
In fact, working with a mouth guard is very painstaking, requires attention and a lot of time. But what is obtained as a result of work is certainly pleasing. Birch burl makes excellent souvenirs that have an individual and unique pattern.
"From the presented material you will learn what" KAP "is, where and how it grows, methods of its extraction, processing, drying. And also you will be presented with a variety of products from this material. Cap, striking in its beauty ... Cap is a growth on a tree forming a spherical shape, this deformation of the tree occurs for a number of reasons, one of which: a sharp change in growth, both natural and anthropogenic in nature. The growths are formed both on the tables and branches of trees, and underground on the roots, called "kapo-root" Under the ground, it is naturally not visible, the ability to find this root only in a dried-up tree that is subject to uprooting.
Cap belongs to valuable wood species, thanks to its unique and unrepeatable texture. The burl is used to make jewelry, knife handles, jewelry boxes, and decorative items for the road. This wood is especially appreciated among artists and brothers of cabinetmakers, for its indescribable beauty of the pattern.
And so let's look at how and where you can get a cap? What is needed to get it?
Instruments
- chainsaw
- hacksaw
- axe
- band-saw
Materials for digestion and drying
- large capacity (for the size of the mouthguard)
- salt
- a heating element
Extraction, processing, drying and burl products.
Many of you go to the forest to pick mushrooms and berries, you probably often noticed a variety of pretentious growths on the trees, but you did not give it much importance, but in vain! Because this build-up can be turned into good money by making, for example, blanks for knife handles. One blank = 2000 rubles. Just don't run into the forest now and chop everything down 😉
And so, in order to get a burl, you need to take with you into the forest: a chainsaw, a hacksaw, an ax, a knife. Go as deep as possible into the forest and look for such growths.  These growths can grow on absolutely all trees, not necessarily only on a birch, as shown in the photo. As you can imagine, each tree has a peculiar, unique pattern. The burl can also grow on the branches of a tree, which is often the case.
  Attention! Never climb a tree with a chainsaw !!! Use only a hacksaw to cut the overgrown branch.
As mentioned above, growths can also be on the roots of a tree (burl-root), they sometimes grow gigantic in size and for their extraction requires a heavy  Good business! Is not it? Yes, such caps are mainly used to make expensive furniture, the price is even difficult to imagine ??? How many zeros will be in the price tag for the product?
But our task is to get small samples. And so, for example, you found a growth, made sure that this is exactly what you need, and not just a karyaga. Take the saw and saw off the piece you want. And in no case do not cut down the whole tree !!! For such a case, a considerable fine is imposed!  They cut it down and quickly put it into a backpack or a bag, and the place of the cut should be treated with garden pitch, in extreme cases, with earth or clay, so that the tree does not hurt afterwards.
  Well, let's say you got the cap, now you need to deliver it home. By the way, on the way, you can look after more copies and take notes, so that later you can find your way back.
  Next, it is necessary to remove the bark from the mouthpiece, this can be done using an ordinary knife.
  After the bark has been removed, the cap will need to be boiled in salt water. This is necessary so that all the juice comes out of the wood. After cooking, you will need to dry your prey for several days, and only then you can start sawing into the sizes and workpieces you need.
  Well, then it all depends on your imagination and carpentry skills. Here are some ideas and examples to help you. Happy viewing.
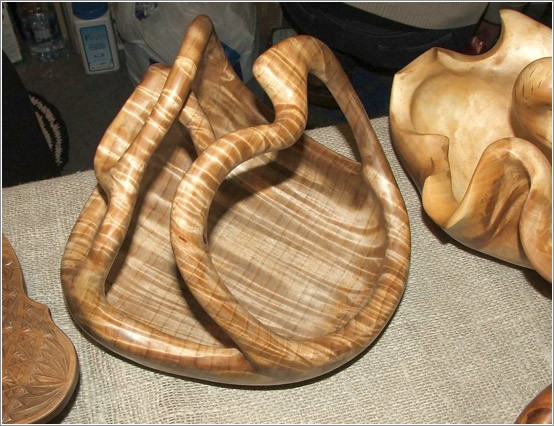
Products from a burl.
Bowl and spoons
 Furniture
 Bowl
Bowl  The violet
  Knife handle

 Mug
Mug 
 Casket