The light bulb is screwed into a special device - a socket designed for a lamp, through which it comes into contact with electric current. An electrical cable from the mains is connected directly to the cartridge. All decorative elements included in the design of the lighting fixture are also fixed to it.
In this article:
General design of sockets for lighting equipment
The product consists of the following parts:
- cylindrical body;
- sleeve;
- ceramic liner;
- bottom of the product;
- brass contacts;
- fasteners.
For your information! The housing is designed not only to secure the sleeve, but also to protect against electric shock. The central contacts are located inside it.
The sleeve has an internal thread, which is called an Edison thread. The light bulb is screwed into the socket thanks to the thread cut into it. Models of sleeves are available with special sockets on springs, into which the lamp is simply inserted and fixed using additionally equipped pins (their number may vary for different models).
After the contacts of the sleeve and the base of the light source come into contact, a short circuit occurs electrical circuit, when mains voltage is applied, the lamp begins to emit a luminous flux. The current from the conductors is supplied through brass contacts

To connect electrical wires, sockets can be equipped with different devices:
- contact connection clamps with screws;
- contact connection terminals for which screws are not provided;
- wire connecting terminals;
- connecting terminals to which wires can be soldered;
- special connecting tips.
Design options for cartridges, their features
Types of products by design:
- screw;
- pin.
Their main difference is in the technology of fixing the light source. Filament lamps are usually equipped with a screw base. Accordingly, they are suitable for lighting equipment with screw sockets.

Expert opinion
Ivan Zaitsev
Ask a question to an expertFor your information! Modern energy-saving light sources (halogen, fluorescent, LED bulbs) are produced with both screw and pin bases.
Product type by material
Most models are made of special heat-resistant plastic. But there are also ceramic versions of products.
Main distinctive characteristics of ceramic products
- On screw-type products with high temperatures the fastening nut gets stuck. Therefore, it must be made of metal.
- During prolonged continuous operation, exposure to high temperatures also causes the sleeve to stick to the base of the product. In such situations, when replacing a light bulb, the sleeve is also unscrewed along with it.
- Advantage - can withstand higher temperatures.
- Disadvantage - they cost much more.

The main distinctive characteristics of products made of heat-resistant plastic
- During the operation of the product white are getting dark.
- Possibility of using incandescent bulbs up to 60 W.
- The advantage is low cost.
- The disadvantage is a fairly short operational period. Products dry out quickly under constant exposure to high temperatures.
Different models of cartridges differ in their dimensions. For ceiling chandeliers, products marked E27, E14 are usually used. It is easiest to select a light bulb for products of this design. That is, you can safely screw into such sockets not only standard incandescent light bulbs, but also energy-saving LED ones.
Products marked E27, E14 have the same design. They differ only in the inner diameter, sometimes equipped with a built-in switch. Also on the market are product options with E40 and E10 bases. The internal diameter of such products is 40 and 10 mm, respectively.
For your information! E14 models are designed for low power. To organize lighting in a room, you need to use several of them at once.
Type G sockets are designed for fluorescent and halogen lamps. The most common on the market are G4, G9, GU10, R7S. Therefore, when purchasing, you should carefully look at the labeling. The number after G indicates the distance between the legs.
Expert opinion
Ivan Zaitsev
Lighting specialist, department consultant building materials large chain of stores
Ask a question to an expertImportant! For lighting equipment that uses low-voltage sockets, for example with a G4 socket, a transformer must be used.

Selecting a cartridge for a ceiling chandelier
The design of the product must correspond exactly to the factory one installed on the lighting fixture. Otherwise, there may be problems with its fixation.
What else you need to pay attention to when purchasing:
- labeling;
- dimensions;
- power;
- voltage.
- It is better to buy products with a ceramic body. They have a much longer service life.
- It is worth choosing products from well-known manufacturers on the market.
For your information! Products E27, E14 are of the same quality.

Marking
Each product must indicate all the main technical and operational parameters:
- manufacturer;
- rated current (A), sometimes power (W);
- type of current (for cartridges equipped with an additional switch);
- rated voltage (V);
- normalized impulse voltage (kV);
- maximum operating temperature;
- IP protection class.
For your information! Products marked E27, E14 can be used for a rated voltage of 250 V. Models E27 - for rated current up to 4 A (880 W), E14 - up to 2 A (440 W).

Replacing the cartridge
When do you need to change the cartridge in a lighting device?
- The product does not operate when the switch is turned on, that is, the light bulb does not light up. main reason- the surface of the central contact of the sleeve is covered with rust. As a rule, cleaning them is ineffective.
- Cracks and other mechanical damage appeared on the surface of the case, which are visible to the naked eye.
- As a result of contact of internal parts, a short circuit occurs.
- The base and sleeve are “soldered” into one.
- The terminals have failed.
For your information! Planned replacement of the device is carried out every 5 years.
To perform this operation, you do not need to have any special knowledge in the field of electricity. After carefully studying the recommendations of specialists, you can make the replacement yourself.
Tools, materials for replacing the device:
- indicator screwdriver;
- assembly knife;
- electrical wire (small pieces may be needed);
- a new socket that matches the lighting fixture;
- terminal blocks;
- insulating tape.
Replacement instructions
- First of all, you need to de-energize the room.
- Next, the fastening elements that hold the chandelier to the ceiling base are detached.
- The bolts holding the terminals are unscrewed. The wiring is removed from their cavity.
- When the lamp is already lying on the desktop, you can unscrew the socket for the ceiling lamp itself, fixed in the housing.
- Now you need to insert the base of the new product and secure it.
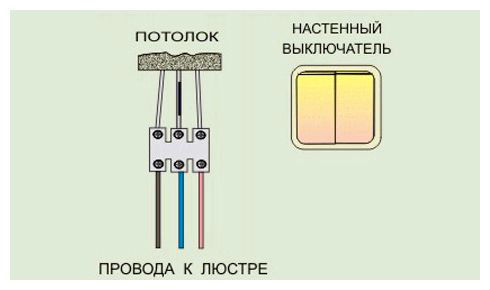
- Next, a conductive ceiling cable is passed through the hole in the housing. Be sure to clean the end of the wire.
- We connect the cores of the electrical cable. To do this, unscrew the bolts on the terminals located on the removable ceramic liner, insert the wires and tighten them.
- We insert the insert with terminals into special grooves and secure the housing.
- We fix the chandelier back to the base of the ceiling.
On this electric installation work completed. All that remains is to screw in the light bulb and check the functionality of the lighting device!
- It is recommended to buy only quality products famous brands to prevent premature failure of the device.
- It is prohibited to replace the cartridge when mains voltage is present. The consequences can be quite serious.
- If a fault is detected in the main electrical wiring, you should definitely replace either the damaged section of the cable or the entire wiring.
- The phase must always be connected to the central contact of the product, but not to the sleeve (when screwing the lamp in, it will produce an electric shock).
- Some cartridge models are equipped with lead wires. In case of connecting wires different types(the main one is aluminum, from the lamp - copper) it is recommended to use special terminal blocks. If there are none, then after twisting the wires need to be well insulated.

Expert opinion
Ivan Zaitsev
Lighting specialist, consultant in the building materials department of a large chain of stores
Ask a question to an expertOne of the main components of a chandelier or lamp is an electric socket, through which not only the light bulb is fixed and current is transmitted to it, but also the lampshade and other elements for controlling the light source are attached.
The design of the product consists of the following elements:
- cylindrical body;
- internal threaded sleeve;
- ceramic insert;
- a pair of brass or copper contacts;
- bottom;
- fasteners.
The design of the product body eliminates the possibility of electric shock when screwing in the light bulb. This is due to the fact that when the central contacts touch, the base is inside the cartridge.
Types of cartridges
Structurally, several types are distinguished according to the method of attaching the light bulbs:
- Screw threaded(the incandescent lamp is screwed inward). Suitable for standard incandescent lamps.
- Pin(fastening is carried out using fastening tabs or pins located on the outer surface of the product). Used for fluorescent, halogen and.
The material used to make the case is:

The principle of operation of all cartridges is identical, the only differences are dimensions and design. All products are designed for operation in a 220V power supply.
The following types are distinguished (the value “E” with a number is used for designation, where the number corresponds to the diameter of the sleeve):
- E5 and E10. They are rarely used due to the consumption of a considerable amount of current with insignificant light output.
- E14. The product is small in size, used with decorative lamps, so-called “minions”, of identical diameter. Their power does not exceed 60 W.
- E27. The most commonly used threaded socket designed for use with conventional, fluorescent, LED and halogen lamps.
- E40. This type is intended for street lighting, where powerful large lamps are used.
Chuck selection
When choosing this product, first of all, you should give preference to a well-known and trusted brand.
To avoid difficulties with fastening, the design of the new socket must correspond to the type of product previously used in the chandelier. It is better to give preference to a ceramic product due to its reliability during operation.
Basic selection requirements:
- the power of the lamp that is planned to be connected;
- diameter corresponding to the type of cartridge;
- marking;
- parameters: dimensions, power;
- the price should not be too low.
The cost depends on many factors, in particular the type of product and its manufacturer. Today the market provides consumers with a wide choice of both Russian and imported brands.
The price range is quite large:
- Type E27:
- domestic production – 25 rubles;
- China – 45 rubles;
- Italy – 130 rubles.
- Type E14:
- domestic production – 20 rubles;
- China – 20 rubles;
- Italy – 90 rubles.
- For halogen lamps:
- domestic production – 15 rubles;
- China – 30 rubles;
- Italy – 150 rubles.

How to change the cartridge in a chandelier
Replacing the product is not particularly difficult and does not require electrical experience, but it does require caution and compliance with all rules and recommendations.
Reasons for replacement
First of all, the need to change the product is indicated by the lamp not glowing when the switch is activated. This is due to rusting of the sleeve or central contact. As a rule, stripping does not have a positive effect.
Replacement is required if:
- The presence of cracks and other defects on the outer part of the body;
- When internal elements come into contact, a short circuit occurs.
- Exit from working state.
- The service life is 5 years.
Required materials and tools
During the work you will need:
- replacement product;
- terminal blocks for connecting electrical wires;
- indicator mini-tester (screwdriver);
- insulating tape;
- construction knife with replaceable blades.

Step-by-step replacement guide
Replacing the socket in a ceiling lamp is carried out in the following sequence:

 Place the chandelier on a table or other convenient surface, disassemble it, removing all the shades and unscrewing the bulbs so as not to break them.
 Checking work
After attaching the chandelier to the ceiling, the lamp is screwed into the socket and fed electricity. If the replacement work is done correctly and all contacts are connected, the lamp will glow.
If, after replacing the product, any problems are detected (flashing of the lamp or its burnout), their causes should be found. Alternatively, it could be an incorrect connection of the current supply wires.
- Carry out the replacement without turning off the power to the room, is strictly prohibited, often leading to tragic consequences.
- If problems are detected in the main it is necessary to completely or partially replace it.
- Sometimes cartridges initially have lead wires, so when connecting various types wires, for example, aluminum acts as the main one, and copper comes from the lighting device; it is advisable to use special terminal blocks for connection. If there are none, the wires should be connected, twisted and covered with insulating tape.
- Before removing the chandelier, you should remember or sketch the connection diagram, which will eliminate the possibility of incorrect connection.
- If the reason for removing the ceiling light is a cartridge that has come out of fret, you can try to repair it. Often, brass plates come off, oxidize, or rust. In this case, they can be cleaned with sandpaper. You should also inspect the contact fasteners located under the ceramic insert. If necessary, they are cleaned and tightened. After a thorough inspection, the socket is assembled and the lamp is screwed into it, the ends of the lamp wires are placed in a carrying case. The result of a properly carried out repair will be the emission of light from the lamp.
- Sometimes it is not possible to remove an incandescent lamp from the socket - the base gets jammed, and when the lamp is unscrewed, only the glass bulb is removed. In order for the cartridge to be used in other chandeliers in the future, it is necessary to unscrew the cylindrical element of the product body, holding it by the lower part. If these manipulations do not give a positive result, you can unscrew the base using pliers, taking its edge and turning it in the socket.
When a light bulb burns out in the house, and replacing it does not bring results, then it is necessary to change the socket in the chandelier. This breakdown is the most common; it can be easily fixed with your own hands without special knowledge and tools.
The main reasons for replacing the cartridge
It is necessary to replace the socket in a chandelier not only due to manufacturing defects, but also due to design features. If the lamp is closed, the temperature inside the bulb increases greatly. Sometimes this leads to melted wiring.
In old sockets, contact with the lamp deteriorates over time. This can cause frequent breakdowns of the latter. After incandescent lamps burn out, sometimes fumes form on the terminals, which leads to poor contact. Simple cleaning rarely brings positive results, so the holders are changed.
Another reason for replacement is the desire of people to switch to energy-efficient LED lamps. Since they are produced with a smaller base, there is a need to change the seat in the lamp. All holders have an identical design. They differ only in the diameter of the thread.
How does a standard cartridge work?
To replace the cartridge in a chandelier, you need to understand its structure and types. For a 220 V network there are 3 types of this product:
Depending on the type used in the lamp, you need to choose one type or another. There are such parts of the cartridge:
- cylindrical body;
- bottom;
- ceramic liner.
The first contains a sleeve with an Edison thread into which the lamp is screwed. The holder body, depending on the model and purpose, can be made of the following materials:
- plastic;
- carbolite;
- ceramics;
- metal;
- silicone
Older models were made of ceramic. But at high temperatures they crumbled and deteriorated. Nowadays the most common material is plastic. Products should be used according to the labeling, since exceeding the power of electric lamps during prolonged use will lead to a change in the properties of the plastic, and consequently, to its destruction. Even in modern ceramic cartridges, contacts burn out at high temperatures.

The most common types of holders used in everyday life are E14 and E27. Their differences lie in the method of fastening, which can be:
- suspended from the ceiling with threaded washers;
- with a straight flange, which allows you to fix the product on the surface;
- with an inclined flange for surface mounting.
When the lampshade is attached to the support, washers are used to mount and secure the holder. The holders for attaching to the nipple have clamps instead of screws. This allows you to connect conductors without violating their insulation. Although threaded holders are easier to use, they are less durable. This is especially true for cartridges used for a long time.
The process of replacing a cartridge in a chandelier
To replace the socket in a chandelier, you must perform the following steps:
- turn off the electricity supply at the panel;
- disconnect the electrical wiring;
- remove the chandelier from the ceiling;
- disassemble the lamp;
- remove the faulty cartridge;
- set whole;
- After replacement, install the chandelier.
Turning off the light on the dashboard
Before replacing the cartridge, you need to turn off the power supply to the room. To do this, the circuit breakers on the panel that provide power to the ceiling chandelier should be switched to an inactive state.

Disconnecting wires
All wires that supply power to the lamp are insulated and routed to each side to prevent a short circuit.
Removing a chandelier from the ceiling
To remove the chandelier, you need to take an indicator screwdriver and a stepladder. First you need to check the switch to make sure there is no electricity. Then do the following:
- remove such fragile parts from the chandelier as the lampshade, decorating elements, lamps;
- unscrew the fixing screw and the cap that covers the wire connection under the ceiling;
- if there is a hook under the hood, the wires are disconnected and separated to prevent a short circuit;
- if there is a strip, loosen the clamping bolt or, if necessary, remove it.

Fixing the chandelier on suspended ceilings carried out using disposable butterfly fasteners. Therefore, it is advisable not to remove them. Otherwise, you should purchase a new mount in advance.
Disassembling the lamp
Most chandeliers have 3 or 5 seats for lamps directed in different directions. If the chandelier was working before dismantling, you need to wait until the temperature inside the lamp drops. First, the lampshades are removed. In old-style chandeliers they are fixed by means of threads. Others are held on with special latches or small bolts.
A plastic threaded ring is most often used to secure this element. It is screwed onto the external thread of the holder, so you need to be careful not to break the insulating part of the element.
The method of dismantling depends on the type of structure and method of fastening in the housing of the lighting device. Most often, fixation occurs with several bolts. The part is removed immediately or it is disassembled, removing the core. In this case, remove the cartridge latch, take out the middle part and disconnect the wires. The last thing to unscrew is the nut securing the housing.
When the screw terminal socket needs to be replaced, the screws should be loosened and the wires pulled out. Some E14 type holders have terminal blocks. In most cases, they are disposable, so they need to be replaced.

The ceramic cartridge is dismantled as follows:
- the plates are pressed out from the central contact;
- unscrew the bolts from the plate, which is located opposite the ceramic base;
- The central terminals are bent to the level of the side contacts.
Sometimes it is enough to clean ceramic products and tighten the terminals to ensure high-quality operation of the cartridge.
Installing a new cartridge
To replace the socket in the lamp, you need to connect all the wires. They are wound through the bottom of the product, and rings are formed from the stripped ends. They are installed on screws, fixed with plates and clamped. If fastening is carried out using terminals, the bare ends of the wires are twisted so that the hairs do not bristle. Then they are inserted into the clamps and clamped with pliers.
The phase is supplied to the central contact.
It is important to ensure that the fasteners are secure to prevent short circuits or poor contact. Otherwise, the wires will begin to spark, which will lead to damage to the cartridge.
Additionally, check whether the cross-section of the wires matches the power consumption of the chandelier. Upon completion of the replacement, the lamp is assembled and installed in the reverse order.
How to properly disassemble the cartridge?
To properly disassemble the holder, it is necessary to determine how the cylinder is fixed. If these are latches, they must be carefully bent so as not to break.
How to properly remove the base from the socket?
Sometimes it is difficult to pull the holder out of the chandelier because it is firmly fixed inside. When unscrewing, only the flask can be removed. To solve this problem, you need to unscrew the housing cylinder, holding it by the bottom. After this it will be much easier to remove the base. If top part the product cannot be unscrewed, you need to remove it with pliers.
Start by looking at yourself simple option– installing a new one of the same type instead of a faulty one is hardly worth it. Even a schoolchild can cope with this, knowing that first you need to turn off the voltage, and then unscrew the cartridge itself, loosen the clamping screws of the terminal block, and so on. This question is mainly of interest to those who want to “modernize” a chandelier in order to use it instead of the traditional “Ilyich bulb” energy saving lamp— to do this, you often have to replace the chandelier socket. Let's look at this in more detail.
It is pointless to recall the advantages of various halogen and others. Once they have been chosen, then all their advantages are already known and appreciated. But why change the cartridge in a chandelier? The whole point is a mismatch in the parameters of the socles (diameter and thread). Without delving into the classification of cartridges and the differences between their types (, E40), it is enough to indicate that it is necessary to install one of two - “14” or “27”. E40 sockets are intended for street lamps.
1. Turn off the machine in the apartment (entrance) panel. Hence the conclusion - it is advisable to replace the cartridge during daylight hours. What if this condition cannot be met for some reason? Install a table lamp near the location of the chandelier so as not to work in complete darkness.
If the wiring in the apartment is done “wisely”, then the sockets and ceiling lamps are routed along different lines (although the author has also encountered “pleasant exceptions”). But we turn off the input machine for safety. This means that the sockets will also be de-energized.
In an apartment, if an internal shield is installed, it’s even easier. It is enough to turn off the corresponding machine.
2. Turn the wall (or other) chandelier switch to the “off” position. If for some reason it is undesirable to turn off the input machine.
3. Using an indicator probe, check that there is no voltage on the terminal block of the chandelier, through which its wires are connected to the intra-apartment line.

Why is this necessary if everything is already de-energized? According to the rules of electrical installation, a switch (circuit breaker) is installed on the phase line, before the lighting fixture. Now the question is - does everyone know this? And of those who are “in the know,” how many comply with this provision? It’s better not to take risks and check the presence/absence of potential at all terminals of the block.
4. Disconnect the chandelier wires. Here you need to figure out what is more convenient to do - leave it hanging or first remove it from the hook (“butterfly”).
5. Lower the chandelier down. Replacing sockets at a height, especially if the lamp is quite large, with several bulbs, is not the best solution.
6. Remove the cartridge. First, it unwinds, after which the wires are disconnected from its ceramic block. Next, remove the lower part of the body. Its fastening is carried out differently, depending on design features chandeliers. The procedure is easy to determine by visual inspection.

If the chandelier has been in use for a long time, then you need to pay attention to the condition of the wires inside it (from the socket to the block). At this stage it is easy to replace them with new ones.
Next is reassembly and connection. And here is one more piece of advice - this must be done immediately. If you leave the installation of a new cartridge “for later,” then it is not a fact that such work will go quickly. Those who do this for the first time have difficulties, since much is forgotten already on the second day. Proven by practice.

If the connection of the chandelier was previously made by twisting, then it is advisable to organize a new connection using terminal blocks.
For household use It is better to purchase products from WAGO. It is much more convenient to work with spring-loaded contacts. Learn about the range and specific application of these products.
To restore the chandelier to full functionality, it is not necessary to replace the lamp socket, which does not light, even if the filament is not broken. Depressurization of the flask (another probable malfunction) is a rare occurrence.
Typical faults
- “Retraction” of the tongue. This often happens if, when replacing light bulbs, they are screwed in too hard. Therefore, the central contact of the base does not reach it. It is not difficult to lift it a little, for example, with a thin screwdriver.
- Carbon deposits on the cartridge tongue. As a result, contact is broken. You can clean it with fine sandpaper. If it is not at hand, the plaque can be easily removed with the tip of a knife.
- Poor contact where the wires are attached. Pulling the screws is a matter of seconds.
Practical tips:
- Before you start work, you need to take care of your own safety. What and where to turn off, how to check that there is no voltage on the wires is indicated above.
- In any case, if you have to work on a chandelier, you need someone to stand nearby and help, and at the same time, insure.
The device by which a light bulb is attached to a lighting fixture and in contact with electricity is called a socket. It also facilitates quick replacement of a burnt-out element.
Its components are:
- Frame.
- Internal sleeve with thread.
- Ceramic liner.
- Two brass contacts.
The light bulb lights up when the cartridge case is in contact with the base and their central contacts, which allows the electrical circuit to close. The design of the case practically eliminates the possibility of electric shock when screwing in the light bulb, because when the central contacts come into contact together, the base is hidden inside the device.
Kinds
Despite the identical operating principle of all sockets, they are produced in two types, which allows you to mount light bulbs different ways. Most often, in everyday life, devices with internal threads are used for standard incandescent lamps, but sockets with sleeves for the pin base of fluorescent or halogen lamps are often found.
The case material can be either heat-resistant plastic or ceramic.
Home technical feature products with a sleeve is its diameter. It is different for each species and is measured in millimeters. To designate the type, a value in the form Exx is used, where xx is the diameter (for example, E14, E40).
The following types exist: E5, E10, E14, E26, E27, E40. E14 and E27 are the most popular among consumers.
Each of them has its own characteristics, namely:
E5 and E10
Not widely used due to consumption of suitable light bulbs significant amount current, but low output of light energy.
E14

A small socket, most often intended for decorative light bulbs of the appropriate diameter. Since their power does not exceed 60W, the chandelier is often equipped with additional devices to ensure full illumination of the entire room.
E27

Universal screw chuck, can be used for screwing in conventional, energy-saving fluorescent and halogen lamps. In this case, there is no need to accurately take into account all the nuances.
E40

This type is used for large high-power lamps, which can illuminate enough large area premises.
A chandelier operating on halogen or must be equipped with special pin sockets. There are a great variety of them and choosing the right light bulb is very difficult.
It is recommended to buy a new one (to replace the burned out one), only using the old one as an example. One nuance of a low-voltage chandelier is the presence of a built-in transformer that supplies (converts 220V to 12V) current to the socket with the light bulb(s). This fact imparts additional weight to the lighting fixture.
Labeling and price
 Each device is marked on the case, from the designations of which you can select the appropriate option, taking into account the technical and operational characteristics. Less often, all data is indicated in the attached technical passport to the product.
The main display data are:
- Brand or manufacturer's trademark.
- Type designation.
- Standard operating temperature.
- Digital values current and voltage.
- Degree of protection from moisture.
- Availability of a grounding terminal.
Example:
- Manufacturer: ERGO.
- Type – ceramics. E27.
- Lamp power – up to 100W.
- Voltage – 220V.
- Current – 6A.
- Operating temperature – +200°С.
- Protection from moisture - no.
- The presence of a clamp - no.
Note: the last two points may not be displayed, but must be noted in the technical data sheet.
Criterias of choice:
- It is advisable to buy the device from a well-known and trusted manufacturer.
- It is recommended to purchase a ceramic cartridge, because it is more reliable in the operational field.
- Power needs to be taken into account future connected lamp.
- Select the desired type according to the diameter.
- Price category should not be low.
Price:
- Heat-resistant plastic product– 60-100 rubles.
- Ceramic product– 90-130 rubles.
- Halogen lamp socket– from 150 rubles.
- Product type E40– from 250 rubles.
Depending on the brand, the price can increase significantly, but this nuance is compensated by additional functional elements, and most importantly, by the quality of the product.
When is it necessary to change the cartridge and how to change it yourself?

The replacement process is not complicated and can be done by the owner of the house without special knowledge in the field of electrical engineering, but it still requires care and compliance with all conditions and recommendations.
Required materials and tools:
- new cartridge;
- terminal blocks;
- screwdriver - indicator;
- perhaps insulation and a piece of wire;
- construction knife;
Step by step guide:
- Initially, the room is de-energized, in which the entire apartment will be reinstalled.
- Fastening elements are unscrewed holding a chandelier. These could be hidden bolts on the body. If it is held on a hanging hook, simply remove it from it.
- Use a screwdriver to unscrew the clamping bolts of the terminals and the underwater current wires are pulled out of their cavity.
- When lighting fixture removed, and it is convenient to work with it on the table, you should unscrew the socket from the chandelier body. It is recommended to take into account that there are many ways to fasten them together and each of them is individual.
- Into the hole from the previous cartridge The base of the new one is placed and clamped.
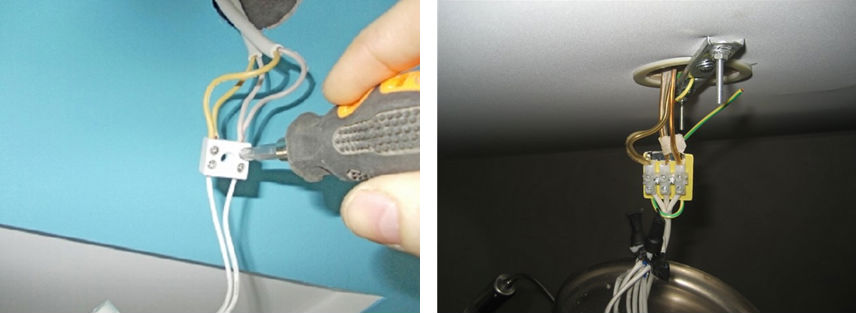
- Next, the chandelier must be leaned against initial position and a current-carrying wire is launched from the ceiling through the through hole of the housing. Before connecting the wire, you need to re-strip it (remove the insulating layer, a length of 0.5-0.7 mm is enough) with a knife.
- For connecting electrical conductors, first you need to unscrew the clamping bolts of the terminals on the ceramic removable insert, and then place them in the cavity and carefully tighten them with a screwdriver.
- The liner is installed in the internal grooves and is secured by a cylindrical body.
- After this, the chandelier is re-attached to the ceiling to the same place.
- A light bulb is screwed into the product and the current supply is turned on. If the entire procedure occurred correctly and all contacts are paired, the light bulb will work.

- Cannot be replaced under voltage– this can lead to serious consequences, including death.
- It is necessary to purchase only quality products to avoid premature cartridge failure.
- Should be taken into account b that the phase should always be connected to the central contact of the device, and not to the sleeve - this nuance will help to avoid electric shock by screwing the light bulbs into the socket under voltage in time.
- If problems are found with the main wiring– it needs to be either completely replaced or some areas replaced.
- In some cases x, the devices are initially equipped with breakout wires. If different types of wires will be connected (the main one is aluminum, and the one from the chandelier is copper), it is better to use special terminal blocks for matching. When you don’t have them at hand, the wires can be twisted and carefully insulated.
- Don't start work, if you are not confident in completely bringing the process to its logical conclusion, it is better to trust a qualified professional.


