The task is issued by Haylin, who is located at the Cambridge police station:
To take this quest you must have started the Semper Invicta quest.
We talk with Heylin, she will tell you that one of the most important tasks of the Brotherhood is the search and preservation of technologies that were lost after the war.

And he will give you a task to search for a specific item.
Note No. 1: the goal of the task is chosen randomly, but its essence is always the same - to come to the specified place and find a certain object. It will be highlighted with a marker, but to get to it you will need to hack a lock or terminal.
Note #2: The task can be repeated as many times as you like. At least I repeated the task 5-7 times, and it wasn’t noticeable that the goals ran out, or that anything changed in Heylin’s answers.
Below, as an example, is a description of how to complete this task. We remind you that your goal may differ from what is described here.
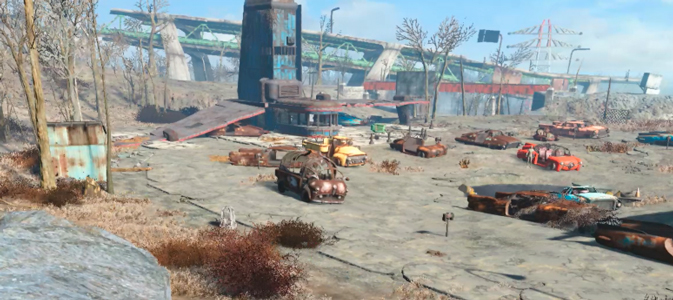
Haylin sent me to Weekend Shopping and asked me to find a reflex capacitor there.
A truck stood in the indicated location, and a marker indicated the contents of its container. To enter there, you had to break into a “Very Hard” level lock. Here you should know that if, on a mission, you encounter a lock of the “Medium” or higher level, it means that somewhere nearby there must either be a key, or there must be a terminal that opens the lock.
So it was in this task in the booth next to the truck, on the table, there were keys:

He took them, after which he calmly opened the chest and took the desired item:

- "Prydwen"
Knight Reese gave you a task - to clear the location he indicated from various kinds of degenerates. You need to find this place and eliminate all enemies, be they synths, ghouls, super mutants, or even cultists who worship the Atom. The location that needs to be cleared is random. Only hostile individuals should be killed; the rest do not need to be killed. After clearing the location, return to Knight Reese and receive your well-deserved reward.
Reward: Lids (about 100)
College Square
College Square is literally one block from the Cambridge Police Station. Before you have time to approach him, you will already encounter a group of wild ghouls. And the station itself is teeming with them.
When you enter College Square Station and see the corpses of ghouls and raiders, who, by the way, have something to profit from, don’t think that you have nothing to do here. In almost every room you will encounter these wild radiation creatures. Be careful, as ghouls crawl out of the most unexpected places and can even fall from the ceiling, so when you first examine the room, do not immediately think that it is empty. Who knows, maybe one of the ghouls has already noticed you and is going to attack you.
When you go down the stairs into the hall where there once were shops and the station ticket office, go to the opposite end of the hall where the ticket offices are located. Hack the door (lock level is difficult) to get inside. There, hack the terminal (level - easy), with its help you can activate 2 protectrons, having previously set their character matrix to law enforcement. They will help you in the fight against ghouls.
If you were unable to break into the door to the cashiers' nook, then go down the left stairs to the platform and go into the room behind the stairs (see screenshot below). There is also a terminal there, by hacking which you can activate protectrons (level - easy).

The right staircase from the hall with the cash registers to the platform will lengthen your path, but will allow you to fully explore the location and collect everything it offers. However, for those who are not interested, follow the left stairs. This is a shorter path to completing the task.
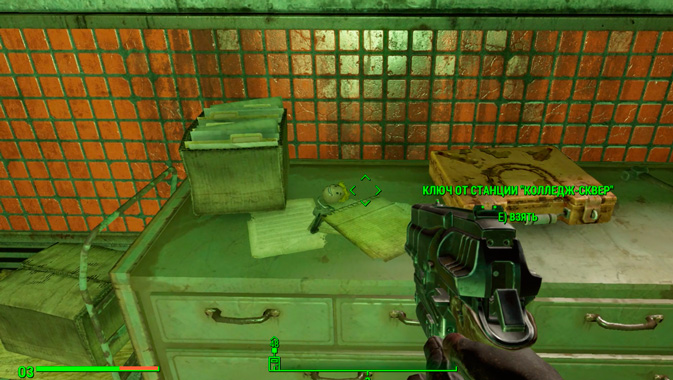
When the clearing task is completed, in the same room on the chest of drawers, find the key to the College Square station. With this key you can open the door to the cashiers' room (there is a magazine there), if you have not hacked it before.
Supermarket

Upon entering the supermarket, you will immediately see a Protectron, who can be activated by setting the character matrix to law enforcement. He will help you in the fight against enemies. The terminal (level - easy) to activate it is located in the supermarket hall on the right. There, also on the right side, you will see a window with a cash register, go inside - there is a terminal in front of you. In addition to activating the protectron, you can also use it to deactivate the safe's lock. Well, or break it manually (the lock level is medium).

Now let’s go buy groceries - we’re at the supermarket after all. Here you can stock up on food and drinks, all types of Nuka Cola. So don’t be lazy to walk between the shelves, but don’t forget that you didn’t come here to shop, but to clear things out - expect that wild ghouls will attack you from time to time.
Clue
At the end of the sales area, near the pharmacy (the sign says "Drugs") you will see a rack for magazines. Take it from there "Tales from a Junktown Merchant" magazine issue 3. It will open you up to a new magazine perk, with which merchants will offer you goods at a lower price. You can check out the full list of magazine perks.

By breaking the door to the pharmacy (the lock level is easy), you can stock up on medicine, and by searching the dead Minutemen, who apparently could not withstand the onslaught of ghouls, you can stock up on ammunition and weapons.
Walk through the service rooms and in one of them, where the office is, crack the safe in the wall, in case there is something interesting there, in the other - take another nuclear unit for your power armor.
We go out through the back door onto the ramp and use the terminal to open the doors. The task of clearing the supermarket has been completed, return to Knight Reese and report it. Get your well-deserved reward.
Wicked Shipping Boat Storage
After completing the quest "Cleansing the Commonwealth" or "Quartermaster", the quest "The Lost Patrol" will become available to you.
Who issues: scriptor Heylin
Tasks:
- Obtain an artifact in the specified location
- Report to scriptor Heylin
Locations to explore:
- Cambridge Police Station
- "Prydwen"
Scriptor Heylin has given you the task of obtaining for her a technological artifact of interest to the Brotherhood of Steel in a certain location. You need to get there, find the artifact, which is usually hidden somewhere, and bring it back to Heylin. It is usually necessary to thoroughly research the location. Killing enemies is not mandatory, but is often necessary. Upon your return, of course, you will receive a reward from scriptor Heylin.
Reward: Lids (about 100)
Monsignor Plaza: get the Flow Sensor
Monsignor Plaza is not that easy to approach; enemies are waiting for you on all sides. However, this building has at least three entrances. Unfortunately, only one will be marked with markers - a green door on the side of the coast of some body of water.
- Approaching Monsignor Plaza from the other side (about 50 steps short of the indicated mark on the map), you will come under fire from raiders and turrets. Deal with them and make your way to their hideout (in the screenshot below).

- Use the terminal to disable the turrets; you don’t even have to hack them. And go inside. You went straight to the second floor. Go forward along the railing of the trading floor, killing raiders along the way and looking into the shops. Who knows - maybe you decide to change your image by choosing a new suit. When the railing ends, we go up the stairs to the third floor (a white arrow is drawn on the wall), and then we follow to the end of the corridor, again we kill the raiders and take away what we came for.

- Entering through the green door marked with a mark, the first thing you do is activate the protectron using the terminal (level - easy), having previously set the character matrix to law enforcement. And forward - into battle with the raiders. The shortest way to the goal: go forward, climb the makeshift wooden stairs from which the raiders were shooting and, turning left, climb the stairs to the third floor (with a white arrow on the wall) and repeat the previous scenario.
- But the shortest and least bloody path to the flow sensor is as follows. We pass by the green door indicated by the task marker, turn the corner and enter the blue door. We climb the stairs to the very top, disarming all the traps along the way, and we immediately find ourselves in the room on the third floor, in which the artifact is hidden in the red chest. Of course, you will still have to kill a couple of raiders, but this way you can avoid a fierce battle with the whole gang. This option is suitable for those who are interested in completing the task as quickly as possible, and not exploring the location.
We choose a convenient method, get what we came for and return to the scriptor Heylin. Don't forget about the reward.
Bedford Station: Get the Reflex Capacitor
The article will be supplemented with the passage of new locations.
After completing the quest "Quartermaster" or "Cleansing the Commonwealth", the quest "The Lost Patrol" will become available to you.
Who issues: Preston Garvey
Tasks:
- Talk to the villagers
- Kill the raiders in the specified location
- Notify residents of success
- Talk to Preston Garvey
Get to the settlement where Preston Garvey sends you as a representative of the Minutemen, and talk to one of the local residents. From the conversation you learn that they are having problems with raiders who are forcing them to pay and taking their food and supplies. Agree to help them.
Clear the specified location from raiders and (optionally) from other enemies. And then return to the settlement and tell them the good news. As a reward you will receive caps, and the inhabitants of the settlement are now ready to join the Minutemen. After everything, report this to Preston Garvey.
Reward: about 100 caps
List of locations to which you can be sent to clear raiders (the list will be updated with new locations):
Corvega car assembly workshop

The Corvega car assembly shop is located in Lexington, which you most likely should have already visited. As always, when approaching the place, enemies and a turret will already be waiting for you near the main entrance. You can deal with them right away or leave them for later and run inside the building.
Going inside, we find ourselves in the workshop reception area. Go forward through the blue door, and take the only possible path through the first floor to the stairs. Go down it. You won't find anything interesting on the ground floor.
Going down the stairs, you will find yourself in a kind of corridor, from which three stairs lead, both down and up. If you want to quickly complete the quest, then take the elevator or the stairs nearby to the top, and if not, then use the other stairs first. You can either go down or go up the second staircase, there is absolutely no difference, since one staircase at the entrance will lead to another staircase at the exit. Let's go down.
Going downstairs, you will find yourself in one of the technical rooms of the workshop. Beware of the turret and raiders, of course. Go through the passage on the left. The first corridor of this wing leads you to a corridor with three staircases, and the second corridor will lead you to the secret exit-entrance of the Corvega car assembly shop. Watch out for the ghouls and turret there. We are not going to leave yet, so we go along the first corridor. After going through it you will find mainly medicines located in drawers and coolers, some of them will have to be broken into (the lock level is easy). Go deeper through the rooms until you reach the stairs leading upstairs. Climb it and go all the way to the stairs leading down. Now you find yourself again in a corridor with a fork. But before you go out, look into the corner room, from where a turret is firing at you. There you will find a warehouse with ammunition and weapons (the castle level is very difficult). If your character has a low hacking level, you can skip this room. Now let's go to complete the task.

Take the stairs located near the elevator or take the elevator to the top level of the building. You will find yourself in one of the workshops where they used to assemble cars or make parts for them. Opposite the entrance, on a pillar, you will find a terminal (level - easy), with which you can activate the Protectron to help you. And beware of the turret mounted on the ceiling of the workshop.

If your goal is simply to complete the task, then you just need to kill the leader of a gang of raiders named Jared, who is located in a small room in the far left corner of the workshop. After killing him, the clearing mission will be considered completed, even if not all the raiders are killed. However, if your goal is not only the task, but also exploration of the location, then the task will be a little more difficult, but the trophies will not disappoint you.
So, go to this observation room, which probably used to be the shop manager's office. Go up the stairs. When you find yourself in front of the gap in the bridge, click on the button on the right to extend it.
Take a good look around these offices. Here you will find a first aid kit with medicine, a chest with ammunition, weapons and armor, and after searching Jared, you will find the key to the Corvega safe, which is located down under the stairs, behind the “Keep out” sign. The safe can be easily broken into (the lock level is medium).

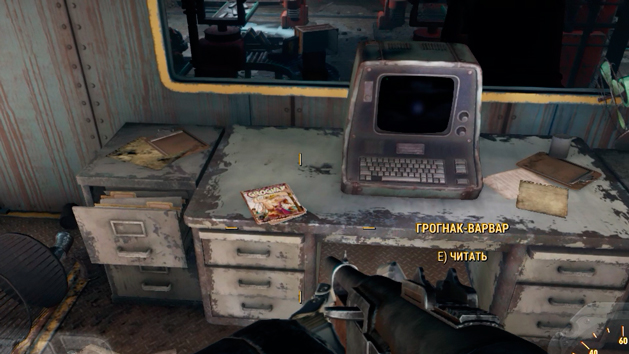
Clue
On one of the desks, next to the working terminal, interesting reading awaits you - magazine "Grognak the Barbarian" issue 3, which will activate a magazine perk or enhance an existing one. With it, critical hits with unarmed or melee weapons deal 5% more damage. A full list of magazines and magazine perks can be viewed.
Using Jared's terminal, near which there is a magazine, you can turn off the spotlights and deactivate the turret.
From here you can finish your inspection of the building and exit through the door marked "EXIT". But don’t think that it’s over, another battle with the raiders awaits you outside. And I strongly recommend that you take a walk along the stairs and staircases built on the external facade of the building, you will not regret it.
After going around them and looking around carefully, you will find several more rooms where there is something to profit from.
Clue
The most important trophy awaits you at the top - bobblehead "Repair", with which nuclear blocks for power armor will work 10% longer. To find it, you need to go up to the ball with the huge inscription “CORVEGA” - the central structure of the Corvega workshop building. At the end of the bridge that goes around this ball you will find a baby doll.

Regional office BKOANTOLO
Who issues: Preston Garvey
Tasks:
- Clean up
- Build and activate a radio beacon
- Talk to Preston Garvey
Minutemen scouts have found a suitable place to build a settlement, but only there is a lair of some bloodthirsty creatures. Your task is to clear this place and place a radio beacon to notify the settlers. Before you know it, a new farm will appear in the middle of the deserted desert. This is how, step by step, you will return the Commonwealth to the minimen.
Having cleared the location from enemies (see the list of locations below), you have the opportunity to use the workshop in this settlement.
You need to build a radio beacon and activate it. To do this, you need to use the workshop and go to the menu in the “Nutrition” → “Miscellaneous” group, and then select the Recruitment Beacon.
Reference
To build a recruiting beacon you will need:
- Wiring: 2
- Crystal: 2
- Copper: 6
- Steel: 10
- Ceramics: 3
- Rubber: 1
- Energy: 1
When turned on, the recruiting beacon attracts new residents to your settlement, so connect a generator to it to provide the site with electricity. It will be enough to assemble a small generator, but you can assemble any of those available to you. Select the “Power” → “Generators” group in the workshop menu.
Reference
For a small generator you will need:
- Gears: 2
- Steel: 4
- Rubber: 2
- Copper: 2
- Ceramics: 1
It will produce: 3 energy
After building the generator, connect it with wires to the radio beacon. That's it - the recruiting beacon is activated. It should look something like the screenshot below.

Return to Preston Garvey and report on the completed task. He will reward you for your work with lids.
Reward: Lids (about 100)
List of possible locations requiring clearing of enemy presence:
Restaurant "Starlight"
In this location, mole rats await you - not the most terrible enemy. They will be easy to deal with. But be careful when approaching the restaurant, as there are traps waiting for you next to it. Under the counter you will find Cherry Nuka Cola. Climb to the second level and go out onto the roof, there are lids scattered there.
The workshop is located in a small booth in the parking lot of the Starlight restaurant. The booth is locked, so you'll have to break into it (the lock level is easy).

The article is under development and will be updated with information and new locations.
Show interest in additional work from Proctor Teagan. He asks you to visit the Commonwealth farm and convince the locals to support the Brotherhood of Steel. You must do this by any means, including capturing the settlement.
Pick up food supplies
Get to the settlement and talk to the local resident.

You can:
- Buy food supplies, for which you have 1000 caps allocated.
Charisma
Try to bargain with the settler, you may be able to reduce the price by half (persuasion level - medium).
Ask a settler to donate part of the harvest to the Brotherhood of Steel and they won't forget (medium persuasion level).
Threaten a settler, and he himself will agree to give up the harvest (persuasive level is medium).
- Kill all the inhabitants, capture the settlement and rule it. And the entire growing harvest is now yours.
Since the settlements are very small: one house and a garden, there is nothing to take there. You can harvest the crops from the beds, and only steal the rest (unless, of course, you killed everyone).
Learn about the features of one of the side quests in Fallout 4. Learn how to get new Quartermaster tasks and earn the required number of caps.
Quartermasters in Fallout 4
To survive in the world of Fallout 4, the main character must constantly improve. Clothing, weapons, armor and skills require not only skillful combat and influence on other characters, but also monetary costs. You can earn money by completing various tasks. The Fallout 4 quartermaster quest allows you to get caps without requiring much effort from the player during the passage.
The main advantage of this mission is that it can be completed multiple times. The number of Quartermaster missions in Fallout 4 the player wants to complete is the number of them he goes through. It all depends on his desire and perseverance.
Passing the quest
A prerequisite for receiving the task is cooperation with the Brotherhood of Steel. Without this, there simply will not be the storyline on which the passage of the Quartermaster of Fallout 4 is based. Elder Maxson directs the main character to search for the Institute and destroy it, having previously provided signal bombs for the rotorcraft. At the same time, you can view tasks on the Pip-Boy, and the Quartermaster will appear there.
We go to the Trinity Church in order to get a Tactile Generator. This is the first Fallout 4 Quartermaster quest, after obtaining the item you need to get to the Cambridge police station and meet with the scriptor Heylin. After talking with her, handing over the item and receiving the reward, the mission becomes complete.
Receiving additional tasks
During the conversation, Heylin offers to contact her in the future if you need work. How many Quartermaster quests in Fallout 4 can be completed now depends on the player's desire. You just need to return to Heilini to receive a new quest from her. All tasks are of the same type - to obtain some high-tech item, for example, a Reflex Capacitor. The search location will appear on the map; while completing quests, the main character will have to fight in some places with various opposing forces, mainly mutants.
It’s a good idea to level up your Treasure Hunter skill, as well as your Burglar and Hacker skills, since some of the items you’re looking for will be hidden under various locks and blocked with electronic keys. In Fallout 4, the Quartermaster quest is a side quest, and in your desire to receive a reward from Heylin, you should not forget about the main storyline and not get too carried away with earning caps.
16597
December 3, 2015 15:52
Who issues: scriptor Heylin
Tasks:
- Obtain an artifact in the specified location
- Report to scriptor Heylin
Locations to explore:
- Cambridge Police Station
- "Prydwen"
Scriptor Heylin has given you the task of obtaining for her a technological artifact of interest to the Brotherhood of Steel in a certain location. You need to get there, find the artifact, which is usually hidden somewhere, and bring it back to Heylin. It is usually necessary to thoroughly research the location. Killing enemies is not mandatory, but is often necessary. Upon your return, of course, you will receive a reward from scriptor Heylin.
Reward: Lids (about 100)
Monsignor Plaza: get the Flow Sensor
Monsignor Plaza is not that easy to approach; enemies are waiting for you on all sides. However, this building has at least three entrances. Unfortunately, only one will be marked with markers - a green door on the side of the coast of some body of water.
- Approaching Monsignor Plaza from the other side (about 50 steps short of the indicated mark on the map), you will come under fire from raiders and turrets. Deal with them and make your way to their hideout (in the screenshot below).
- Use the terminal to disable the turrets; you don’t even have to hack them. And go inside. You went straight to the second floor. Go forward along the railing of the trading floor, killing raiders along the way and looking into the shops. Who knows - maybe you decide to change your image by choosing a new suit. When the railing ends, we go up the stairs to the third floor (a white arrow is drawn on the wall), and then we follow to the end of the corridor, again we kill the raiders and take away what we came for.
- Entering through the green door marked with a mark, the first thing you do is activate the protectron using the terminal (level - easy), having previously set the character matrix to law enforcement. And forward - into battle with the raiders. The shortest way to the goal: go forward, climb the makeshift wooden stairs from which the raiders were shooting and, turning left, climb the stairs to the third floor (with a white arrow on the wall) and repeat the previous scenario.
- But the shortest and least bloody path to the flow sensor is as follows. We pass by the green door indicated by the task marker, turn the corner and enter the blue door. We climb the stairs to the very top, disarming all the traps along the way, and we immediately find ourselves in the room on the third floor, in which the artifact is hidden in the red chest. Of course, you will still have to kill a couple of raiders, but this way you can avoid a fierce battle with the whole gang. This option is suitable for those who are interested in completing the task as quickly as possible, and not exploring the location.
We choose a convenient method, get what we came for and return to the scriptor Heylin. Don't forget about the reward.
Bedford Station: Get the Reflex Capacitor
The article will be supplemented with the passage of new locations.
After completing the quest "Quartermaster" or "Cleansing the Commonwealth", the quest "The Lost Patrol" will become available to you.
-1) (_uWnd.alert("You have already rated this material!","Error",(w:270,h:60,t:8000));$("#rating_os").css("cursor", "help").attr("title","You have already rated this material");$("#rating_os").attr("id","rating_dis");) else (_uWnd.alert("Thank you for your rating !","You've done your job",(w:270,h:60,t:8000));var rating = parseInt($("#rating_p").html());rating = rating + 1;$ ("#rating_p").html(rating);$("#rating_os").css("cursor","help").attr("title","You have already rated this material");$("# rating_os").attr("id","rating_dis");)));"> I like 13Learn about the features of one of the side quests in Fallout 4. Learn how to get new Quartermaster tasks and earn the required number of caps.
Quartermasters in Fallout 4
To survive in the world of Fallout 4, the main character must constantly improve. Clothing, weapons, armor and skills require not only skillful combat and influence on other characters, but also monetary costs. You can earn money by completing various tasks. The Fallout 4 quartermaster quest allows you to get caps without requiring much effort from the player during the passage.
The main advantage of this mission is that it can be completed multiple times. The number of Quartermaster missions in Fallout 4 the player wants to complete is the number of them he goes through. It all depends on his desire and perseverance.
Passing the quest
A prerequisite for receiving the task is cooperation with the Brotherhood of Steel. Without this, there simply will not be the storyline on which the passage of the Quartermaster of Fallout 4 is based. Elder Maxson directs the main character to search for the Institute and destroy it, having previously provided signal bombs for the rotorcraft. At the same time, you can view tasks on the Pip-Boy, and the Quartermaster will appear there.
We go to the Trinity Church in order to get a Tactile Generator. This is the first Fallout 4 Quartermaster quest, after obtaining the item you need to get to the Cambridge police station and meet with the scriptor Heylin. After talking with her, handing over the item and receiving the reward, the mission becomes complete.
Receiving additional tasks
During the conversation, Heylin offers to contact her in the future if you need work. How many Quartermaster quests in Fallout 4 can be completed now depends on the player's desire. You just need to return to Heilini to receive a new quest from her. All tasks are of the same type - to obtain some high-tech item, for example, a Reflex Capacitor. The search location will appear on the map; while completing quests, the main character will have to fight in some places with various opposing forces, mainly mutants.
It’s a good idea to level up your Treasure Hunter skill, as well as your Burglar and Hacker skills, since some of the items you’re looking for will be hidden under various locks and blocked with electronic keys. In Fallout 4, the Quartermaster quest is a side quest, and in your desire to receive a reward from Heylin, you should not forget about the main storyline and not get too carried away with earning caps.


