(17
estimates, average: 4,41
out of 5)
 Have you purchased a summer cottage? Then you can safely congratulate you on the beginning of your summer cottage life! Surely this was a long-awaited event for you, and now you are in anticipation of growing your own fruits, vegetables and just a wonderful holiday as far from the bustle of the city as possible. Very often, plots are sold with houses already built on them, but if this is not your case, and you definitely want to build a summer house on your own, then our article is for you. Today we'll talk about the types of country houses, materials for their construction and how to inexpensively build a country house with your own hands.
How to save
Mostly they choose for giving small compact houses, consisting of a kitchen, bedroom, bathroom and veranda. Building a country house with your own hands is not necessarily a high-cost and time-consuming process. It is quite possible to choose an inexpensive house project that meets all your requirements for comfort and convenience. If the budget is strictly limited, then you can save on building materials. The main thing is that the building is safe. Before starting construction, you need to choose the exact location of the future house, choose a ready-made one or create your own project and decide on the materials.
Seat selection
The construction of country houses is a must starts with choosing a seat... Basically, the area of such a house is from 24 to 30 square meters. Larger dimensions are used much less often, most often it is no longer a house for the summer cottage, but a place where you can live all year round with a large family. When planning the location of your home, you should mainly rely on the requirements of your horticultural partnership. But there are also basic requirements that do not depend on the region and local administration. Namely:

In order to avoid flooding during the period of heavy rainfall and melting snow, it is better to build a dacha on an elevated place. Excessive moisture will deteriorate the materials you build from more quickly. This is especially true for timber frame houses.
Types of country houses
Most often, one-story buildings with an open or closed veranda are erected in the country. Very popular cottages with attic- since it can store a considerable amount of things that are not used daily. If there is no attic space, then the roof will be the ceiling. There are three most common types of country houses:
- log cabin;
- frame country house;
- block or brick house.
 But what if you have a large family, and there is not as much building space as you would like? There is a wonderful way out - build a two-story house... The first floor can be used as a kitchen and living room, as well as a terrace, but on the second floor there will be excellent lounges.
When drawing up a project for your summer cottage, take care of insulation. Despite the fact that the summer house is used in warm seasons and requires insulation of walls and floors as such, there are cold rainy days on which you will certainly want to warm up. Mostly summer residents use heating devices such as convectors, oil radiators and electric heaters. But if desired, the construction of a stove or fireplace can also be included in the project of the house.
Material selection
If you have already prepared a project for your house, then it's time to do selection of material for its construction... The total cost of the house, its comfort and appearance directly depends on the choice of building materials.
The most popular material is undoubtedly wood. Many people choose wood due to its environmental friendliness, pleasant smell and relatively low price. It remains only to choose - there will be a construction from a bar or logs, or generally give preference to the frame type. Despite the high flammability of this material, you should not be so afraid to build from wood. Indeed, today there is an incredible assortment of all kinds of impregnations and other coatings that protect wooden coatings from the effects of fire and minimize the risk of a sharp fire. Well, in general, everything depends on you yourself - how careful and responsible you are in matters of security.
Build a house out of bricks is a much more expensive undertaking. But there is a significant advantage over wood - the durability of such a structure and a higher fire safety, since it is much less exposed to fire. And when installing a stove or heating in such a house, it will easily be possible to overwinter. Probably the only drawback is high financial costs and a longer construction process. You can safely attach block houses made of foam concrete and expanded clay concrete blocks to the same category.
Most often, several types of materials are used at once. For example, the house itself is frame and built of wood, and the foundation is built of concrete and bricks. In principle, this option can be called optimal, since it includes a moisture-resistant foundation and an excellent basis for timber frame walls. It is the construction of this type of country house that we will consider in more detail.
Construction stages
 For a start, clearly calculate the amount of all building materials, which will be needed to build a house. Decide in advance on color and texture solutions. The number of purchased materials directly depends on the project of your house. If you do not have the time or desire to carry out detailed calculations of all costs, then you can buy a model of a ready-made house in a prefabricated form. This will simplify the construction process - after all, all you need to do is prepare the required area and, in fact, the assembly itself. But, if you still want to build a house inside and out with your own hands, then be patient and proceed with this, though difficult, but pleasant business.
Foundation
You need to purchase:
- sand, cement, crushed stone and expanded clay (middle fraction);
- boards and bars are not of the highest quality;
- concrete blocks or bricks;
- roofing felt or other vapor barrier material.
There are two main types of foundations for summer houses: strip and columnar. Which one to choose is only your decision. Columnar is chosen much more often because of the lower need for building materials and its simple design, which can be easily dealt with alone. The strip foundation is stronger and more durable, but much more building materials will be required. And the construction process itself is quite time consuming - you need to dig trenches around the perimeter of the house and all rooms, isolate it from moisture, lay reinforcement and fill everything with concrete. Moreover, it takes almost a month for such a foundation to solidify.
Walls and roof
For the construction of walls and roofs purchase in advance:

Further, the installation of the support beams is carried out at a distance of at least 60 centimeters from each other. They are attached to the crown bars with metal corners. After that, you can start building walls. You can assemble the frame separately and attach it ready-made, or start assembling directly on the strapping bars. The size of the bars for frame walls should be at least 10 by 10 centimeters. If you are using boards, their cross section should be at least 5 by 15 centimeters.
When installing uprights, remember to openings for windows and doors... The door opening must be additionally reinforced with an additional post. After the construction of the frame, they are engaged in sheathing. Most often they use lining. It is advisable to perform the sheathing process before covering the roof, as this will strengthen the entire structure and add rigidity to the walls.
 When installing the roof it is necessary to decide on its type. A flat roof is more simple and economical in design, but the most popular is still a gable roof. The rafter structure of such a roof can be layered or suspended. For a small house without load-bearing walls inside, a hanging rafter system is quite suitable. Hanging rafters are fixed with a special pulling and thereby relieve unnecessary stress on the walls. The overhead system presupposes the presence of load-bearing walls, on which the additional emphasis of the rafters goes. After installing the rafters and ramp elements, you can proceed to the roofing.
This process begins with vapor barrier film gaskets- this is done perpendicular to the rafter system, and each next layer must be overlapped with the previous one. Only after that you can start laying the corrugated board or other material you have chosen for covering. Don't forget to organize your drainage system.
So, the walls are up, the roof is covered - which means it's time to start installing windows and doors. Following this, you can insulate walls and floors and engage in interior finishing work.
Nowadays, most people in the warm season want to live in nature. Breathing clean air, temporarily getting rid of the atmosphere of a noisy smoky metropolis and constant stress is the dream of many townspeople. For years, some have been collecting the required amount for the construction of a capital house in the country. But in order to move to nature, it is not at all necessary to wait until you collect the required amount of money. A garden house can turn out to be a comfortable temporary housing, it will not take much time to build it, it will be inexpensive and it will be very pleasant to live in it in the summer. It's realistic to build a garden house with your own hands, you need to choose a suitable project, material, and decide on the price.
A budget version of a garden house can be built from a bar or using Finnish frame-panel technology. These are buildings of the same type, only when building a log house, it is sheathed with a bar (profiled or simple), and a frame house is sheathed with chipboard, plywood or fiberboard.
Garden houses using Finnish technology are a good solution for a summer cottage. For a lightweight construction, a massive foundation is not required, the frame is quickly sheathed with finishing material.
It takes less time to build such a house than a log house, because large sheets of plywood, which are used for sheathing, are attached to the frame much faster than beams. Such a house can be built even in a week, and it will look presentable, especially if you use wood lining for cladding.
A beautiful garden house made of plywood - decorative chimney trim, brightly painted walls, an openwork porch and a roof made of bituminous tiles. The house can look aesthetically pleasing without wood paneling

Construction stages:
- Installation of foundation supports.
- Erection of the frame: work on the upper and lower cladding, erection of vertical supports and rafters. For the installation of doors and windows, contours are formed using additional beams.
- To create a rough version of the floor, thick boards are used - 20 cm thick or more.
- The outer sheathing of the frame with plywood, self-tapping screws are used for fastening. For internal cladding, drywall, plywood, fiberboard or chipboard are used. Nights in spring and even in summer are sometimes quite cool, so it is advisable to insulate the house. To do this, a layer of mineral wool insulation can be laid between the layers of the cladding.
- Installation of a clean floor - floorboard or linoleum.
- Sheathing with plywood rafters. The plywood is then covered with a layer of drying oil and roofing felt.
For your house to be beautiful, it needs a solid exterior cladding. For example, siding or wood paneling. Windows in a country house can be installed both plastic and wooden, this is a matter of taste. But plastic is easier to clean, and such windows will last longer.
You can build a garden house with your own hands from a bar. This is the most commonly used material for country houses. The timber looks aesthetically pleasing, and a building made of this material can serve for a long time. In construction, you can use a simple and profiled timber. In the latter case, the assembly of the house resembles a constructor, since the connection of the elements is due to the groove-ridge system. Many companies offer country houses made of profiled timber today, all the elements of such a house are already ready, they only need to be assembled.
Construction of a garden house from a bar
First of all, as usual, we make the foundation. It can be either columnar or tape. A columnar foundation is suitable if the size of the house is small. For the foundation, you can also use concrete slabs, they are laid on a well-tamped layer of sand, buried in the ground by about 15 centimeters. After the foundation is erected, a waterproofing layer should be laid on it, roofing material will do.
After the foundation is made, the frame is installed. The crown and logs (lower strapping from a bar) are laid on the foundation supports, then vertical supports from the same material are installed.

The frame of a garden house from a bar is erected in a short time, while the building is quite strong and durable
If you like a garden house with a veranda, the lower joists are extended to its intended length by installing on additional supports. Thick boards are used to create the floor, as in the above option.
After installing the floor, we collect the walls from the timber. To fasten the connections, pins are used, after a layer of sealant, a new crown is laid out on the finished row. A sealant is required for each layer, you can use jute or tow.
Then we equip the roof. Installation of braces and rafters from a bar. The next stage is sheathing with a bar and laying a layer of roofing material. After that, the final work on the floor. The plank floor is covered with thermal insulation (mineral wool layer). Glassine can be used as a waterproofing and vapor barrier. Thick linoleum or floorboard is suitable as a floor covering in a country house.
The house will look very attractive if the outside beams are or wooden clapboard. Now you can proceed to the installation of windows and doors and think about how you want to see the interior of your country home.
Interior design of the garden building
The interior of a garden house from a bar is good in itself - the walls and floors sheathed with wood look excellent, so the design of the garden house inside can be made in a minimalist style - the necessary furniture, a minimum of accessories, the general background is wood paneling.
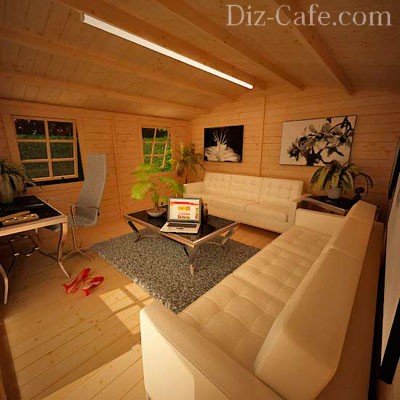
The interior of the garden house in a minimalist style. Walls, floor and ceiling - wood paneling, a minimum of furniture and decor in the form of green plants and a couple of paintings
Wood goes well with natural stone, so you can make a countertop from sandstone, lay out a part of the wall. On the veranda, in combination with wood, forging elements will look harmonious.
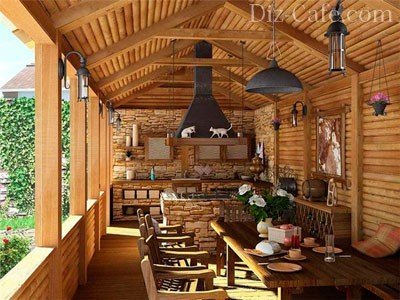
Veranda of a garden house made of timber, where wood, forged lamps and natural stone are perfectly combined with which the wall, table and brazier are lined
Rustic style is also good for indoor garden house design - use patchwork, plaid fabrics and curtains, pottery, rough wood furniture, dry bouquets if you like country style.
The material on country style in the country will also be useful:
If the house is sheathed with plywood or drywall from the inside, you can give the dwelling an urban look - wallpaper the walls or paint, cover the floor with a carpet.

Garden house interior in urban style, 2 in 1, bedroom and study
Examples of the layout of garden houses
The plan of a garden house should be simple - it is a construction of a small area, usually with one or a maximum of two living rooms, a kitchen, a small bathroom, an entrance hall / pantry and a veranda, if provided for by the layout.
A garden house with your own hands will perfectly fit into any area.
To build it, if your site is only a few hundred square meters, means to create an area for rest and storage of the necessary utensils.
If you have a lot of land and already have a real country house, then a garden house will be an excellent solution for placing work tools and decorating the interior of your site.
The advantage of this building is that you can make it yourself, without the involvement of many specialists.
In addition, the construction of a small building will be much cheaper and easier to implement.
First of all, refer to the photo instructions and diagrams - they will facilitate your work and make construction much easier.
The main stages of building a garden house
- laying the foundation,
- walls and a roof are being erected, insulation,
- finishing (usually siding),
- creation of an internal interior.
Construction starts with a project.

House projects can be ready-made - you can take them as they are, or you can slightly transform them to fit your needs. Therefore, first of all, decide for what purpose you need a garden house.
Most often it is used as a temporary shelter during the summer months, and maybe infrequent winter visits. In winter, the roof of the garden house will shelter tools, garden furniture and other necessary things from snow.
Since the first purpose of the house is living, you need to make it comfortable for life, both in winter and in summer.
Photos of projects of such structures look as follows: a floor plan (floors) indicating the size of the premises, drawings of the roof, supporting floors and nodes in which the walls meet the floor and ceiling.
For more clarity, see the photo.


If you are planning to conduct light and heat into the house, then you need to think about the schemes of communication networks.
After the projects, diagrams and drawings have been drawn up, you will see how much material you need to start construction, as well as how much money will have to be spent on it.
A standard frame house made of wood or foam blocks for a summer residence is 6x7 meters, but you can make your frame house larger or smaller. After you decide on the size, you need to choose a place on the site.
The best solution is the highest point of the plot on the north or northwest side.
Small garden houses made of wood or foam blocks, as a rule, are one-story, sometimes with a roof with an attic. Photos of options for buildings from a bar, see below.


Such buildings are the most convenient because the inner space can be used as a bedroom and dining room, and the roof (attic) is used as a storage for belongings, tools and items of the summer kitchen.
Building materials
The construction of a small house can be done from:
- wood,
- timber,
- bricks,
- foam blocks.
Construction from foam blocks and osb is the fastest-built option.
OSB slabs are made from wood chips, the size of which is about 15 cm. OSB is an environmentally friendly and cheap material, and the assembly of a house from OSB resembles the assembly of a constructor.
OSB boards are made by pressing three layers of chips - the pressure on the material is so strong that they literally intertwine with each other, so the end result - the OSB board - turns out to be very durable, does not crumble or fall apart.

Whichever option you choose, you cannot do without a wooden beam - it is needed for the building frame.
Only the frame is made from a wooden bar, for the rest of the elements - the roof, floor, ceiling, decoration, etc., you can use sawn timber (usually from pine).
Before you start laying the floor, do not forget to dry the material from the bar - it must be dry to avoid shrinkage and deformations that appear when the wood dries.
If you are finishing external walls with clapboard, then it should also be completely dry.
In addition to wood and foam blocks, you will need insulation, asbestos cement sheets, roofing felt and other materials for processing and fixing.
If environmental friendliness is important to you, then you can use more wooden elements: beams, boards, etc.
They can be used to make floors, frames, wall decorations, etc. In this case, you will need tools for sawing and installing wood.
The first stage of construction from foam blocks is the construction of the foundation: it will be on it that the future floor will be located.

If you plan to build a small garden house with your own hands from brick, concrete or stone, you need to make a strip foundation, if from wood and foam blocks, a columnar one will be enough.
Under the foundation itself, concrete, rubble concrete or any stone of natural origin is most often chosen.
Look at the photo of the foundation pouring.
Before laying the walls, a rough timber is placed on the foundation - it will create the contour of the walls. Fastened with ordinary nails.
Waterproofing must be done between the foundation and the first row of timber (usually with roofing material).
As the basis of the frame, 4 pillars are made from a bar - they need to be dug in each corner of the perimeter. They are attached from below with long nails. The roof is laid on the frame.
How to make a frame, see the photo.
After fixing, the frame should become rigid - now it can be finished from the inside and outside. It is necessary to lay pieces of timber in the edges of the corners (fixed with nails). Linen tow is placed between the timber.
The door frames are installed immediately.

The base (beams) of the first floor are laid directly on the strip foundation. A rough floor is laid on top - it is made of planed boards.
Then you need to make a screed and place insulation. It is recommended to install a clean floor one year after the subfloor has been laid. boards shrink and gaps appear.
The subfloor is covered with tar paper, and heat-insulating material is used as waterproofing.
Next year, you can cover the floor with laminate or ordinary boards, depending on how you want it to be.
Watch the video on how to build a garden frame house and repeat all the stages of construction.
How to insulate and decorate a house?
If you decide to build a garden frame house with your own hands from foam blocks or osb, then you are in luck, because this material itself is quite warm. Wall insulation is carried out only from the outside.
Insulation of internal walls is not performed due to the fact that condensation may form.
After the walls have been insulated, they are finished - first of all, to decorate the interior (they are usually finished with siding).
Before starting insulation, you need to prepare the walls. First, their surface is cleaned, then a primer is applied.
After drying, the walls are treated with plaster in two layers - after that, insulation can be carried out.
After plastering, the wall should be flat. The second layer is covered with reinforcing plaster, which will make the surface of the walls even. This material is used for insulation.
In general, this process is quite difficult, and if you do not have experience, then it is better to entrust the insulation of the house from foam blocks or OSB to professionals.
The most commonly used materials for insulation are mineral wool, thermal panels or polystyrene.
The latter is the cheapest, so if you want to make economical insulation, choose it.
The most attractive are thermal panels. They will provide not only insulation of the house, but also a decent look of the external interior.
Exterior decoration of the house
After warming the house, finishing will be required. As a rule, they choose siding trim - it looks good and is suitable for any type of building.
Of the advantages of siding finishing, it is possible to note light weight, ease of installation, durability and an affordable price.
In the photo below you can see how the roof of the garden houses is arranged and how their external decoration is made.


You can choose any color of the material: look at the photo and decide which color is best for your site.
Siding coating cannot be done immediately on the walls - before that, you need to mount and install the crate, on which the material will then be installed.
If you have chosen cladding with metal siding, then the only option for you is a galvanized profile - it is installed around the entire perimeter of the walls.
In addition to the profile, it will be necessary to carry out waterproofing. When these points are completed, you can proceed to decorating the walls with siding.
The panels are attached to the starting plate, the upper ones are fixed with self-tapping screws in the center. This is how all the panels are installed, rising in rows to the roof and windows of your house.
Do not try to anchor the panels very tightly - the normal condition for siding is a little free movement. When all panels are in place, the top row is secured with a final plank.
The video below shows an overview of a frame garden house.
You can cope with decorating the house with siding with the help of video and photo instructions.
Siding finishing will not only protect your structure from the effects of the external environment, but will also decorate the external interior, therefore it is recommended to choose this particular finishing material.
Interior decoration of the house
Interior decoration means rather work with the interior of the house. First of all, think about a competent delimitation of space - it does not build to turn a house into incomprehensible cluttered areas.
Wood trim is the most popular option, because it is the most natural material.
For wall decoration, you can buy wood or bamboo panels, or use what you have at your dacha.
Perhaps the most important and noticeable part of the garden house is the veranda. The appearance of the building depends on its interior.
Depending on the device, the veranda can be a separate space or be an extension of the main room.
The photo below shows the interior decoration in the garden house.


Decorating the veranda interior is not a troublesome business. The main requirement is more open space.
It can be built open or equipped with removable frames. Here you can also organize a summer kitchen or dining room.
The "natural" interior of the veranda will be well complemented by baskets and vases with flowers, wicker furniture or a wooden table.
It is better to give up plastic materials in favor of natural ones - this applies to all the decoration of the house.
The floor can be covered with bamboo rugs or wood paneling.
See the photo of the device of the veranda and other premises of the garden house - they will help you with creating an interior in your own building.
The topic of this article is the construction of a garden house with your own hands. We have to get acquainted with the main points of the construction of a very specific structure - a frame house with insulated walls on a columnar foundation, covered with bituminous tiles.
Choice of design
Why did we choose this particular project?
- Frame walls filled with insulation allow for effective thermal insulation at minimal cost... In addition, they will easily tolerate minor deformation when.
Let's clarify: some alternative solutions (for example, sip panels) guarantee better insulation with greater structural rigidity.
However, when using them, the costs of building or rebuilding a garden house will increase significantly.
- Columnar foundations again mean minimal costs with little excavation... All alternatives are more complicated and more expensive. Yes, this type of foundation has little bearing capacity; however, the mass of the frame structure is more than small.
- Bituminous shingles, laid on a solid board, attracts with the complete absence of noise in rainy weather... Moreover: the shield under it will greatly simplify the thermal insulation work.

So let's get started.
Foundation
The construction of garden houses, like any other, begins with marking and laying the foundation.
Since the material for sheathing the wall frame will be OSB (oriented strand board), which has standard dimensions of 2500x1200 mm, it will be logical to make the length of each wall a multiple of the smaller of its dimensions: 3.6, 4.8 meters, etc.
The maximum spacing between the support posts should not exceed 2 meters. This applies not only to the perimeter: the internal partitions must be supported by their own props.

After the position of the supports is marked, we proceed to their construction:
- We tear off pits about 50x50 cm in size and at least half a meter deep.
- We fill each of them with rubble. Backfill height - 20 cm.
- We tamp the crushed stone by hand tamping.
- We form a 10 cm thick concrete pad on top of the bedding. Concrete grade - M100. When self-mixing, you can focus on the following proportions of the materials constituting concrete (in terms of one cubic meter):
| Strength grade | Cement М400, kg | Crushed stone, kg | Sand, kg | Water, l |
| M100 | 210 | 1080 | 870 | 210 |
| M150 | 235 | 1080 | 855 | 210 |
| M200 | 286 | 1080 | 795 | 210 |
| M250 | 332 | 1080 | 750 | 215 |
| M300 | 282 | 1080 | 705 | 220 |
- We spread red brick columns in the size of a brick or one and a half on a cement mortar. In the middle of the column, a piece of 14 mm reinforcement is laid, on which we will anchor the grillage.
Please note: the height of the grillage (and, accordingly, of the pillars) must be at least +25 cm from the ground level.
The columns are displayed in the horizon due to the thickness of the seams.
From above, each pillar is waterproofed with two layers of roofing material.
Floor
Grillage
The grillage material is larch, wood, extremely resistant to decay. Section - 150 mm. The bar is drilled where it will sit on the anchor; in the corners, the grillage is connected to a half-tree.
Lags
They will be boards 50x150 mm with a pitch of 60 cm, placed on the edge.

The lag material in this case does not really matter: an inexpensive pine tree is quite suitable. Lags can be attached directly to the grillage beam with galvanized corners using galvanized self-tapping screws.
Warming
The construction of garden houses used for living in early spring and late autumn implies their insulation.
Among other things, the floor is to be insulated.
- Cranial bars are stuffed along the bottom of the lag.
- The flooring is laid on them from a board with a thickness of 20-25 mm.
- Above - a layer of vapor barrier.
- Then the space between the lags is filled with mineral wool.

- A waterproofing film is laid on the logs.
The flooring is made of 40 mm grooved board after the construction of the frame.
Walls
Frame
Corner posts and top strapping are made of 100x100 mm timber; fastening - galvanized corners already familiar to us. At the time of the construction of the frame, the racks are reinforced with slopes; the structure will reach full rigidity after sheathing. Material for intermediate posts and crossbars - 50x100 board.
Attention: window and door openings are tied with a board around the entire perimeter.

Sheathing
Sheets of 12 mm OSB are fastened with galvanized self-tapping screws 51 - 55 mm long in increments of no more than 25 cm. The joints of the sheets should fall exclusively on the racks.
By the way: if you foam the joint before screwing in the screws, the walls will be noticeably warmer.
Warming
The vapor barrier is laid under the insulation from the side of the outer skin; its second layer closes the insulation from the inside after the mineral wool mats are installed between the posts. From the inside, they are sewn up later, in the process of interior decoration.
Roof and attic
The construction of a garden house with our own hands does not end with the construction of walls: we have to build a roof.
- We put ceiling beams on top of the upper trim (50x100 boards, placed on the edge). We fix them with corners. The step is the same 60 cm as for the racks.
- We put on the corners of the rafters from the same board. We connect each pair of rafters with a horizontal jumper on a hairpin. For the temporary fastening of the rafter system, we again use jibs.

- We construct the frames of the pediments with the strapping of the skylights and the entrance.
- Sew up the roof (including gables) with 15 mm OSB sheets and cover it with a shingle backing.
- We cover the floor of the attic on top of the previously laid vapor barrier with a board - edged or grooved, depending on whether the attic will be used.
- We install mineral wool slabs between the ceiling beams and fasten the vapor barrier from below with a stapler.
- If it is necessary to insulate the attic, we perform similar operations under the roof.
- We cover the roof with bituminous tiles. The sheets are fastened with galvanized studs.

The direction of laying is from the overhangs to the ridge.
Interior decoration
The traditional instructions for the construction of frame houses are quite standard: the frame is sewn up with OSB both from the outside and from the inside, after which the owner must do the interior decoration.
Most of the plasters and paints do not adhere to the OSB surface; the price of specialized primers can plunge even an inveterate optimist into a deep depression.
We will simplify our life and use drywall for wall cladding from the inside. Since the step between the uprights is large enough, you will have to sheathe in two layers with overlapping seams. The pitch of the screws is 15-20 cm, their length is 50 mm; for walls, sheets with a thickness of 12.5 mm are used, for a ceiling - 9.5 mm.

Useful: with two-layer sheathing, you can do without reinforcing the seams with a serpentine. Cracks can appear only with a serious deformation of the frame of the house.
Outdoor decoration
It would be strange to build a house - garden or any other, and not decorate it from the outside. The simplest solution is to use vinyl siding; it is fastened along a 40 mm lathing required to ventilate the space behind it. Do not forget: siding lengthens a lot in the summer heat, so its fastening should provide for the possibility of displacement of the planks.

Conclusion
Of course, we have described just one of the myriad of possible designs. For more information on how to build a garden house, the video in this article will offer. Good luck!
Excellent article 0
If you think that the small area of your country house is a good reason why it cannot be beautiful, comfortable and cozy, then think again! We have selected photos of amazing country houses, the area of which does not exceed 40 sq.m. And most of them are much smaller! You will see inspiring examples of successful organization of a small space.
Summer residents create houses that are not only compact, comfortable and beautiful, but also incredibly original, and the photos of houses in these summer cottages are really unique.
Country house with two bedrooms on different levels: 7 photos
This house, with the exception of the porch and carport, has an area of 37.6 square meters. Despite its small size, it has two bedrooms - one downstairs, the other in the attic.


The home combines a seating area, a dining room and a compact kitchen built along the back wall. At the entrance to the house from the side of the carport, a wardrobe is provided.

In the other half of the house there is a small bedroom.

Next to the bedroom is the bathroom, which is accessible both from the living room and from the bedroom.

The second bedroom is located in the attic above the bedroom and bathroom.

Because the upper bedroom is spacious enough, then if the family is small, but loves to receive guests, you can increase the living room area on the lower floor, abandoning the bedroom there.

For the same purpose, you can make a wider terrace at the entrance to the house, which will also give more space for guests.
Modern country house with loft style: 6 photos
The area of the house in the photo is a little over 37sq.m, the house has a living room, a kitchen-dining room, a bathroom and 2 bedrooms.  Looking at the photographs of the interior, it is hard to believe that it all fits into this tiny space.

Thanks to the large number of windows and light, from the inside, the house does not seem small at all. On the contrary, a feeling of spaciousness and comfort is created at the same time.

A bathroom and a bedroom are located behind the kitchen. The space under the stairs to the attic is used as a storage room.

The small bedroom downstairs looks light and cozy due to the large windows.

There is a fairly spacious children's bedroom in the attic.

Country house with a bright interior: 3 photos
And this sweet home, immersed in greenery, was built by a married couple with their own hands. They did absolutely all the work themselves (including making the furniture!), And it took them six years to build this house!

The interior of the house is filled with retro things and bright colors.

As well as original design solutions.

Original house hut: 4 photos
This pretty house at the dacha captivates with its atmosphere: the tree is everywhere in it, and this creates a unique charm. But admit, you are one of those who look at such houses and sigh: "Yes, it is original, but in such a house it is difficult to properly place everything ..."

Let's take a look at its interior, how everything is conveniently placed in this small space. A staircase leads to a cozy bedroom.

And on the ground floor there is a neat compact kitchen, a living room and a surprisingly spacious bathroom.

The kitchen has access to a terrace at the back of the house.

But the main thing in this house is the spirit of solitude and quiet life.

Practical country house 25 sq.m
Nice and functional - no extravagance. It is not difficult to imagine such a house standing in the most ordinary village or in a summer cottage.

The same can be said about the interior.

The house has everything you need, while its area is only 25 square meters.

Country house from a construction trailer.
A construction trailer, it turns out, can be turned into a stunning open-plan holiday home.

Moreover, the space inside such a structure cannot be called cramped.

Inside there is absolutely everything for a comfortable life, up to the shower and toilet.

An unusual country house in the form of a castle.
This house rightfully bears the proud name of a miniature castle. Being located quite high in the mountains, it amazes not only with its design, but also with picturesque views.

Despite its modest size, there was room for everything inside, including a bedroom, a modern kitchen, a fireplace and - of course! - rocking chair.

Country house from old windows.
We change everything for new ones, while throwing away a lot of old windows of varying degrees of wear and tear. The owner of this house is engaged in the installation of windows, and she was always tormented by the desire to find a use for the still quite good old windows. This is how this country house was built.
 Various cozy little things give this house a special charm: an iron bed, old paintings. Huge windows let in a sea of light, so sleeping until twelve in such a bedroom is unlikely to work!

Country house with a sleeping attic: 9 photos
This 31.2 sq.m. country house is made of used materials: wood and roofing iron, at the same time, for security reasons, the electrical wiring and plumbing in the house are completely new.

Downstairs, the open plan kitchen is connected to the living room. This small room is quite comfortable for relaxing and contains a sofa and an armchair. In addition, a folding dining table is provided on the kitchen island from the back wall.

It is also possible to place the dining area on a covered veranda at the back of the house.

The bathroom is located behind the kitchen and is equipped with a toilet, sink and shower.

As you can see on the plan, there is a storage room next to the bathroom, and at both ends of the house, the country house has sleeping attics.

On one side, the bed is located above the bathroom. The upward staircase is successfully combined with the kitchen rack.

At night, the house is lit by candles, oil lamps, and electricity stored from solar panels during the day.

Country house in the trunk of an old spruce.
But the first place for originality should be given to this incredible structure. It is so small that it is very difficult to call it a home. But the story of its creation is truly fantastic! The fact is that this house was carved by hand from the trunk of a giant spruce. All this enormous work was done alone by the artist Noel Votten. It took him 22 years.

So if you are dreaming of a small cozy country house, then you should know: your dream can come true!