So you are faced with the question of how to partition your hard drive. The reasons may be different, for example, you purchased a new HDD to increase the permanent memory of an existing computer, or you bought a new laptop, but without a pre-installed system, and you yourself have to install the Windows shell, or you simply did not have enough space in the system partition of the disk for newly installed programs .
Basic ways to divide hard drive space
Regardless of the reasons that prompted you, you want to partition your hard drive yourself, but have little idea how this is done in practice. This is where we will try to help you by telling you not only about the basic ways to properly partition a hard drive, but also pointing out certain nuances and difficulties that you may encounter during this difficult work.
Let's look at how to divide a hard drive of any type (HDD or SSD) in three ways, namely using:
- standard utilities running Windows installed on your computer;
- special programs for working with various information storage devices;
- Windows PE boot shell.
So, let's get started and try to exactly follow the sequence of actions, otherwise, this may lead to either repeating operations for a new drive, or losing important data when working with existing storage media.
Partitioning a disk using a standard Windows utility
This method of working with drives is not very complicated and, most importantly, does not require third-party programs. It is suitable for dividing both the main drive “C” and for dividing an external HDD into partitions. This utility for working with storage media is available in all versions from Windows XP to Windows 10.
So, to work directly with hard drives, you need to open the standard Windows shell utility, and it can be called to the desktop in two ways:
In the window that opens " Disk management“All storage devices currently connected to your computer, including flash memory, should be displayed.
We move the mouse cursor over the desired partition and right-click the context menu for this disk. And here, depending on what we want to do, we decide on the team we need in the future.
Divide the disk into two
If this is one main drive “C”, then this is an easy way to divide the hard drive into two and with one hundred percent certainty not to lose system information. To do this, perform the following steps:

That's it, the main disk is divided into two partitions.
Partitioning the disk
But how to divide a hard drive into partitions, in the case of a new, just purchased drive, working with this standard utility, is also not difficult, but the algorithm of actions will be slightly changed. The sequence of actions will be as follows:

It is worth remembering here that the disk system MBR allows you to create no more than 4 partitions on one hard drive.
Working with disks using special utility programs
The following universal software utilities for working with various information storage devices have found the greatest popularity among users, namely:
- Acronis Disk Suite;
- Paragon Partition Manager Professional;
- AOMEI Partition Assistant Technician Edition.
These utilities are specially adapted to perform almost all basic operations with HDD, SSD and other storage media. They have a fairly clear interface designed to work with both specialists and ordinary users.
We will analyze how to split a disk into partitions using such universal utilities using the example program AOMEI Partition Assistant, which can be installed on your computer as a standard application, or used from portable mode.
And also, for comparison, we will show the operation of the utility in two modes when dividing the main disk into two and dividing the new hard disk into several partitions.
We open the program and see a window with extensive information on all connected storage media and their sections.
Divide by two
The algorithm for partitioning the main hard drive “C” consists of a set of sequential commands:

After the reboot, having completed all the operations, the system will boot, but with the main disk divided into two parts.
Dividing a new disk
Typically, the new HDD will represent unallocated space and will only be visible in the program window.
First, be sure to clearly indicate the disk with which we will work by hovering the mouse cursor and obtaining the corresponding color gradation of the position. But in case of an error, you can lose all important information on a randomly selected existing storage medium.

The algorithm for working with other universal programs for resizing various storage media is very similar to the example above. The only significant difference will be the program interface and menu layout.
Partitioning the main disk using the Windows PE boot shell
If you decide to install a new operating system or completely update the old one, and the existing partition sizes of the main HDD do not suit you or do not meet the necessary requirements, then it is better and easier to reformat by logging into the computer from a special simplified shell.

If desired, various versions can be downloaded from the Internet, and they are freely available there and are equipped with a set of all the necessary portable programs for working not only with storage media, but also have a whole set of various useful utilities. For example, you can take the distribution kit from the site https://diakov.net/8305-adminpe-30.html, which does not require additional registration from the user.
Having loaded onto a USB or CD/DVD media, we boot the system using the key to call up the menu, in which there is a choice of boot device. As a rule, this is the function key F11, after pressing which we select our media.
After loading the portable desktop, a desktop will appear that almost completely replicates the familiar Windows shell, but with pre-installed software modules.
We open a universal program for working with various storage devices and work according to the example given earlier in the background and without unnecessary reboots.
The main advantage of the shell is that the software modules are in no way connected to the hard drives, which allows you to perform all possible operations to reformat them in any possible way without any restrictions.
Conclusion
In this article we learned how to partition a PC or laptop disk in different ways. Examples were considered: how to divide a hard drive into 2 parts, and how to create partitions on a hard drive. You can use similar methods to partition an external hard drive. Just connect it to your computer and do the same steps.
Video on the topic
There are times when when purchasing a computer or laptop, there is only one system drive “C”. I think everyone knows that having one partition is bad. After all, after reinstalling the operating system, all your files and documents will be permanently deleted. Therefore, you must have at least two partitions C and D. The first will contain the operating system with all the necessary programs, and the second will contain personal files (music, video, photos, etc.). To do this you need to partition the hard drive. So the question arises - How to partition a hard drive yourself in the Windows 7 operating system? At the same time, so that the files located on the hard drive are not damaged. The easiest way is split hard drive, using Windows 7’s own tools. And we’ll look at this method today.
How to partition a hard drive in Windows 7
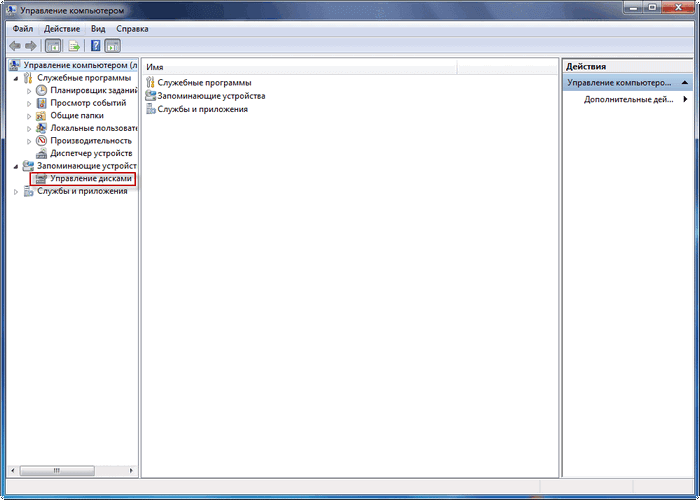
So let's get started. Right-click on the "My Computer" icon and select Manage.

Find the "Disk Management" item and click on it.

Below you can see that I have 3 hard drives, and one of them (Disk 0) is already divided into two partitions.

Disks numbered 1 and 2 are not broken.

Using Disk 2 as an example, I will show you step by step how to partition a hard drive. It is not empty; it contains the operating system and various files. In your case, it will not be Disk 2, but Disk 0, since I have three hard drives installed in my computer.
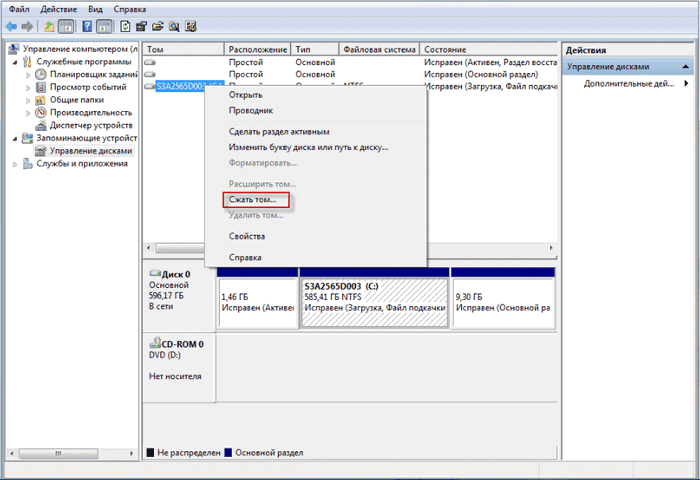
So, we divide Disk 2 into two partitions - to do this, right-click on Disk 2 and select “Shrink Volume”.

There is a request for space for compression.

And in the window we see the available space for compression - 222361 MB.

Now we need to indicate how much we will compress the volume. If I didn’t touch anything here and click “Compress”, then the size of the volume with the OS would become small, that is, about 15 GB. This is naturally very small, so be careful.

It is clear that a lot depends on the overall size of your hard drive, but I would advise setting the size of the future partition C to at least 60 Gigabytes (I usually set it to 80-100 GB).
In this case, I will try to divide the hard drive into two equal partitions. I will set the size of the compressed space to 115,361 MB, this is exactly the partition that will be empty. And now we observe that the total size after compression has changed to the number 123,112 MB, that is, 120 GB, this is the system partition on which the operating system with programs is located.
In other words:
- The size of the compressed space is the size of the additional disk;
- The total size after compression is the size of system drive C. For example, you have a hard drive of 1000 MB in size, then you can allocate 100-150 GB to drive C, and the rest (850-900 GB) to the second drive.
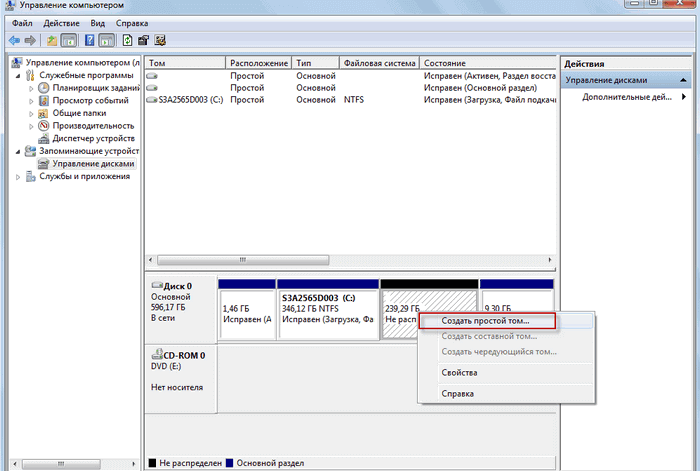
After you have decided on the sections, click “Compress”. When the compression process is completed, there will be unallocated space. Now it needs to be converted to a simple volume. To do this, right-click on the unallocated space and select “Create simple volume.”


Then we assign any letter for the future partition (disk). I chose the letter F.
When installing Windows, the hard drive is traditionally divided into at least two partitions - a smaller system partition with the letter C and a larger user partition with the letter D. This division was not just invented because of someone’s whim, it has important practical value. Firstly, partitioning the hard drive in Windows 7/10 allows you to save the user’s personal files when reinstalling the system, otherwise they would be destroyed during formatting; secondly, it’s just more convenient to work with data, not to mention the fact that This significantly reduces the risk of accidentally deleting system files.
However, some computers and laptops with a pre-installed system have only one partition - the system one, not counting the “System Reserved” area. In such cases, the user has to create additional volumes on the disk himself. This procedure is very simple, however, for beginners it can still cause certain difficulties, especially when it comes to partitioning the partition with the installed system. So how to properly partition a hard drive without losing data?
There are three main ways to partition a hard drive into volumes: using the standard disk management snap-in, using a command line utility Diskpart and with the help of third-party programs created specifically for these purposes. The first method has a number of limitations, the second may seem complicated, the most convenient is the third, using third-party software, but not all such programs are free. Let's consider all three options.
Using Disk Management
So, you have a computer that has only one volume on its disk, not counting the reserved area. First, let's look at how to split a hard drive into two partitions using the built-in Disk Management snap-in. By pressing Win + X Call the context menu of the Start button and select “Disk Management” from it.
In the window that opens, right-click on the area of the system partition with the letter C and select the “Shrink Volume” option from the menu.

After the volume is polled for allocated space, specify the size of the new partition in megabytes in the “Size of compressed space” field and click “Compress”.

As a result, you will get unallocated space highlighted in black. Right-click on it, select “Create simple volume” and follow the wizard’s instructions.

During the creation of the partition, you will be asked to specify the volume size, assign a letter, select a file system (NTFS is needed) and assign a label, that is, the name of the volume displayed in Explorer.


After clicking the “Finish” button, the section will be created.


Partitioning a hard drive in Diskpart
Now let's look at how to divide a hard drive into 2 parts in Windows 7/10 using another standard tool - a console utility Diskpart. Unlike the Disk Management tool, which has a graphical interface, it has a large set of functionality; in addition, you can partition a disk into partitions in Diskpart from under the bootable media, even in a non-working system. So, open a command prompt or PowerShell console as an administrator and run the following commands:
diskpart
list volume
select volume 1
shrink desired=102600
list disk
select disk 0
The first command launches the Diskpart utility itself, the second command displays a list of partitions available on the physical disk, the third selects the partition number corresponding to drive C, the fourth compresses it to the specified size in megabytes. The fifth command displays a list of all physical disks, the sixth command selects the disk to be partitioned (if there is only one on the PC, its ID will be 0).

Let's continue.
create partition primary
format fs=ntfs quick
assign letter=G
exit
The seventh command creates a new partition, the eighth command formats it into the NTFS file system, the ninth command assigns the specified letter to the new volume, and the tenth command terminates Diskpart.

As you can see, the algorithm of actions has much in common with how the partition was created through the built-in Disk Management snap-in. Now, if you go to the “This PC” section, you will see a new logical partition there.
Dividing a disk into parts in Acronis Disk Director
You can also use third-party tools to create custom disk volumes. One of them is Acronis Disk Director– a powerful program for partitioning your hard drive and more. The procedure for partitioning a hard drive in this program is very simple. After launching the application, select the disk to be shared with the mouse and select “Split Volume” from the operations menu on the left.

A dialog box will open in which, using the slider, set the size of the new partition.

If there are user files on the source disk, you can transfer them to the new volume being created, however, this can be done later in Explorer. But system files cannot be transferred, otherwise Windows may not boot. After setting the procedure parameters, click first “OK” and then “Apply pending operations”.


If the system asks you to reboot, give it permission. The program will do the rest itself, you just need to wait for the operation to complete.
How to partition a hard drive in Paragon Hard Disk Manager
Another powerful program for working with disks and partitions. It also has its own wizard for disk partitioning. After launching the application, switch to the “Partition Operations” tab in the main menu and click on the “Partition Wizard” link.


At the next stage, the program will ask you to decide on the size of the new partition. Use the marking slider or enter the desired size manually. Assign a letter to the volume, click Next and confirm the operation.


Clicking “Finish” completes the wizard.

Now, to apply the planned action, click on the button of the same name on the left side of the Paragon Hard Disk Manager window and once again confirm your intentions to partition the disk.

After this, the re-partitioning procedure will start. If the disk is a system disk, you will need to restart the computer.

Disk partitioning in AOMEI Partition Assistant Standard Edition
And finally, let's see how to partition a hard drive in a free program AOMEI Partition Assistant Standard Edition. There is no separate partitioning wizard in this program; repartitioning is performed in two stages. First you need to get some free space. Right-click on the shared disk and select “Change partition size” from the menu.

Drag the slider to set the new partition size and click OK.

As a result, unoccupied space will be created. Select it with the mouse and select the “Create section” option in the menu on the left.

In the window that opens, if necessary, adjust the layout parameters (you can change the size, letter, file system type and partition type) and click “OK”.

Now, to start the staking procedure, click the “Apply” button.

Since you are working with the system disk, you will need to restart the computer.

All of the above methods allow you to partition a hard drive without losing data, however, when performing this procedure, especially with the use of third-party software, you should be careful, since the risk of losing information, although very small, is still present.
How to partition a hard drive in the Windows operating system - there are two answers to this question. The disk can be divided into several partitions using operating system tools, or using third-party software.
The process of dividing a hard drive into two or more parts is no different in the operating systems Windows 7, Windows 8.1 (Windows 8), or Windows 10.
Manufacturers of computers, especially laptops, often create only one partition of the hard drive on which the operating system is installed and all the user’s files will be located there in the future.
For more convenient use of the computer, you can create another hard drive partition on which the user will store his files - music, videos, documents, and other files. This will make it easier for him to find the necessary files, because if all the files are on one disk, then it will be quite difficult to find the necessary folders and files.
If the operating system fails, files located on another drive will not be lost during the process of reinstalling the operating system.
You can divide your hard drive into partitions using a tool in the operating system Windows 7, Windows 8 or Windows 10. More advanced operations with hard drive partitions can be done using programs specifically designed for this, such as, for example, Acronis Disk Director, EASEUS Partition Manager, MiniTool Partition Wizard.
Keep in mind that when partitioning MBR on a hard drive, the disk can only be divided into 4 main partitions. If you already have 4 such partitions created on your disk, then you will not need to perform this operation, since the new, created partition will not be displayed in the operating system. This is often encountered by laptop owners, because manufacturers often create hidden partitions on the disk for system recovery and for storing individual programs and drivers.
Modern computers use the GPT partition style, which allows you to create as many partitions as you need. There is no such restriction here.
How to partition a Windows 7 hard drive
In order to partition a Windows 7 hard drive, you must log into Disk Management under an administrator account. In a similar way, you can divide a hard drive in Windows 8.1 or Windows 10; the process of dividing the disk into parts is no different.
After you open Explorer => “Computer”, then you will see the partitions of your computer’s hard drive.
In this image you can see that the hard drive has two partitions: “Local Disk (C:)”, which will need to be partitioned, and a protected partition - “Microsoft Office 2010 (Q)”, which cannot be changed.
Here you can see that the hard drive is already about half full of data. The partition itself, on which the operating system is installed and the files are located, is named after the brand of the hard drive installed on the computer.
A new hard disk partition will be created from the free space of the “Local Disk (C:)”.
To partition your hard drive, you need to go into Disk Management. First, you will need to go to the Start menu and then right-click on the Computer button. In the context menu that opens, select “Management”.
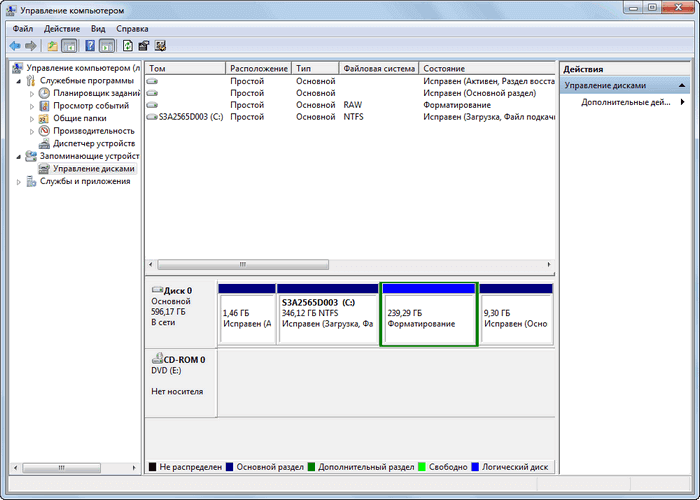
This will open the Computer Management window. Next, on the left side of the window, select “Disk Management”.
Information about your computer’s disks will appear in the “Disk Management” tab. This image shows that the computer has one drive - “Logical drive (C:)”, which is named after the brand of hard drive (hard drive). The disk has an NTFS file system. I will divide this section into two parts.
Also on the hard drive there are also two special protected partitions that were created by the laptop manufacturer - the “Recovery Partition” (it is not displayed in Explorer) for system recovery, and the partition with Microsoft Office 2010.
On a desktop computer, there may not be such additional partitions if you did not buy a computer from a well-known manufacturer. These protected partitions will not be needed to solve our problem - dividing the hard drive into two partitions.

There is another way to enter Disk Management. To do this, you need to go to the “Start” menu, enter the expression “diskmgmt.msc” in the “Search” field, and then press the “Enter” button on the keyboard. This will open the Disk Management window.
The contents of this window are identical to the contents of the Disk Management tab in the Computer Management window.
In order to divide a hard drive into two parts, you need to select a disk that will be divided into two parts. To do this, you will need to move the mouse cursor over the disk that is to be divided, in this case it is the “(C:)” drive, and then in the context menu that opens, click on the “Compress volume...” item.
This will open the Request Compression Space window, informing you that it is polling to determine available compression space.

In my case, there was already data on the hard drive occupying a size of 342 GB.
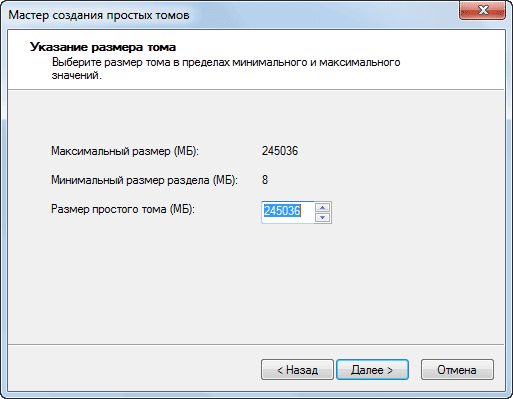
After completing the survey process, the “Compress From:” window will open, which will indicate the following parameters: the total volume of the hard drive before compression (599480 MB), the space available for compression (245037 MB), the size of the compressed space (245037 MB), as well as the total disk size after compression (354423 MB).
You can change the size of the shrinkable space. The "compressible space size" is the size of the future second disk that will be created after splitting the hard disk into two parts. “Total size after compression” is the size of the “Logical drive (C:)” after the hard drive has been split into parts.
When using the Windows operating system tool, you will not be able to split your hard drive more than in half. Please note that the sizes of the disks should not be the same, they should differ in size from each other. Read more about this at the end of this article.

After this, the compression process begins. After it is completed, you will see that a new partition has appeared with unallocated space.

After this, the “Create a Simple Volume Wizard” window opens, in which you will need to click on the “Next” button.

In the next window, “Specifying the volume size,” click on the “Next” button.
In the “Assign a drive letter or path” window, you need to select a letter for the new disk partition. If the computer already has a disk designated by the letter “C”, then it would be better to assign the following letter of the alphabet to the second disk: “D”. Then you should click on the “Next” button.

In the “Format Partition” window, some settings are already selected by default - file system, cluster size and volume label, and the “Quick Format” item is activated.
By default, the volume label is named "New Volume". You can delete this name and do not fill in anything in this field, then the second partition of the disk will have the name “Logical disk (D:)”. In the future, if necessary, the section title can be corrected.

Then formatting of the new hard drive partition begins.
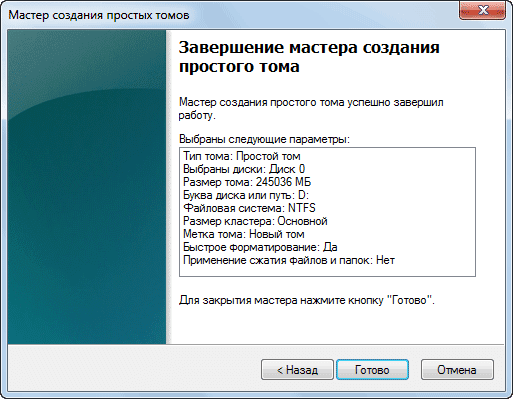
After completing the formatting process, in the next window “Completing the Create Simple Volume Wizard” you will be informed that the creation of a new hard disk partition has been completed. You can view the parameters of the created hard disk partition.
After this, you need to click on the “Done” button.
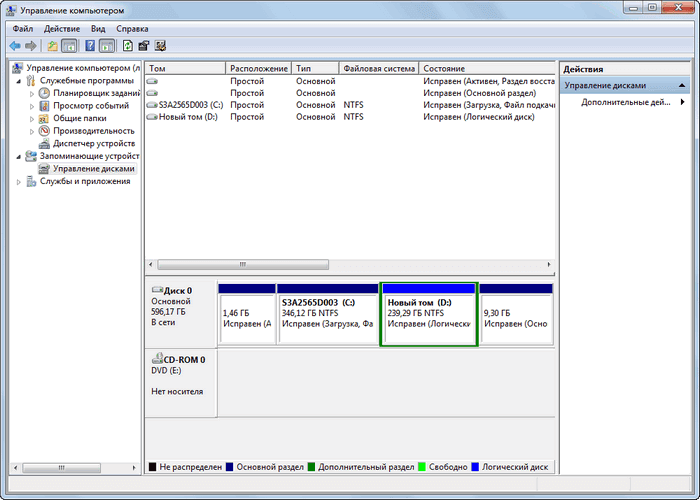
In this image you can see that a new hard drive partition has appeared - “New Volume (D:)” with the NTFS file system.
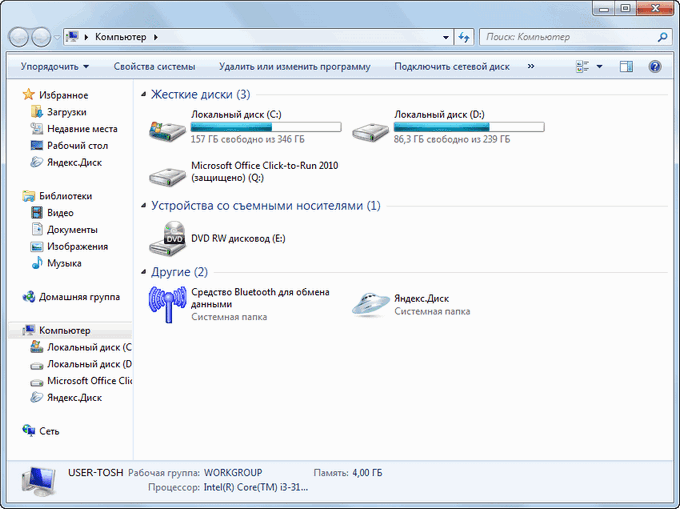
After opening Explorer, you can see a new hard disk partition created, which is still free of files, as well as the “Local Disk (C:)”, which is full.

Now you can change the names of the hard drive partitions, if you have not done this before, to others that are more understandable.
To do this, you need to right-click on the disk that you want to rename, and select “Rename” from the context menu. Then you should enter a new name for the hard drive partition, and then press the “Enter” button on the keyboard. It is not necessary to change the partition names; you can continue to use the partition names already on your computer.
After renaming, the hard drive partitions will have more understandable names. In this image, you can see that I have already moved some of the files from “Local Disk (C:)” to another, just created disk - “Local Disk (D:)”.
If you have the Windows 8 operating system installed on your computer, then you can partition your hard drive in the same way as described in this article.
How to change the drive letter
The DVD optical drive on the computer was labeled "D". Since I was going to divide the disk into two parts, I changed the drive letter in advance.
This is done so that the hard drive partitions have letter designations in the order of the letters in the alphabet, for more convenient use and perception. For example, in Explorer, the hard drive partitions will first be indicated, then the CD/DVD drive, and then connected drives, memory cards and disks.
To change the drive letter, you need to go to “Disk Management” and right-click on the CD/DVD drive. In the context menu, you need to click on the item “Change the drive letter or path to the drive...”, and in the window that opens “Change the drive letter or path for D:” (your letter name may be different) click on the “Change” button.
In the “Change drive letter or path” window, you must enter a different letter to change, and then click on the “OK” button.
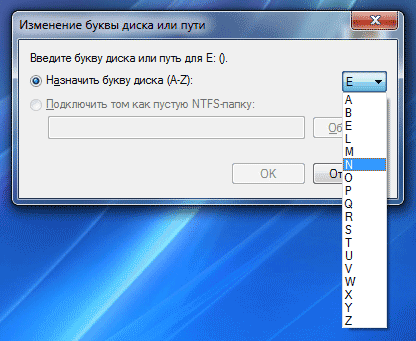
It is not necessary to change the drive letter. A new hard disk partition can be designated by any letter of the alphabet not yet occupied.
Solving the problem with the RAW file system
After partitioning your hard drive using the Windows operating system, if you made the hard drive partition sizes the same, a problem with the file system may arise. After formatting, you may find that the new disk partition was created not in the NTFS file system, but in the RAW file system.
I myself encountered this problem when I was partitioning a hard drive in Windows 8 on my daughter’s laptop. In order to avoid this problem, when creating a new hard disk partition, the partition being created must have a different size than the “Local Disk (C:)”.
To resolve this issue, you need to re-run the Create Simple Volume Wizard process. In the “Specify volume size” window, in the “Simple volume size (MB)” item, you need to slightly reduce the partition size, and in the “Format partition” window, uncheck the box next to the “Quick format” item.
Formatting will take some time, which will depend on the size of the hard drive partition. Once the formatting process is complete, the problem will be resolved, the new disk partition will now have the NTFS file system.
Conclusions of the article
Using the operating system tool, you can easily split your hard drive into two parts in Windows 7, Windows 8, or Windows 10.
When purchasing a computer or installing Windows or another OS, many users want to split the hard drive into two or, more precisely, into several partitions (for example, drive C into two drives). This procedure makes it possible to store system files and personal data separately, i.e. allows you to save your files in case of a sudden system crash and improve the performance of the OS by reducing fragmentation of the system partition.
Update 2016: new ways to split a disk (hard or SSD) into two or more have been added, a video has also been added on how to split a disk in Windows without programs and in the AOMEI Partition Assistant program. Corrections have been made to the manual. Separate instructions: .
You can split a hard drive or SSD into several partitions not only in Disk Management, but also using the command line in Windows 10, 8 and Windows 7.
Be careful: the example shown below will work without problems only in cases where you have a single system partition (and possibly a couple of hidden ones) that needs to be divided into two partitions - for the system and data. In some other situations (MBR disk and already have 4 partitions, when shrinking the disk, there is another disk "after" it) this may work unexpectedly if you are a novice user.
The following steps show how to split the C drive into two parts at the command prompt.

Done, now you can close the command line: in Windows Explorer you will see the newly created disk, or rather, the disk partition with the letter you specified.
How to partition a disk in Minitool Partition Wizard Free
Minitool Partition Wizard Free is an excellent free program that allows you to manage partitions on disks, including dividing one partition into two or more. One of the advantages of the program is that a bootable ISO image with it is available on the official website, which can be used to create a bootable flash drive (the developers recommend doing this using Rufus) or to burn a disc.
This makes it easy to perform disk partitioning in cases where this cannot be done on a running system.
After loading into Partition Wizard, you just need to right-click on the disk you want to split and select “Split”.

The next steps are simple: adjust the partition sizes, click OK, and then click the “Apply” button at the top left to apply your changes.

You can download the Minitool Partition Wizard Free bootable ISO image for free from the official website https://www.partitionwizard.com/partition-wizard-bootable-cd.html
Video instruction
I also recorded a video on how to partition a disk in Windows. It shows the process of creating partitions using standard system tools, as described above, and using a simple, free and convenient program for these tasks.
How to partition a disk during installation of Windows 10, 8 and Windows 7
The advantages of this method include its simplicity and convenience. Partitioning will also take relatively little time, and the process itself is very clear. The main disadvantage is that the method can only be applied when installing or reinstalling the operating system, which in itself is not very convenient; in addition, there is no possibility of editing partitions and their sizes without formatting the HDD (for example, in the case when the space of the system partition has run out and the user wants add some space from another hard drive partition). Creating disk partitions when installing Windows 10 is described in more detail in the article.
If these shortcomings are not critical, consider the process of disk partitioning during OS installation. These instructions are fully applicable when installing Windows 10, 8 and Windows 7.

Attention! When you delete disk partitions, all data located on them will be deleted.

Partitioning a hard drive when installing Windows XP
During the development of Windows XP, no intuitive graphical interface was created. But although control occurs through the console, partitioning the hard drive when installing Windows XP is as easy as when installing any other operating system.
Step 1. Delete existing partitions.
You can repartition the disk while defining the system partition. You need to split the section into two. Unfortunately, Windows XP does not allow this operation without formatting the hard drive. Therefore, the sequence of actions is as follows:

Step 2. Create new partitions.
Now you need to create the necessary hard disk partitions from the unallocated area. This is done quite simply:

Step 3. Determine the file system format.
After the partitions are created, select the partition that should be system and press Enter. You will be prompted to select a file system format. FAT format is more outdated. With it you will not have problems with compatibility, for example, Windows 9.x, however, due to the fact that systems older than XP are rare today, this advantage does not play a special role. If you also consider that NTFS is faster and more reliable and allows you to work with files of any size (FAT - up to 4GB), the choice is obvious. Select the desired format and press Enter.
Then the installation will proceed in standard mode - after formatting the partition, the installation of the system will begin on it. You will only be required to enter user parameters at the end of the installation (computer name, date and time, time zone, etc.). As a rule, this is done in a convenient graphical mode, so it is not difficult.
Free AOMEI Partition Assistant
AOMEI Partition Assistant is one of the best free programs for changing the structure of partitions on a disk, transferring a system from HDD to SSD, and, among other things, you can use it to split a disk into two or more. At the same time, the program interface is in Russian, unlike another good similar product - MiniTool Partition Wizard.
Note: despite the fact that the program claims to support Windows 10, on my system it did not partition for some reason, but no failures occurred (I think it should be fixed by July 29, 2015). Works without problems in Windows 8.1 and Windows 7.
After launching AOMEI Partition Assistant, in the main program window you will see the connected hard drives and SSDs, as well as the partitions on them.

To partition a disk, right-click on it (in my case on C), and select the “Partition Partition” menu item.
At the next step, you will need to specify the size of the partition to be created - this can be done by entering a number, or by moving the separator between the two disks.

After you click OK, the program will display that the disk has already been partitioned. In fact, this is not the case yet - to apply all the changes made, you must click the “Apply” button. You may then be warned that your computer will restart to complete the operation.

And after the reboot, you will be able to observe the result of disk separation in your Explorer.
Other programs for creating partitions on your hard drive
There is a huge amount of different software for partitioning a hard drive. These are both commercial products, for example, from Acronis or Paragon, and distributed under a free license - Partition Magic, MiniTool Partition Wizard. Let's look at dividing a hard drive using one of them - the Acronis Disk Director program.

How to partition a hard drive in MacOS X using standard means
You can partition your hard drive without reinstalling the operating system or installing additional software on your computer. In Windows Vista and higher, the disk utility is built into the system, and this is also the case in Linux systems and MacOS.
To partition a disk on Mac OS, do the following:

After this, after a short (for SSD anyway) partition creation process, it will be created and available in the Finder.
I hope the information is useful, and if something doesn't work as expected or you have questions, please leave a comment.


