With the development of technology and the growing availability of high-speed Internet, the need for physical storage media is steadily decreasing. Of course, it will not be possible to completely abandon CDs and DVDs, flash drives and external hard drives, since they are needed for backup data storage. However, virtual devices may well minimize their use.
What are virtual devices in Windows 10 and what are they for?
Virtual devices are software codes that imitate physical devices, fully or almost completely realizing their functionality. Examples of these kinds of devices that are most commonly used in everyday life are:
- virtual (screen) keyboard;
- virtual drive;
- virtual hard disk (VHD).
Virtual keyboards are needed if it is impossible to use physical ones, they are not capable of more. For example, if a real keyboard is broken or a person with a disability is working on the computer, you can display an input device on the screen and use the cursor to enter a key combination or type text.
Using the virtual keyboard, you can fully carry out data entryVirtual drives are designed to connect CD and DVD images to a computer and then interact with them. Disk images are often used when installing software products: applications, games, and system shells.
 Virtual drives are designed to mount disk images and then interact with them
 Virtual hard disks are the most widely used. First of all, because the partition of a virtual hard drive is very easy to encrypt or password protect. This significantly increases the security of documents and other important data. In addition, VZD is a convenient environment for testing software, scripts and other software development products. Virtual disk technology simplifies data backup, physical media cloning, and more.
How to create a virtual hard disk in Windows 10
Creating a VZD is a fairly simple procedure that takes a little time. It is performed as follows:
- In the Windows search, enter the string "Computer Management" and select the best match.
 In the Windows search, enter the string "Computer Management" and select the best match
 - In the left part of the window that opens, go to the "Storage devices" section and select the "Disk Management" item.
 In the left part of the computer management console window, go to the "Storage devices" section and select the "Disk Management" item
 - On the toolbar, open the "Action" tab and click on the line "Create a virtual hard disk".
 On the toolbar, open the "Action" tab and click on the line "Create a virtual hard disk"
 - We select the place on the hard drive where the file containing the virtual hard disk will be located, and enter its name. Set the size in MB, GB or TB in the corresponding field and click OK.
 Set the size of the VZD file, enter its name and specify the location on the physical disk
 - At the bottom of the window, in the section with volumes, a new section "Disk 2" will appear (the figure may differ depending on the number of hard drives installed on the computer). This section will be marked to the left of the title with a red arrow pointing down. We right-click on it and select the action "Initialize disk", and then click OK in the confirmation window.
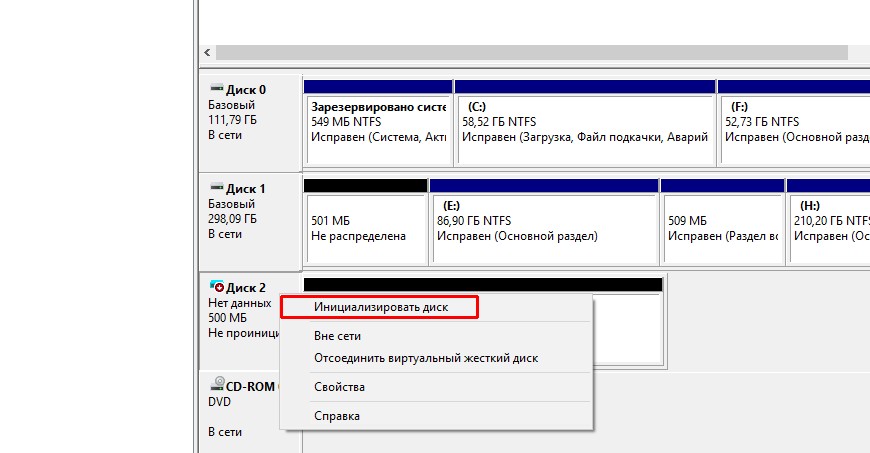 Right-click on the new partition and select the action "Initialize Disk"
The virtual disk is connected and healthy. It remains only to create a section. For this:
- Right-click on the "Unallocated" area and select the "Create Simple Volume" option.
 Right-click on the "Unallocated" area and select the option "Create a simple volume"
 - In the partitioning utility window that opens, click the "Next" button, select the size of the virtual volume, and click "Next" again.
 Set the volume size in megabytes and click the "Next" button
 - Assign a drive letter from among the available ones and click the "Next" button.
 Select a Latin letter from the available ones and click the "Next" button
 - Leave the formatting settings untouched and click the "Next" button.
 We leave the file system type NTFS and click the "Next" button
 - Confirm the changes with the "Finish" button.
 Check the settings and click the "Finish" button
 - Upon completion of the operation, a new partition will appear on the hard disk containing a virtual volume ready for use.
 In the Disk Management console, the VZD practically does not differ from the standard hard drive partitions
For myself, I've only created virtual hard disks a couple of times. The first time, the reason was that important documents were stored on a work computer that many people had access to. Therefore, during working hours, I initialized the VZD, and turned it off after work. All data on the disk was saved, but no one had access to it. The second time I created VZhD was to store very personal media files. Unfortunately, the hard drive then burned down along with the virtual disk.
Video: how to create a virtual hard disk
How to create a virtual drive
It is impossible to create and permanently save a virtual drive in the system using standard Windows 10 tools. The service responsible for virtual DVD devices starts working only after the image is mounted. That is, the virtual drive immediately disappears as soon as the ISO file is extracted from it. This standard Windows features differ from special emulator programs. This implementation option was chosen in order to save RAM.
To connect a virtual drive, perform the following steps:

How to delete a virtual device in Windows 10
If the virtual drive is not in use, then I recommend deleting it. Supporting a virtual DVD consumes computer resources, although they are small, but they may be needed if you play a more or less decent game. I always check out an image right after I'm done with it.
How to remove a virtual drive
As mentioned above, the standard virtual drive in Windows is removed by extracting a disk image file. If you used third-party emulator programs, then in each of them the drive is removed in its own way.
Removing a Standard Virtual Drive
To remove the standard virtual drive, open the disk management console, and then do the following:

Disabling the virtual drive in emulator programs
In most emulators, virtual drives are created automatically the first time the program is launched, sometimes even without the user's knowledge. But removing them is easy. It is done like this (in each program in its own way):
- In the UltraIso program on the top panel, open the "Options" tab and select the "Settings" mode. Then go to the "Virtual drive" tab, set the "Number of devices" filter to "No" and save the changes with the OK button.
 We find the parameters of the virtual drive and set the filter "Number of devices" to "No"
 - In the Alcohol 120% program, open the "Service" tab, select "Settings", then go to the "Virtual Disk" item, set the number of drives to 0 and save the changes with the OK button.
 We find the parameters of the virtual drive and set the filter "Number of virtual disks" to 0
 - In the Daemon Tools application, right-click on the bottom panel with drives, select "Delete All" and confirm the action.
How to delete a virtual hard disk
If the virtual hard disk is no longer needed, then it is very easy to remove it. You can do this in two ways:
- through the disk management console;
- using the command line.
Removing through the Disk Management console
We perform the following steps:
- Open the Disk Management console. We right-click on the virtual hard disk and select the action "Delete volume". Then we agree that all data from this section will be deleted, and we are waiting for the result.
 Right-click on the virtual hard disk and select "Delete Volume"
 - Next, right-click on the virtual hard disk again, select the item "Disconnect virtual hard disk" and agree to the terms by clicking the OK button.
 We right-click on the virtual hard disk, select the item "Disconnect virtual hard disk" and agree to the terms by clicking the OK button
 - After that, delete the virtual partition file itself.
 After disconnecting the virtual hard disk, delete the partition file
Removing using the command line
The command line also allows you to delete a virtual volume, and this can be done with literally one command.
For this:

Creating a virtual device on a computer is very easy. At the same time, you get a disk or drive that is practically not inferior in its properties to a physical one, and can be used for a variety of purposes. And when it's no longer needed, it's just as easy to remove.
A virtual disk in the Windows operating system, just like a regular hard disk, can be used to store data. This data can be user files such as images, music, documents, etc., as well as files used by installed programs and the operating system itself.
Many users like to have a separate partition for storing important files, which is created in addition to the system partition. In this case, if the operating system crashes, you will need to reinstall it, formatting only the system partition. Important data stored on the secondary logical partition will remain intact.
In the absence of a separate physical disk, it is always desirable to main on several additional partitions before installing the OS. But be that as it may, these partitions will still be parts of the same HDD. If it fails, your important data will not be protected from destruction.
What to do in the event that you want to create a separate place to store any data after installing Windows and marking up the necessary partitions. You can simply create a virtual disk using free HDD space. It will be possible to format it, assign its own letter and work the same way as with a separate physical one.
It may also be useful for you to experiment with and do other virtualization testing. Let's see how you can create such a disk using the Windows 10 operating system.
VIRTUAL DISK
Press the Win + R key combination on your keyboard and in the input field write:
Diskmgmt.msc
then wait for the system management utility to launch.
Define a disk partition that allows you to allocate enough free space to create a virtual one. Click on the main menu item "Action" and select "Create a virtual hard disk".

Specify the preferred location for the file, its size and type, and then click on the “OK” button.

After the creation process is complete, right-click on the created disk and click on “Initialize”.

After that, select the "Create a simple volume" item in the context menu, assign a letter, label, file system and click the "Finish" button last.


Go to Explorer, where you will see the created virtual HDD. Now you can use it to store files or attach to a virtual machine. When you want to delete it, go to management, detach the volume and delete the folder with the file. That's all!

P.S. Browse through a list of all of our computer tips for .
Good afternoon friends, today we will talk about how to make a virtual disk. All PC users know what an optical disc is and how to use it. And what is a virtual disk, not everyone knows. An optical disc is a very handy thing. Even some 10 years ago, computer users stored the information they received on floppy disks. The capacity of such media is small - about 1.4 MB. At the moment, some people do not really have a clue what it is, because. modern computers are produced without the so-called "Flopik" - a floppy disk drive.
Now users store information on optical discs. Unfortunately, in some cases this is inconvenient or not entirely appropriate compared to a virtual disk. Optical discs scratch, break, and generally take up free space in your computer desk drawers. In addition, discs are often lost, and their search takes a lot of free time. If the disk is lost or has become unusable, this leads to the loss of your information, which is unacceptable. Most of us add a new larger hard drive to increase our information.
This is a good option, although information may be lost from there as well. You can store information on Blu-ray discs. This is also not a bad option, although they can also be lost or broken, like optical discs.
But remember for a moment, you launch your favorite game or, and it completely refuses to work without the original disc in the drive. This is due to the fact that the makers of optical or Blu-ray discs intentionally build this feature into their discs in order to increase the sales of their product.
In this case, you will have to copy the disc as accurately as possible onto a disc and insert such a disc into the drive. Although, by the way, not every such recorded disc will launch a program or game.
How to make a virtual disk through explorer
In the beginning, let's try to make VZD, working directly through the computer system. This is done quite simply. Right-click on the "Computer" label and select the "Management" item.

We will open a new window. In this window, select "Disk Management".


At the top of the main menu, click "Action" and select the item "Create a virtual hard disk."


In a new window, we indicate the location of the VZhD by clicking the "Browse" button for these purposes.

We will see that we already have a disk selected. I have it D. Your case may be different. Enter a name for this disk. For example, I will enter Virtual HDD, click on save.


At the bottom of the VZhD management window, we will see another disk that is not allocated (Disk 1). Right-click on it and click "Initialize Disk".

We will open a window in which you leave everything by default and click OK.


We will see the "Create a Simple Volume Wizard". Click next,


We will open the "Volume Size" window, where we also need to click "Next". We do not need to change the drive letter, click "Next". Let's move on to partition formatting, where we will leave everything as default. Click "Next". It remains for us to complete our action by clicking "Finish". Our virtual disk has been created!
How to make a virtual disk using DAEMON Tools Lite
You can also make a virtual disk with a virtual disk drive using third-party software. The most famous of these programs is Nero. This is a handy virtual disk creation program. But the problem is that the modern version of Nero is paid.
Therefore, we will talk about a free analogue of this program, which is called DAEMON Tools Lite. In my opinion, this program is no worse than the paid Nero will help you make a virtual disk. This program can also be paid, but we are now talking about the free version with the word Lite at the end.
We launch the program and start creating an image, insert the disk into the drive. Click "Create Disk Image". Next, we specify the drive from which we will save the image and indicate the path where we will create this image.
After that, we move on to motivating the created image. To do this, we need to select the image we have chosen, located at the bottom of the catalog window, there we select the virtual disk (the program creates automatically) into which we are going to mount it. If necessary, you can create an additional drive, click on the "Add virtual drive DT" button.
I hope you are now aware, “How to make a virtual disk? It's actually pretty easy. All the best to you!
Another anecdote:


Hello admin! My computer has one hard drive divided into two volumes. Windows 8.1 is installed on the first partition (C :), and on the second partition (D :) I want to install Windows 10, but not just like that, but on a VHD virtual disk. Please explain how to do this quickly and easily? I read on the Internet that on a simple hard disk you can place a dozen virtual disks and you can actually install an operating system on each of them!
How to install Windows 10 on a virtual drive using the program WinNTSetup
Hello friends!
First, I’ll tell you what a VHD virtual hard disk is and why our reader wants to install Windows 10 on it.
Secondly, I will introduce another hero of today's article, this is a utility WinNTSetup, which can create virtual VHDs and install operating systems on them.
Virtual Hard Disk (VHD) is a file format that has the same structure as a hard disk. In simple terms, the operating system perceives virtual diskVHD is like a regular hard drive, but the disk VHD has several advantages, the most important of which allows several operating systems to simultaneously reside on the same partition of a conventional hard disk!
For example, we have a hard disk installed in our computer, in order to install five operating systems on this hard drive, it must first be divided into five partitions, but this is not at all necessary when using virtual disks. We will simply take and create five virtual disks on any partition of the hard disk VHD and install different Windows on them. We can do all this without leaving the operating system!
I propose to move from theory to practice and create a virtual VHD disk using the utility WinNTSetup, then the same utility will install Windows 10 directly to our virtual hard disk, everything is quick and easy.
- Note: If you like to solve various computer puzzles, then WinNTSetup will come in handy more than once, I suggest that you read the descriptions of the work of the program.
- Another article for you on this topic.
Preparation for work
See Disk Management of my computer.
The hard drive is divided into three sections.
1 . Hidden partition System Reserved (Reserved by the system, 350 MB) containing the Windows 8.1 boot files.
2. Drive (C:) with Windows 8.1 installed (on the desktop is an ISO image of Windows 10).
3 . The new volume (E:) is a file dump. On it, we will create a virtual VHD disk, on which Windows 10 will be installed.
Note: Before work, be sure to create a backup copy of the boot storage (BCD), in case you decide to delete it after using Windows 10, because after uninstalling the system, the choice of operating systems ( Windows 8.1 or Windows 10) will remain on boot.

Editboot storage (BCD) and removing the unnecessary entry is very simple, but it's even easier to deploy a backup. In the details of this issue, be sure to read it.
Windows 10 ISO image
Before starting the WinNTSetup program, we find an ISO image with Windows 10 on the disk (C :) and copy all the distribution files to some folder or double-click on the ISO image by connecting it to a virtual drive (if you are working in Windows 8.1).
I have a Win 10 image right on my desktop.

Windows 10 ISO image connected to virtual drive (D:)

It's WinNTSetup's turn
Download WinNTSetup you can on my Yandex.Disk at the linkhttps://yadi.sk/d/xLGkpAOzhXCPcor on the official website
http://www.winntsetup.com/?page_id=5

Unzip and run the executable file of the program WinNTSetup_x64.exe (if you are running a 64-bit version of Windows).


In the main WinNTSetup window, point to the install.wim file located in the D:\sources folder of the Windows 10 distribution.
Click Select.

Select the file with the left mouse install.wim and click Open.

The Windows 10 bootloader is automatically selected by the program - Z: (the first partition, System Reserved, is 350 MB, hidden and has no letter).
We create a VHD file on which Windows 10 will be installed. Click the VHD button.


If we create a dynamically expandable the size of the VHD virtual disk, then after installing Windows its size will be small (several megabytes), but during operation it can grow to gigantic sizes and when data is deleted from it, the size will not decrease, this is a little inconvenient. It is worth choosing this type in case you do not plan to work in a system installed on a VHD disk for a long time, but just want to experiment.
If you create a fixed size of the VHD virtual disk and select its size of 50 GB, then a virtual disk of exactly this size of 50 GB will be created, when filled with files, its space will be filled, and when deleted, it will be freed, that is, everything is the same as in the case of a simple hard disk. I will choose this option.
I specify the size of the created VHD file and click on the View button.

In the Explorer window that appears, I specify the location of the created virtual disk on the partition (E :), also give it the name Windows 10.vhd and click Save.


The process of creating a virtual hard disk VHD on volume (E:) begins and ends successfully


Disk Management


In the WinNTSetup program, click on the Install button.


The process of installing Windows 10 on a virtual disk VHD begins

and finishes successfully, click OK.

To continue installation, restart your computer.
After the reboot, a window for selecting operating systems appears (Windows 8.1 or Windows 10).
Choosing Windows 10

and we enter the final stage of installing Windows 10, familiar to you from our previous articles about the WinNTSetup program (I will not repeat it).

I think everything worked out for you and Windows 10 booted successfully.

In Disk Management, you can see that Windows 10 takes our VHD virtual disk as a regular hard disk with one partition under the letter C: (the operating system is installed on it).
However, the virtual disk itself is on the (E:) partition.


Windows 10 virtual disk properties.vhd

device Manager

In the same way, you can create several more virtual disks on the disk (E:) and install operating systems on them. When the computer boots up, a boot menu will appear in which you can select the Windows you need to work with.
If your computer is running Windows 10 Pro or Enterprise, you may not know that this operating system has built-in support for Hyper-V virtual machines. Those. everything you need to install Windows (and not only) in a virtual machine is already on the computer. If you have a home version of Windows, you can .
An ordinary user may not know what a virtual machine is and why it can be useful, I will try to explain this. A "virtual machine" is a kind of programmatically launched separate computer, if even more simply - Windows, Linux or other OS running in a window, with its own virtual hard disk, system files and other things.
How to do it:
- In Hyper-V Manager, on the left side of the list, select the second item (your computer name).
- Right-click on it (or "Action" menu item) - Virtual Switch Manager.
- In the Virtual Switch Manager, select "Create a virtual network switch, "External" (if Internet is needed) and click the "Create" button.
- In the next window, in most cases, you don’t need to change anything (if you are not an expert), except that you can set your own network name and, if you have both a Wi-Fi adapter and a network card, select that one in the “External Network” item. and network adapters that is used to access the Internet.
- Click OK and wait while the virtual network adapter is created and configured. During this time, the Internet connection may be lost.

Done, you can proceed to create a virtual machine and install Windows into it (you can also install Linux, but according to my observations, in Hyper-V its performance leaves much to be desired, I recommend Virtual Box for these purposes).
Create a Hyper-V virtual machine
Also, as in the previous step, right-click on the name of your computer in the list on the left or click the "Action" menu item, select "Create" - "Virtual Machine".
At the first stage, you will need to specify the name of the future virtual machine (at your discretion), you can also specify your own location for the virtual machine files on the computer instead of the default one.

The next step allows you to select the generation of the virtual machine (introduced in Windows 10, this step was not in 8.1). Read the description of the two options carefully. Basically, generation 2 is a virtual machine with UEFI. If you plan to experiment a lot with booting a virtual machine from different images and installing different operating systems, I recommend leaving the 1st generation (2nd generation virtual machines do not boot from all boot images, only UEFI).

The third step is to allocate RAM for the virtual machine. Use the size that is required for the OS you are planning to install, or even more, bearing in mind that this memory will not be available in your main OS while the virtual machine is running. I usually uncheck "Use dynamic memory" (I like predictability).


The virtual hard disk is connected or created in the next step. Specify the desired location on the disk, the name of the virtual hard disk file, and also set the size, which will be sufficient for your purposes.

After clicking "Next", you can set the installation options. For example, by setting the item "Install an operating system from a bootable CD or DVD", you can specify a physical disk in the drive or an ISO image file with a distribution kit. In this case, when you first turn on the virtual machine, it will boot from this drive and you can immediately install the system. You can also do this later.

That's all: you will be shown a summary of the virtual machine, and when you click the "Finish" button, it will be created and appear in the list of virtual machines of the Hyper-V Manager.

Starting the virtual machine
In order to start the created virtual machine, you can simply double-click on it in the Hyper-V Manager list, and in the window for connecting to the virtual machine, click the "Enable" button.

If, when creating it, you specified an ISO image or a disk from which you want to boot, this will happen at the first start, and you can install an OS, for example, Windows 7, in the same way as installing on a regular computer. If you did not specify an image, then you can do this in the "Media" menu item of the connection to the virtual machine.
Usually, after installation, the boot of the virtual machine is automatically installed from the virtual hard disk. But, if this does not happen, you can adjust the boot order by right-clicking on the virtual machine in the Hyper-V Manager list, selecting the "Settings" item and then the "BIOS" settings item.

Also in the settings you can change the size of RAM, the number of virtual processors, add a new virtual hard disk and change other parameters of the virtual machine.
Finally
Of course, this instruction is only a superficial description of creating Hyper-V virtual machines in Windows 10, all the nuances cannot fit here. Additionally, you should pay attention to the possibility of creating checkpoints, connecting physical drives to the OS installed in a virtual machine, advanced settings, etc.
But, I think, as a first acquaintance for a novice user, it is quite suitable. With many things in Hyper-V, you can figure it out on your own if you wish. Fortunately, everything is in Russian, well explained, and, if necessary, searched on the Internet. And if you suddenly have questions during the experiments - ask them, I will be happy to answer.


