Guys, we put our soul into the site. Thank you for that
that you are discovering this beauty. Thanks for the inspiration and goosebumps.
Join us on Facebook And In contact with
Smartphones developed by Apple have long taken a strong position in the mobile phone market. Nevertheless, the operating system of Apple phones still has untapped capabilities that you didn’t even know about.
website shares with you some amazing tricks you can do with your iPhone.
Timer for music playback
Now, before going to bed, you can enjoy your favorite tunes without worrying about not falling asleep and leaving the music playing all night. Just set the timer for the time you need, which is located on the “Clock” tab. In the “When finished” section, instead of the specified ringtone, select “Stop” and fall asleep. Your phone will do the rest of the work for you. A real find for audiobook lovers!
Creating a Unique Vibration
Instead of the standard vibration pattern for text messages, you can easily create your own template.
- Go to your phone settings, then “Sounds” > “Ringtones” > “Vibration”. Select the section labeled “Create Vibration.”
- Start recording and tap the screen in time with the desired vibration rhythm. After this, stop recording and save your template. It will be stored in the “Vibration” subsection (ringtone menu), in the “Custom” list.
Additionally, you can create a personalized vibration for each contact in your phone book.
Cleaning the device's RAM
To make your iPhone run faster, try clearing the device's RAM. You can do this with a few simple steps:
- Press and hold your device's power button until the power off slider appears.
- Without making the usual swipe on the shutdown slider, press and hold the “Home” button.
- After a few seconds, you will see a slight flicker on the screen and then be taken back to your desktop. At this point, the RAM of the iPhone or iPad will be cleared and the device will start working faster.
Time to send the message
You can easily find out the exact time a message was sent with a few simple steps:
- Go to the Messages app.
- Now open the conversation that has the message you're interested in.
- Swipe from the right edge of the screen to the left.
- The date and time it was sent or received will appear next to each message.
Character counter for SMS
To avoid manually counting the characters used in a message, enable the standard counter function on your iPhone:
- Open the Settings app and find the Messages section.
- In the “Messages” section, opposite the “Number of characters” item, activate the slider.
Ready! As soon as you start typing your message, you'll almost immediately notice a character counter on the side that shows how many characters you've already entered.
Shooting video with the screen off
If you want to prevent others from noticing you taking photos or videos, do the following:
- On the locked screen, press the “Camera” button and raise the “curtain” that appears halfway.
- While continuing to keep the shutter half-open, switch to video mode if necessary and press the record button.
- Double click on the “Home” button three times.
- Hold the “curtain” until the screen goes completely dark and remember that recording is already in progress!
- If you want to interrupt video recording, activate your device as usual and stop recording in the menu.
Rewind audio and video
You can change the rewind speed by moving the slider. So, the yellow area is used for fast rewinding, the red area rewinds twice as slow, and the green area takes even longer.
Call an extension number
If you want to call an extension from your iPhone, dial the main number and then press star for a few seconds. A comma will appear on the screen after the main number, enter the extension number and press “Call”.
Changing the panorama shooting direction
Easily change the panorama shooting direction on iPhone by simply tapping the arrow on your phone screen.
Removing numbers in a calculator
If you notice an error in the number you typed, delete any outer digit by swiping your finger to the left or right in the input field.
Quick ambulance call
If you fill out your “medical record” on your phone in advance, anyone can provide doctors with information that is important to save your life in a critical situation. We recommend that you include at least your blood type and information about what medications you may be allergic to.
Recovering closed pages in Safari
To see your most recently opened tabs in Safari, simply tap the “+” icon at the bottom of the screen.
Offline maps
If you have previously downloaded the required map, then by writing “OK maps” in the search, you will be able to use the viewed maps offline.
Hidden "Field Test" application
Service codes are available on the iPhone, with which you can get various information about the gadget, mobile operator and cellular network. A simple call to *3001#12345#* can open a hidden menu with information about the SIM card, cellular operator network, signal strength, etc.
Increase Wi-Fi speed

On iPhones there is only one physical navigation button - the “ Home", which is located under the screen in the middle. This key allows you to minimize applications, call a virtual assistant and perform a lot of other necessary actions. Control your gadget without the " button" Home"becomes almost unrealistic - but what to do if it fails?
Fortunately, Apple developers have provided the ability to display the “ Home"on the iPhone screen. You will learn how to do this by reading this article.
Display the button " Home"The Assistive Touch function allows you to access the iPhone screen. This function is intended for people with disabilities, but it is more often used by owners of gadgets with faulty physical keys.
The Assistive Touch function is especially popular among Chinese users - in the Middle Kingdom, almost half of iPhones are controlled “from the screen”. Practical Chinese claim that this method of control is not only more convenient, but also prevents wear and tear on the physical buttons.
How to set up Assistive Touch? All you need to do is follow a few steps:
Step 1. Go to " Settings" and follow the path " Basic» — « Universal access».
Step 2. In chapter " Universal access» find the block « Interaction" It will have a subsection “ Assistive Touch- go into it.

Step 3. Switch the slider " Assistive Touch» to active position.
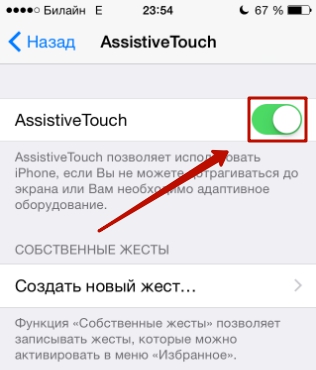
A translucent square with a white circle inside will appear on the screen - the menu launch button.

This means that the function " Assistive Touch"is activated and you can control the gadget without using physical keys.
“Assistive Touch” can be enabled on any Apple device with iOS version higher than 5.0.
How to use Assistive Touch?
First of all, you need to place the function menu launch button in a convenient place. You can move it along the screen frames by holding it with your finger. Placing the key in the center of the screen will not work.
Once you have decided on the location of the button, click on it. You will see a menu like this:

At the bottom of the menu there is a virtual button “ Home» . The functionality of the virtual button is 100% identical to the functionality of the physical one - in particular, by long pressing it you can launch Siri.
In the main menu " Assistive Touch» there are other options:
- Notification Center– allows you to call up the notification screen. The traditional way to bring up this screen is to swipe from top to bottom.
- Voice control- another way to “wake up” Siri.
- Command centre– makes it possible to display a menu for quick control of some of the functions. Pressing this key actually replaces the bottom-up swipe.
- Favorites. Through " Favorites» You can activate gestures that the user has created independently. To start creating a new gesture, go to “ Favorites" and click on any of the squares with the sign " + " inside.

Also in the main menu " Assistive Touch"there is a button" Apparatus" Clicking on it will take you to a submenu where you will find on-screen keys that allow you to perform actions such as locking/rotating the screen and changing the device volume.

Through " Assistive Touch"You can even take a photo of the iPhone screen - to do this, go to the function menu along the path " Apparatus» — « More" and click on the button " Snapshot screen" Only static images should be photographed this way, because the screen element responds with a significant delay.
On devices with iOS 9, the main menu “Assistive Touch” can be customized. In particular, users can increase the number of icons in the main menu to 8 pieces.
How to remove the Home button from the iPhone screen?
Deactivating the function " Assistive Touch" is performed in the same way as activation. You just need to follow the path on your iPhone " Settings» — « Basic» — « Universal access» — « Assistive Touch" and switch the toggle switch of the same name to the inactive position.
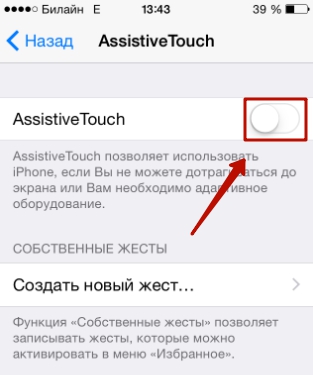
The square with a white circle inside will disappear from the screen.
How do I set up quick access to Assistive Touch?
You can adjust your iPhone so that to start " Assistive Touch“I didn’t have to go through the settings every time. Here's how it's done:
Step 1. Go to the section " Universal access» in the main settings of the gadget and scroll the screen to the very end. At the bottom you will see a subsection “ Keyboard shortcut».

Proceed into it.
Step 2. In the subsection " Keyboard shortcut"Tick the box next to " AssistiveTouch».

After this, you will be able to call the menu launch button " Assistive Touch» by triple pressing the physical key « Home” and hide it in the same way.
Conclusion
At least the virtual button " Assistive Touch" and can completely replace the physical button " Home“, this does not mean that you can delay repairing the device. If the gadget is under warranty, the user should go to the service center immediately - otherwise he risks completely saying goodbye to the hope of having the defect fixed for free.
Control Center is one of the main functions in iOS, providing quick access to important settings - toggles, media playback controls and others.
Even though Control Center comes with the most essential features a user needs, I wish Apple would add some extra functionality. For example, displaying switches directly in Control Center.
The problem is solved with the help of jailbreak, which allows you to customize iOS devices according to user desires. With jailbreak, you can even give Control Center a new look on iOS 10. How - read the link.
So, we bring to your attention a list of 9 jailbreak tweaks that will allow you to modify Control Center on your iPhone or iPad.
App Center
With the advent of iOS 10, Spotlight learned to display recently used applications, but the App Center tweak went even further - now you can add not only recently opened, but also any favorite applications to the Control Center. The tweak creates a new page in Control Center that displays your favorite and frequently launched programs.
What's even more interesting is that the tweak allows you to launch and work with applications directly from Control Center.
Horseshoe

In iOS 10, the Control Center began to consist of two parts, one of which is dedicated to controlling multimedia playback, and the other to night mode (Night Shift), switches, brightness, volume settings, etc.
The Horseshoe tweak combines two pages into one. The result is an impressive new Control Room design.
CCRecord
One of the missing features in iOS is iPhone screen recording. If you wish, you can do this using a Mac or third-party applications, however, if you jailbreak, take full advantage of the CCRecord tweak. It adds a toggle to Control Center that lets you capture iPhone screen recordings and save them to your Camera Roll.
Onizuka

Onizuka is a multifunctional tweak for iOS 10 that allows you to customize the Control Center. For example, hide those elements of the system interface that are not needed by a specific user. Among other things, the tweak adds a new page to Control Center where you can view device information and add favorite applications.
Cream 2

One of the advantages of the Apple Watch is the colored toggle switches in the Glances menu. Jailbreak tweak Cream 2 allows you to add the same switches to the iOS 10 Control Center. The toggle switches in the Control Center are colored when active, making it easy to distinguish between on and off settings.
FlipControlCenter
The control center provides access to a number of useful settings, but it would be convenient to create your own set of necessary toggle switches. FlipControlCenter is a popular tweak with which you can add any number of settings switches to Control Center, determine their position and select the ones you need.
The FlipControlCenter tweak is perhaps the most necessary tweak on our list today. We recommend you try it!
Repository for Cydia: http://rpetri.ch/repo
CCTButtonActions
Have you ever used an Android device? If yes, then you probably know: long pressing the toggle switch in the quick settings notification area opens its panel. Jailbreak tweak CCTButtonActions brings the same functionality to iOS 10's Control Center. It lets you toggle a toggle switch using 3D Touch to view preferences in Settings.
CCPlus

Have you bought a new iPhone? Take a look at its settings. There are so many categories, and so many options within those categories. It's enough to make your head hurt.
And do you think the factory settings are ideal? Right out of the box, will the iPhone truly be tuned for optimal performance and battery life? I doubt. Here are the iPhone settings you should take care of right away.
1. Decrease brightness.
Simple math: the brighter the screen, the more battery it will consume. That's why you should lower your brightness setting, and not just a little. Reduce the brightness level to 50% or even lower.This will provide a significant boost to battery life, and I suspect you'll barely notice the difference in convenience. (The change may seem off-putting at first, but trust me, it won't bother you after a few minutes.)
To adjust the brightness level on iPhone, swipe up (starting at the bottom of the screen) and then drag the brightness slider to the middle.
2. Disable email checking.
Do you need a phone to monitor your email accounts every second of every day? This is the basic definition of "push" email, which consumes a lot of battery power.I personally don't like the setting that checks for new mail at specified intervals. My approach: When I want to check for new messages, I launch the mail application and check for new mails. Everything else is from the evil one.
Try turning both of these options off. To do this, click Settings > Mail, Contacts, Calendars, then click Fetch New Data. Turn off mail checking, then scroll down to the mail download section and select Manually.

Remember: if someone needs to contact you urgently, they can call or send SMS.
3. Turn on Do Not Disturb mode.
If your iPhone is constantly sitting on your nightstand at night, you probably don't want to listen to it squeak or buzz every time there's an incoming call, message, or notification—especially when you're trying to sleep.Fortunately, there is a mode that will force your phone to remain silent - Do Not Disturb mode. To use it, swipe up from the bottom (starting at the bottom of the screen), then tap on the crescent moon icon.
It's even better if you dive deeper into the settings for more granular control over this feature. Here you can set scheduled times to turn Do Not Disturb on and off. More importantly, you can set exceptions to allow certain calls. For example, if you add important friends and family members to your Favorites group in the Phone app, you can allow calls from those people so they can bother you at any time.

Likewise, if you enable the repeat calls option, your phone will ring if your number is dialed twice within three minutes. This way, regular subscribers can still get through to you in an emergency.
4. Numerical charge indicator.
Want to know exactly how much battery power is left? By default, your iPhone only shows you a small indicator - not a super informative one.
Here's the fix: Tap Settings > Battery, then turn on Battery Percentage. That's all! You now have a numeric indicator next to the battery icon.
5. Adjust text size.
The size of your iPhone screen doesn't have to determine the size of the text you'll read. Although iOS has a default font size, you can customize it by going to Settings > Display & Brightness > Text Size. Then drag the slider a few points in any direction until the text feels more comfortable to you.
As noted on this settings page, this will only affect apps that support dynamic type (those are standard iOS apps and a small number of others). You can also improve readability by going to Settings > General > Accessibility and turning on the Bold option.
6. Setting up automatic blocking.
Tired of pressing the power button (called standby) every time you lock your phone or put it in your pocket or purse? I'm always surprised when I see people leaving their phone screens on and active, which creates a security risk and drains the battery.
Luckily, your iPhone can automatically lock (i.e. turn off the screen) after a set interval. To change it, tap Settings > General > Automatic lock and then set the option to 30 seconds.
7. Add multiple fingerprints to Touch ID.
All new iPhones have Touch ID - a fingerprint sensor that is designed to quickly and easily lock the screen. And when you first set up your phone, you probably trained Touch ID to recognize one of your fingers.There's only one problem: sometimes you have to use other fingers. Like, say, the thumb on the other hand, or the index finger when the phone is on the table.

Luckily, iOS can remember up to five fingers. All you have to do is teach him to recognize more. To do this, go to Settings > Touch ID & Passcode, then enter your numeric passcode. Now click "Add Fingerprints" and follow the on-screen instructions. Repeat this process for any additional fingers you want to add.
8. Turn off unnecessary location services.
When you agree to share your location with apps like Waze, Uber, etc., there is a tangible benefit to it. But what about apps like Facebook? GroupMe? OneDrive? I don't see any benefit to letting them collect or report my location, especially since it drains battery life noticeably.To find out which apps have this feature enabled, tap Settings > Privacy > Geolocation. Then scroll down the list. When you see an app that is set to always ask for geo-coordinates, decide whether you want the app to know your location. If not, you can change the setting to Never.
9. Customize the Today screen.
When you swipe down the screen (starting just above the top), you get immediate access to the iOS notification center, where you can read, view, and delete received notifications.You can also tap Today for quick access to information from a wide range of apps. Here's how to customize what information appears here and in what order.
Swipe down, tap Today, scroll down to the bottom, and tap Edit. The items at the top are already added to the Today screen. All details below are available for adding. Just click on the green "+" icon next to the ones you need.

To change the order in which they appear, click and drag one of the "handles" (represented by three horizontal lines) and place it in the desired location. Then click "Done". Now you will see the Today screen with all the details allowed and in the desired order. Click "Edit" again if you want to make additional changes.
If you made any changes to your iPhone settings that you considered necessary, please describe them in the comments to this article!
In this series of articles we thoroughly analyze iOS 10 settings. Settings in iOS are added, modified and even deleted with each new version of the system. The article is also relevant for, but you need to take into account that the higher the system number, the more opportunities it offers.
- Part 1. Communication settings (Wi-Fi, 3G, LTE, Bluetooth)
- Part 2. Notifications, Control Center, Do Not Disturb (current article)
- Part 3. Basic settings
- Part 4. Wallpaper, screen and brightness, privacy and more
Today in the second part of the article I will analyze the second block of settings. It includes three items: notifications, control center and do not disturb.
The article is aimed at beginners, but perhaps experienced users will learn something for themselves.
Notifications
This section is intended for setting up notifications in iOS.
Notifications– these are text and/or sound notifications to the user about the application. These notifications are sent manually by application developers, or they are triggered by certain events within the application. For example, the developer can notify you about the release of new levels in an update, or the program reminds you of a certain date in your calendar, etc.
The arrow in the screenshot shows the call to the notification center.

Notification style in settings. Here is a list of programs in which the user can customize notifications to their liking.
The screenshot below shows the options you can select for the application. Please note that some programs may not have certain options - this means that this is intended by the developer.

Allow notifications– main option. Feel free to disable it if you do not want to see notifications from the application in any form. There are applications that annoy you with annoying notifications - then I run here. Plus, when you first start it, as a rule, the program asks for permission to notify. If this permission is not given, then this item in the settings will be immediately disabled.
In Notification Center– whether to display notifications from the application in the notification center.
Sounds– disable if you do not need sound notification. I disable this option for applications that overuse sounds, because they often sound at the most inopportune moments.
Badge sticker– whether or not to display the number of notifications on the icon.

On a locked screen– whether or not to display notifications (including in the notification center) when the iPad is locked. If the option is disabled, notifications from the application will only arrive during active operations with the tablet.
Warning style in iOS 10:

You should know that the four standard applications have separate notification settings. In particular, the Photos and Messages applications have an option Show thumbnails. If it is enabled, a miniature photo is displayed in notifications (if it was in the message).

For the calendar, you can separately configure different types of events in the program (see screenshot below).

Mail notifications are configured separately for each mailbox in the system. Very comfortably.

Command centre
Control room (or control center) is a panel that can be called up by swiping up at the bottom of the screen. This panel contains useful options for quick access. Unfortunately, the control center cannot be flexibly configured to suit your needs - you must put up with the functionality that it has.
The control center in iOS 10 is divided into two panels. The second panel is called up by swiping left.
Functions of the first panel of Control Center:
- enable/disable airplane mode, Wi-Fi, Bluetooth, do not disturb mode and screen orientation lock
- screen brightness control
- launching the Clock and Photos applications
- AirDrop, AirPlay and Night Shift control (not available for all iPhone and iPad models)

The second panel is responsible for managing Music in iOS.

There are only two switches available in the Control Center settings:

On a locked screen– whether or not to allow the control point to be available on the device’s locked screen. With this option enabled, anyone without authorization will be able to turn on music, turn on airplane mode, take a photo, and more. I recommend turning off this option if you do not want unauthorized (albeit limited) access to the device.
Access in programs– whether or not to allow the control point to be accessible while applications are running. Sometimes it is important to disable this option in games where swipes are actively used (for example, Fruit Ninja) so as not to accidentally call up the panel.
Do not disturb
Do not disturb(or “Do not disturb mode”) – is designed to switch the device to silent calls, reminders and notifications.

If the mode is enabled, a crescent moon icon appears in the upper right corner of the screen.

Manually– if you turn on this switch, the device goes into “Do Not Disturb” mode and to disable it, you must manually turn off this function. An alternative to this button is the switch in the control center.

Planned– here you can specify the time interval during which the “Do Not Disturb” function will be turned on automatically. Time can be specified up to minutes.
Call Allowance– here you can select from whom audio calls and messages are allowed. In the standard Contacts application, you can create a separate group that can disturb you even in Do Not Disturb mode.

Repeated calls– if enabled, repeated calls from the same subscriber within three minutes will be heard with sound. As a rule, normal people call back many times in a row if they believe that their call is very important. That is, you won’t miss the most important calls with this function.
Silence– here the user chooses whether he needs silence during Do Not Disturb mode always or only when the iPad is locked.
There are no pitfalls in using the mode; all its capabilities and functions are obvious.
See you in the next issues.


