What's a holiday without a children's birthday cake? A children's birthday party scenario cannot be complete without everyone's favorite delicacy. Children's birthday cakes must be bright and very appetizing, because children perceive everything with their eyes. We have selected several delicious and affordable children's birthday cake recipes especially for you and your birthday boy or girl.
Recipes for making children's birthday cakes
Child's birthday cake "Fruit delight without baking"
Ingredients:
Cookies - 300 Grams
Butter - 100 grams
Yogurt - 500 Gram
Gelatin - 2 tbsp. spoons
Sugar - 100-150 Grams
Strawberries - 400-500 Grams
Preparation:

1. This no-bake fruit cake recipe starts with the crust. To do this, you need to turn the cookies into fine crumbs. The structure of the cake is so delicate that it is better to do this using a blender to avoid any cookie pieces.

2. The next step is to melt the butter. In a deep bowl, combine butter and cookie crumbs. Mix thoroughly so that no lumps form.

3. Place crumbs on the bottom of the mold and press well. The cake should be smooth and dense. For convenience, the sides of the mold can be lined with paper, which can then be easily removed.

4. In this case, strawberries are used, but it can be absolutely any fruit or berry. Wash the strawberries and remove the stems. Cut several berries in half and place them against the sides of the pan.

5. Now is the time to do the so-called cream. Soak gelatin in a small amount of hot water. Mix well and wait until it completely dissolves. In a separate container, mix yogurt (it is better to use natural thick yogurt without additives) and sugar. Leave some of the strawberries to decorate the cake, and puree the rest. Add strawberries and slightly cooled gelatin to the yogurt and mix thoroughly. Pour the prepared mixture into the mold.

6. Fruit cake without baking at home is almost ready. All that remains is to decorate it on top and put it in the refrigerator to harden. It should spend at least 5-6 hours in the refrigerator, but it is better to leave it overnight.
Children's birthday cake "Rainbow"

Ingredients:
Flour - 1 Cup
Sugar - 1 Glass
Eggs - 5 pieces
Baking powder - 1 teaspoon
Confectionery powder - 1/2 cup (small peas)
M&Ms - To taste (rainbow colors (or less))
Ready curd cream - 2 cups
Preparation:

1. First prepare the sponge cake. Separate the whites and yolks. Separately, beat with sugar into a thick foam (divide the sugar in half). Then stir in one bowl with a spoon. Add sifted flour and baking powder. Stir with a spoon. To add brown color, add 2 tbsp. spoons of cocoa (you don't have to add it). Bake in a greased pan in an oven preheated to 1801 degrees for 35 minutes. Check doneness with a toothpick. Then cool.

2. Cut the cooled sponge cake in half.

3. You can buy ready-made cream cheese. But just whipped cream cheese will do.

4. Grease the side of our sponge cake with cream.

5. Dip it in confectionery powder.

6. Grease one side of the biscuit with cream (two sides are possible).

7. Place candies or jellies on the bottom in the colors of the rainbow. Remember? Red, orange, yellow, green, blue, indigo, violet. Rainbow cake is ready! Bon appetit!
Birthday cake for a girl "Hello Kitty"

Ingredients:
- Eggs - 8 pieces
- Sugar - 2 Cups
- Flour - 2 Cups
- Baking powder - 2 teaspoons
- Butter - 1/2 Cup
- Powdered sugar - 2 cups
- Salt - 1 pinch
- Vanillin - 1/2 teaspoon
- Heavy cream - 3-4 tbsp. spoons
- Chocolate - 50 Gram
- Confectionery dyes - To taste (colors - pink, yellow)
Preparation:

1. First, prepare the dough base. We need to bake two biscuits. Separate the yolks from the whites, divide the sazar in half and add to the yolks and whites. Beat separately with a mixer. Then mix both mixtures with a spoon in a large bowl. Sift the flour, mix with baking powder. While stirring the egg mixture with a spoon, gradually add flour. Grease two molds with butter, sprinkle with breadcrumbs and pour in the dough. Bake the biscuits in an oven preheated to 180 degrees for 30 minutes. Check readiness with a match. Remove and cool. Cut out the head of Hello Kitty from one biscuit.

2. To make it easier to cut out and decorate the cake, print out a large format Hello Kitty head (the size of your biscuit), place the picture on the biscuit and cut it with a sharp knife. You can use ready-made cream for the cake, or you can prepare it. To do this, beat the butter with a mixer, add powder, continuing to beat. Then add salt, vanillin, cream and beat well. If necessary, add cream. Color the third part of the cream pink with confectionery coloring.

3. After covering the base with a thin layer of cream, decorate the edges of the cat’s head. To do this, use a pastry syringe and an “open star” (or “closed star”) nozzle.

4. Cut out a bow from paper, place it on the side, and also decorate the remaining surface of the head with cream “stars” from a syringe.

5. We use the third part of the pink cream for the bow and the second biscuit on which the head lies.

6. By the way, the color of the bow can be made more intense. Melt the chocolate and use it to make figures - a bow, eyes and mustaches. Draw the outlines of a bow on parchment paper and pour chocolate onto the outlines in a thin stream. Make another small circle and mustache (6 pieces). The chocolate should harden. Instead of chocolate, you can use a special confectionery glaze; it is easier to work with.

7. Arrange all the parts, paint the spout yellow, cool and serve. Hello Kitty cake is ready! Bon appetit!
I don’t know about you, but in February we start having birthdays one after another. And although everyone is a little tired from the previous holidays, I still want to cook something delicious. And a cake is not just food, but also a gift, especially if you make it yourself at home.
Therefore, today we will look at several delicious cakes, known to everyone by name, but not everyone baked them themselves. And even if you don’t have any birthdays in the coming days or weeks, this will still be useful to you.
Recipes for holiday cakes with photos, step by step, at home
When you're getting ready to bake a cake, the most important thing is to take your time and do it with passion. If you are not in the mood, it is better not to take the cake. Good luck!
1. Zebra Cake
Everyone knows this miracle from early childhood. His recipes have been passed down for generations. The taste is simply amazing. Consider the classic recipe for this cake.
Ingredients:
- flour 2 tbsp.
- eggs 4 pcs.
- sugar 1.5 tbsp.
- sour cream 200 gr.
- butter 180 gr.
- soda 0.5 tsp.
- vinegar essence
- cocoa 3 tbsp.
- vanillin on the tip of a knife
Preparation:

1. Combine fresh eggs with sugar in a cup and beat with a mixer.

2. Melt the butter over a fire or steam bath and cool it slightly. Pour the oil into the eggs in a thin stream, stirring them constantly.
It is advisable to use butter with at least 80% fat content. Not only quality, but taste and aroma depend on this.

3. Add sour cream to the total mass. It is better to take it with more than 20% fat content. Mix everything thoroughly.

4. Gradually add flour, sifting it. It is imperative to control the consistency of the dough. It should not be very thick, but not liquid either. Mix everything well again.

5. Combine soda with a few drops of vinegar (sour cream), thereby extinguishing it. Add to the dough and mix everything.

6. Divide the finished dough in half. Add cocoa to one half, flour to the other. They should have the same consistency.

7. The dough should resemble thick sour cream.

8. Having completed kneading the dough, you can move on to the creative part of preparing the cake.
9. Initially, you need to grease the mold well with vegetable oil, or use parchment.
10. Place 2 tablespoons of light dough in the center, then 2 tablespoons of chocolate dough. And so alternate until the required amount of dough in the pan.
To make the drawing beautiful, you need to try to pour the dough into the same point.

11. A lot of patience is needed here. You will immediately notice when a pattern begins to form. You should get multi-colored circles. Continue adding until the dough is finished.

12. To create a more original design, I advise you to use a toothpick or skewer. Here you can show all your imagination. Or do as I did - draw lines with a toothpick from the center to the edge of the mold. If you draw the lines the other way around, from the edge to the center, you will get a completely different drawing.

13. Place the cake in a preheated oven at 160 degrees and bake for 40 minutes. Since the dough is made with sour cream, the baking process may take a little longer than usual due to the low temperature.
By lowering the temperature and increasing the baking time, the cake turns out more even. The middle practically does not rise and remains at the same level with the main mass. It turns out an even cake.
14. While baking the cake, do not open the oven door so that it turns out smooth and fluffy. Otherwise, it may settle abruptly.
15. When the cake is browned, take it out and check for doneness with a toothpick. If it is crumbly and wet, put it back in the oven for another 5 minutes on the previous setting. If it is dry and clean, it is completely ready.
If your cake turns brown quickly, but is still damp, you can cover it with foil. Then it will bake well and not burn.

16. Remove the finished cake from the mold and can be served as a cupcake or made into a cake base. If this is a cake, then the cake needs to be cut into several flat cakes and soaked in cream to your liking. Place on the table with aromatic tea.
17. Consider a recipe for making universal sour cream, which is suitable for soaking any cake.
Ingredients:
- Sour cream 500 ml.
- Sugar 200 gr.

1. Mix fresh sour cream and sugar. Refrigerate for 10-15 minutes. After this, mix again and beat well with a mixer.

2. Beat sour cream and sugar at maximum speed until a creamy consistency is formed. The cream will be thick and fluffy.
3. Grease the cake layers with the prepared cream. Decorate as desired with whatever you like best. You can invite all household members to the table.
Bon appetit everyone!
2. Cake “Honey cake”
Honey cake is a delicate and pleasant-tasting cake, where many thin cakes are soaked and greased with cream. With a slight taste and aroma of honey.

I bring to your attention a recipe for a classic honey cake, which presents a step-by-step preparation recipe with photographs.
Ingredients for the crusts
- eggs 4 pcs.
- sugar 1 tbsp.
- honey 4 tbsp. l.
- butter 100 gr.
- flour 3 tbsp.
- salt a pinch
- vanillin - on the tip of a knife
- soda 1 tbsp. l.
Cream ingredients
- butter 250 gr
- condensed milk 1 can (380 gr.)
Honey cake can be prepared in two different ways: using a water bath or in a saucepan over heat. Here is a method using a water bath.
 1. The meaning of such a bath is that a smaller one is placed in a larger vessel. But it should seem to cover a large saucepan with a lid.

2. The small saucepan should not be placed in boiling water. It should be above it and heated with steam.
3. Before adding honey to the total mass, you must taste it. After all, whatever its taste is, that’s how the whole dessert will turn out.

4. Heat the ingredients together in a small saucepan. in this way they seem to melt. To prevent the mixture from sticking to the bottom, it must be constantly stirred. The fire should be as strong as possible.

5. Beat the eggs so that the white is well combined with the yolk, since when adding eggs to a hot mixture, the white may curdle. There should be a light foam.
6. It is better to beat eggs with a mixer at high speed. They should be poured in in a very thin stream and at the same time actively stir the hot mixture so that the white and yolk do not cook when adding them to boiling water.

7. Without removing the dough from the heat, add soda and mix thoroughly again.
There is no need to extinguish the soda here, since it will be completely extinguished by honey. Its taste will not be felt in the finished delicacy.
8. The resulting mixture must be warmed well. In this case, a light foam and airiness should form. Only then can it be removed from the fire.
9. In a separate deep bowl, sift the flour (you can do it several times) and add vanillin. Mix everything.
The more often and more you sift the flour, the fluffier the cakes will be. Since flour is saturated with oxygen during sifting, which is not so unimportant!

10. Add sifted flour in parts to the kneaded dough. At the same time, do not forget to stir.

11. The batter is very sticky. Therefore, by gradually adding flour, it becomes less sticky and more dense.
Be careful! If you add a lot of flour, the cakes will turn out very dry and hard.

12. When the dough becomes very difficult to stir with a spoon, you need to transfer it to the table, adding a little flour. Ideally, the dough should not stick to your hands. At the same time, it spreads noticeably.

13. Wrap the dough in cling film or cover with a lid and refrigerate for 1 hour. Once it cools down, it will completely stop sticking and it will be easier to form the cakes.

13. After the time has passed, remove the dough and divide the “sausage” into 8 equal parts.
14. Form each part into a ball and place in a cup, covering with a towel or film. Place in the refrigerator. Leave only one of them on the table. Continue further work with him.

15. Roll out the first cake layer. It is better to put parchment paper under it. The dough does not stick and it is easier to transfer it to a baking sheet. Or you can constantly sprinkle a small amount of flour under the cake.

16. Immediately cut out the desired shape. You can use the lid here. Place it on top of the cake and, using a knife, trim off the excess that will be needed to decorate the cake.

17. In a preheated oven to 160-180 degrees, bake the future cake. The main thing is not to dry it out. Otherwise, it will turn out fragile and will not be saturated with cream.

18. Bake each cake until a reddish color appears, about 5 minutes. Depends on oven temperature.
19. Do the same with the remaining balls.

20. Bake and scraps. Then chop them using a rolling pin. They look very interesting as decoration on a cake. If you need smaller chips, it is better to use a blender.
21. Place the cakes in a stack on a separate tray and leave until required.
Butter cream with condensed milk
It is important that condensed milk and butter are at the same temperature.

1. In a bowl, beat the butter until light and fluffy. It should be soft and warm.
2. Without stopping whipping the cream, gradually add condensed milk. The main thing in such a cream is not to overpower it.

3. If your cream has grains, then it needs to be heated and then whipped again. Our butter cream is ready!
Cake assembly:

1. Place the first cake layer on a beautiful dish and brush it with cream. The cream should be in moderation, and not so much that it runs. You can divide the total amount of cream by the number of cakes.

2. Grease all the cakes in this way. Be sure to lubricate the top and sides. Sprinkle crumbs, broken or crushed, over the top and sides of the cake.

3. Leave the finished cake to stand in a warm place for an hour or two. During this time it will be well soaked. And then put it in the cold for 2-3 hours, then a pleasant honey aroma and taste will appear.
Your family will be delighted, bon appetit!
3. Low-calorie yoghurt cake with kiwi and banana

And this wonderful cake will delight you not only with its lightness, but also with its appearance. And pieces of fruit will give you some pleasant aroma and taste. In addition, it is very easy to prepare.
Ingredients:
- Kiwi – 6 pcs.
- Banana – 2 pcs.
- Sugar – 70 g
- Water - ½ tbsp
- Natural yogurt – 500 ml
- Butter – 70 g
- Edible gelatin – 4 tsp.
- Shortbread cookies – 200 g
- Lemon juice – 1 tbsp.

1. Grind regular cookies into crumbs as finely as possible.

2. Add soft butter and stir everything into a homogeneous mass.

3. Place cookies in the form of a cake in a springform baking dish and place in the refrigerator for 30 minutes.

4. Pour gelatin with warm boiled water and leave to swell for 30 minutes.

5. Peel the kiwi and cut into cubes.

6. Combine kiwi with lemon juice and sugar.

7. Warm everything over medium heat for about 2-3 minutes so that the kiwi releases its juice. Then cool the resulting mass.

8. Then add gelatin, yogurt to the kiwi and mix everything well.

9. Cut bananas into rings.

10. Place the sliced bananas on top of the crust.

10. Pour the yogurt mixture over everything and leave in the freezer for 6 hours or in the refrigerator overnight.
The cake is ready. Enjoy your tea!
4. Video - recipe for a delicate fruit cake without baking
Birthday is a favorite holiday for adults and children. This is one of the most anticipated events for everyone, because it is on the birthday that the birthday person receives the greatest attention, relatives and friends present gifts and arrange a magnificent banquet.
In this article, the News Portal “site” brings to your attention several simple, but very effective ways to decorate a birthday cake with your own hands at home. Having mastered simple techniques for decorating homemade desserts, you will definitely be able to surprise and delight your family, loved ones and friends.
How to decorate a birthday cake with fondant
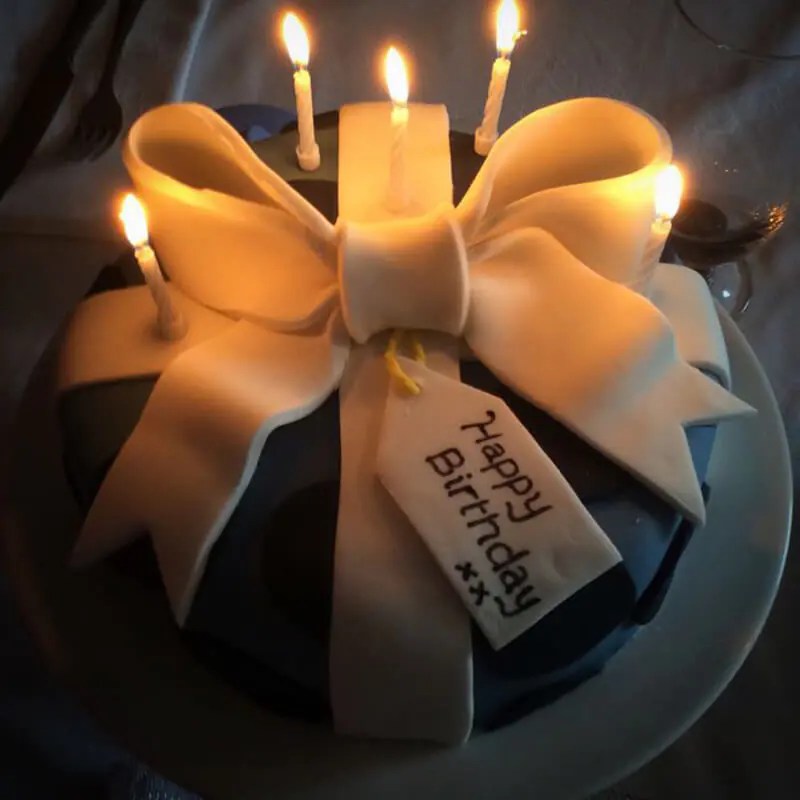
Today it has become very popular to use sugar mastic to decorate cakes. Mastic has earned such incredible popularity due to the fact that its use opens up wide possibilities in decoration. Sugar mastic can come in a wide variety of colors (food coloring is used), can take the desired shape, and besides, it tastes good.
We invite you to decorate your birthday cake with sugar mastic as a sweet gift. Prepare sugar mastic, you can use the recipes given in this article -

Roll out a thin piece of mastic and wrap it around your homemade cake. Now make an edible bow from mastic of a different (contrasting) color.
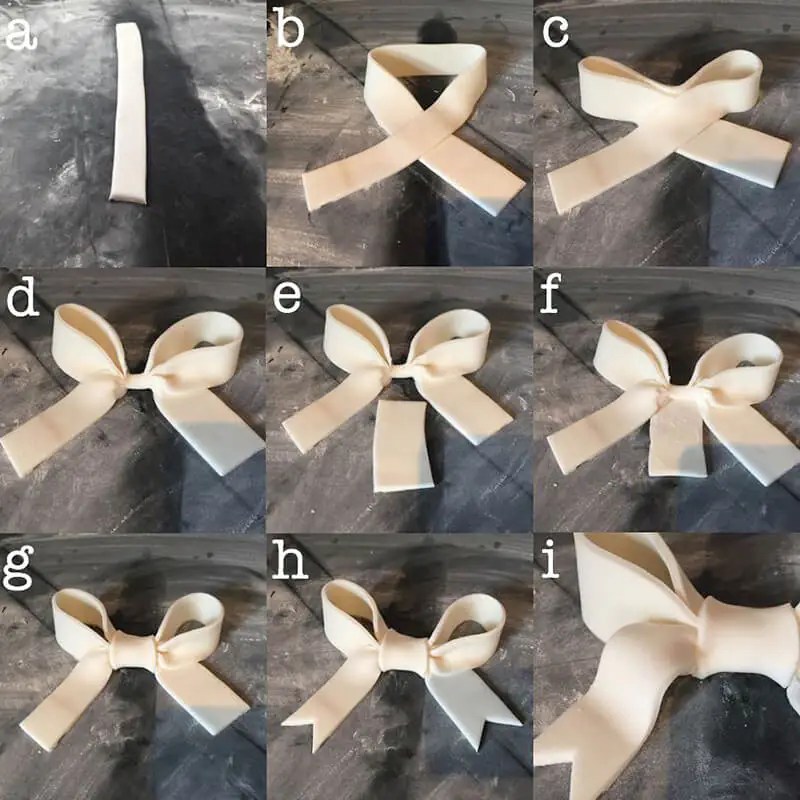
Wrap the cake with a sweet ribbon and decorate with a ready-made sugar bow.
Cake decorated with sweets
A simple and, most importantly, quick way to make a homemade birthday cake beautiful is to use the most ordinary candies as decorative elements.
Sweets can be of a wide variety: lollipops, chocolates, caramels, toffees and colorful gelatins.
You can place sweets on the top of the cake and write congratulatory phrases with them.
If you decide to use lollipops, then simply stick the lollipops, freed from their wrappers, into the cake (be sure to thoroughly wash the sticks on which the lollipops are held with soap first).
Multi-colored caramel, crushed into pieces on the top of the cake, looks unusual.
Or broken chocolates with fillings inside.
To decorate a homemade cake, you can also use store-bought cakes, cookies, cupcakes, etc.
Cake decorated with fruits

If you want your homemade birthday cake to look light and appetizing, use fresh fruits and berries to decorate the cake.
You can also try using canned fruits such as pineapples, peaches, apricots, cherries, etc.
Cut the fruit into neat slices and arrange them on top of the cake. Add a few whipped cream roses and grated chocolate to add a touch of sophistication.
DIY birthday surprise cake
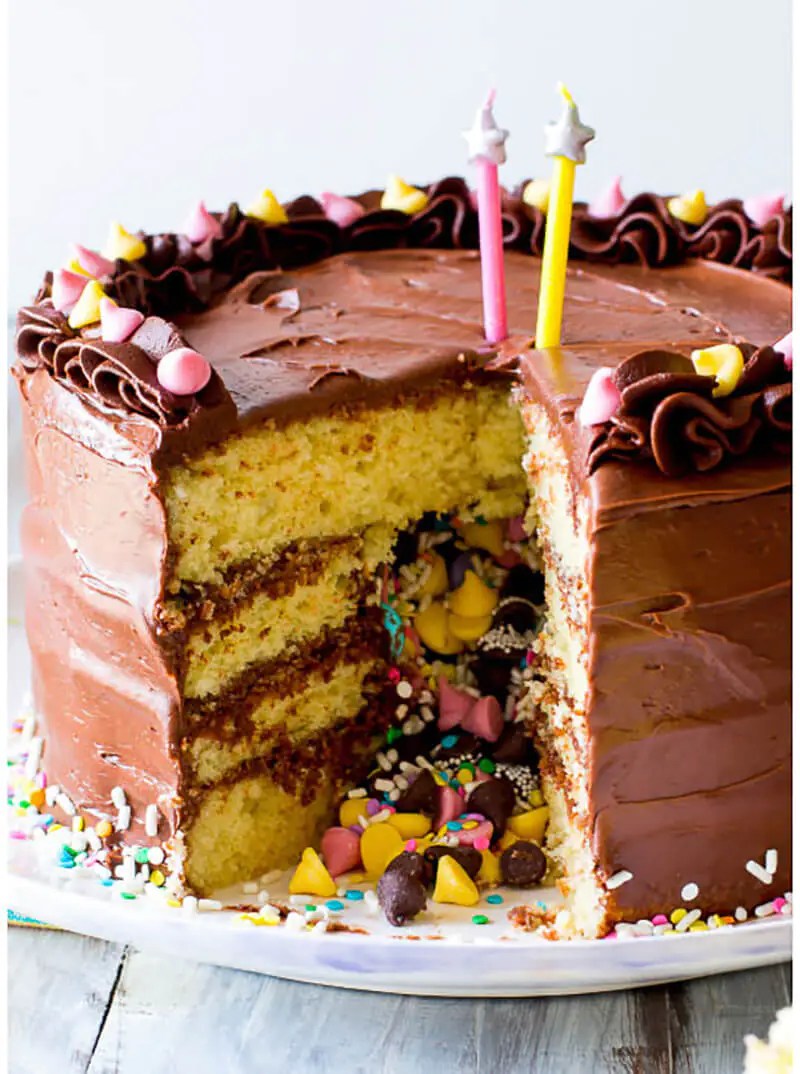
In order to surprise the birthday boy and his guests, sometimes it is enough to do just a little - prepare an unusual surprise cake.
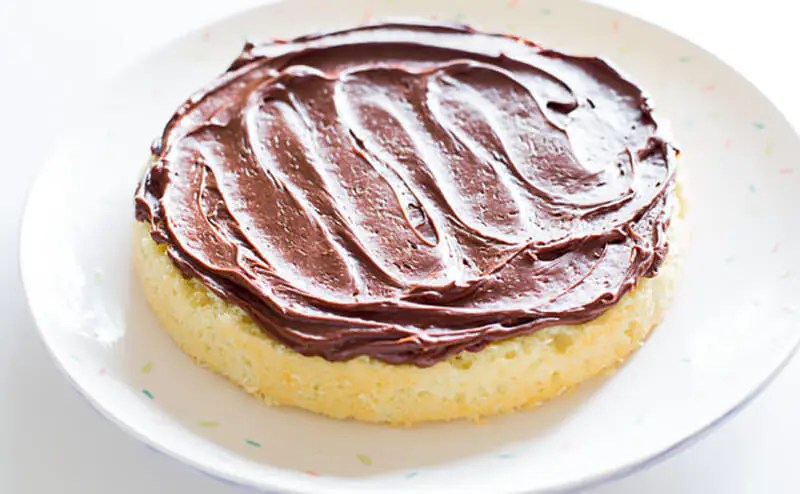
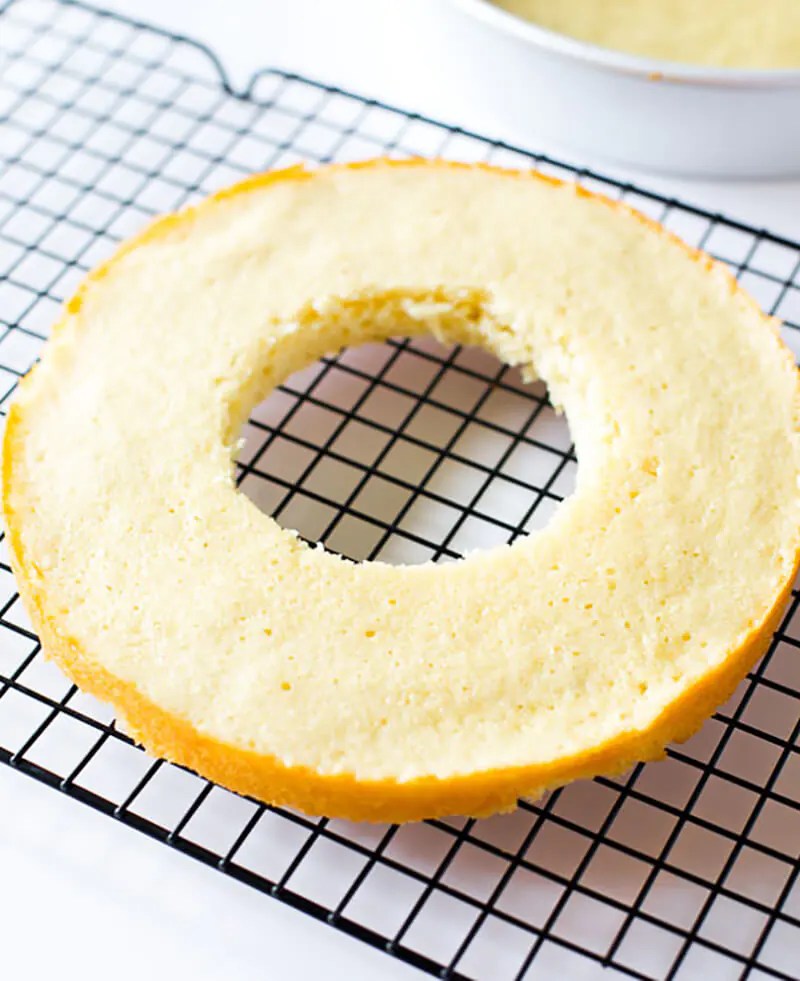
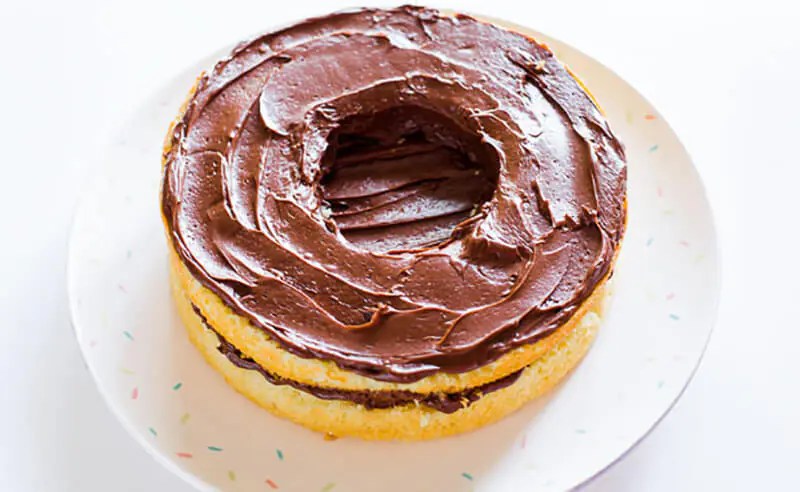
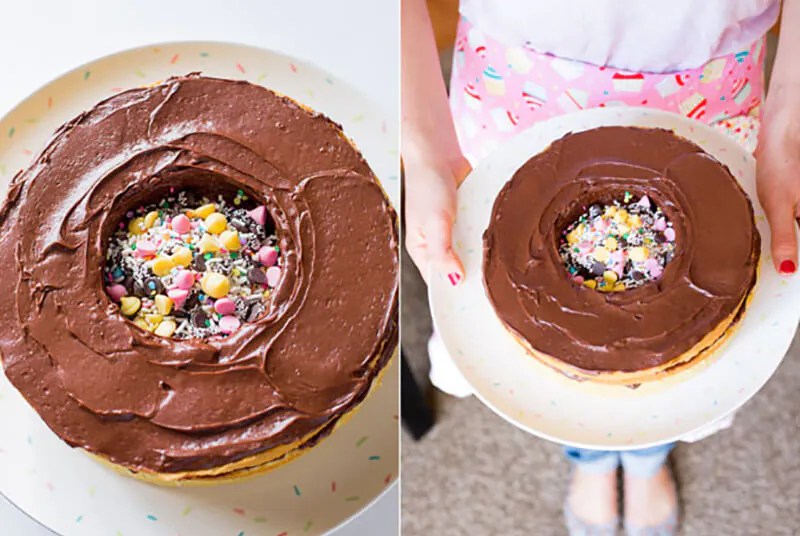

Make homemade cake layers, then cut a neat slit in the inner layers. Coat the cakes with cream, and fill the resulting cavity with multi-colored candies, cookies, dried fruits and even fortune notes.
Learn how to make your own birthday cake!
Fortunately for mothers, a child’s birthday comes once a year, but you need to prepare properly for this event! Think through everything down to the smallest detail. Beginning with . And especially the main detail of the holiday, without which there simply is no birthday. This is cake! It must be there.
Of course it must be tasty. But for a child it is important that the cake is BIG! When talking about the holiday the next day, the child will certainly talk about the cake. But if the cake was simply delicious ─ of course, good. But not impressive. And if the cake wasoooooooooooooocool!

How to make a cake like this with your own hands? Every mother decides for herself. Depending on your capabilities and skills.
We'll give you some tips on how to make a baby cake with your own hands.
Option one. It is suitable if you have a large dish or a large tray. Then you increase the width of the cake. Here the round option is not suitable, we settle on a square or rectangular one, depending on the available shapes.
If you have a sponge cake, then double the number of cakes baked (three times, and so on, depending on the size of what the cake will lie on and the number of guests).
We lay out the cakes very tightly to each other, spread them and decorate.
One moment: it is necessary to take into account the design feature when cutting and direct the knife in the child’s hand to the right place.
Second option simpler, but also very interesting: we enlarge the cake in an upward direction. The technology is the same. Instead of two or three cakes, we bake five or six. In this case, you can use a round shape, it is even preferable.
DIY children's cakes popular recipes:
A child's birthday cake must have fruits, nuts, and chocolate. Cakes can be baked or made without baking.
Let's start with a homemade sponge cake for a child!

There is no sugar in this cake.
Sponge cake with fruits
We calculate the products for two biscuits. If you bake a larger cake, the amount of ingredients will increase.
We will need:
200 grams of flour
100 grams of starch
2 grams citric acid
2 grams vanillin
If you wish, you can add raisins, pieces of dried apricots, and prunes directly to the biscuits.
We tie on an apron and start preparing biscuits.
First, break the eggs into a bowl and begin to beat them, slowly adding sugar and citric acid. Take a larger bowl. The mass should double. And keep in mind, it will not be very thick, as happens if you beat only egg whites.
- Now you need to mix the starch with flour and slowly, stirring constantly, pour it into the beaten eggs.
- Here you can add dried fruits (don’t forget to finely chop the dried apricots and prunes before doing this), mix everything thoroughly again.
- Preheat the oven to approximately 200 degrees.
- Grease the mold with vegetable oil and carefully pour out about half of the resulting mass.
- Place in the oven and increase the temperature to 250 degrees.
- Bake for about 30 minutes, making sure that the cake is baked evenly; to do this, swap the baking sheet with the mold. You can check readiness with a wooden spatula.
- Carefully remove the cake from the mold and begin baking the second one in the same way.
Please note that the cakes rise during baking, almost doubling in size.
We soak the first biscuit while it is hot. For impregnation, you can dilute any jam in a small amount of water. Don't be afraid if you have some jam berries left on the sponge cake. You need to thoroughly soak the second sponge cake after removing it from the oven.
Since we are preparing without using sugar, and it is a children’s birthday, you can grease the first bottom cake with condensed milk after it has cooled. And then we connect both cake layers.
Let's start preparing the cream.
For this we need thick yogurt. You can take any one.
- Mix yogurt with a teaspoon of gelatin, add 3-4 tablespoons of syrup or jam.
- Spread the cake with cream and put it in the refrigerator.
It is better to prepare the cake itself on the eve of the holiday and leave it in the refrigerator to soak. And here It’s best to decorate with fruit in the morning. This will keep the fruit fresh. You can take any fruit and arrange them as you wish. But on a birthday cake it is better to place them around the edges, in a circle, leaving room for candles without fruit. Use orange slices, kiwi pieces, juicy pears, bananas. And don't forget about! A beautiful cake, should stand on a beautiful table!
You can make a cake without flour. For example, using plain oatmeal. By the way, there is no sugar either.

Oatmeal fruit cake! Another version of a homemade birthday cake for a child.
We will need:
Walnuts 100 gr
Raisins 200 gr
Prunes 100 gr
Dried apricots 100 gr
Oat flakes 500 gr
Sour cream 400 gr
Baking powder 1 teaspoon
Orange 1 piece
Banana 1 piece
- Let's start by chopping nuts, dried fruits and oatmeal.
- Add sour cream and baking powder and mix thoroughly.
- Then beat the eggs and add to the mixture. Let's mix.
- Let's divide the mass into two parts.
- In the first place we put orange slices, cut into four parts crosswise.
- Pour the mixture into a mold greased with vegetable oil.
- Then add bananas, whipped into a homogeneous mass, into the remaining mixture and pour on top of the first portion.
- Place everything in a preheated oven and bake for 30-35 minutes at 200 degrees.
The cake can be made without baking.
Coconut cake
We will need
pulp of two coconuts,
2 cups dates,
6 tablespoons cocoa.
Let's start cooking.
- First we clean the coconut.
- Pour one and a half glasses of water into a bowl, add the contents of the coconut and beat until smooth.
- Place the mixture in cheesecloth and squeeze.
- Place the resulting thick mass from gauze into a bowl.
- Now beat the bananas into a homogeneous mass and combine with coconut.
- Add cocoa and chopped dates. Mix well. Put it in the form.
Preparing the cream:
Banana 1 piece
Dates half a glass
Cocoa 2 tbsp. spoons
Beat all the listed ingredients into a homogeneous mass and place on top. If desired, decorate with fresh or canned berries.
We put it in the refrigerator.
Usually a no-bake cake is made using cookies, but you can use waffles and gingerbread as a base. Let's try the last option.
Gingerbread cake.
We will need:
Fresh gingerbread, preferably chocolate 500 g
Curd mass or homogeneous cottage cheese 500 g
Sour cream 200 gr
Sugar 1 cup
Any dried fruits 150-200 g
So let's get started!
- We cut all the gingerbreads in half or even into three parts.
- Beat cottage cheese with sugar and sour cream. This will be cream.
- Soak the dried fruits in boiling water, and when the water has cooled, cut them into smaller pieces.
- Cover the mold with cling film.
- Now generously grease each piece of gingerbread with cream and carefully place it in the mold.
- Having laid a layer, sprinkle with dried fruits, lay out the next one, sprinkle, and so on until the end.
- Place the cake in the refrigerator for two hours.
- Take it out, turn the container over, and place the cake on a plate.
- remove the film
- grease the top of the cake with the remaining cream and decorate with fruit as desired
The cake is ready! Again, remember: the cake can be made the day before, but it is better to lay out the fruit for decoration on the day of the holiday!
For many people, a holiday is primarily about pie. And indeed, what could be better than a homemade classic pie, which can be decorated with the name of the birthday boy on top, laying it out from thinly rolled strips of dough! Just like in the good old days, this is exactly what our grandmothers did on our mothers’ birthdays.
So, let's bake sour cream pie with apples
- Take a stick of butter it must be taken out of the refrigerator in advance because it should be soft.
- Grind butter with sugar. Determine the amount of sugar yourself. If you like sweet dough, then put half a glass, and if just for taste, then two to three tablespoons will be enough.
- Now add sour cream (half a glass) and soda to the resulting mass (half a teaspoon and no need to quench! We put it in sour cream),
- then add 2 cups of flour and knead the dough. It should turn out very soft.
- Grease the mold with vegetable oil and place the dough in it, filling the entire mold evenly.
- Let's make edges from the dough around the edges.
Apples should be cut into slices and carefully placed on top of the dough. Each slice should “peek out” from the next one.
Now we prepare the filling.
- Grind an egg with half a glass of sugar,
- add half a glass of sour cream and two tablespoons of flour. You can take a tablespoon of starch instead of flour, both flour and starch are needed so that the filling does not float away.
Let's preheat the oven and place the pie. We will bake for 40 minutes at 170-200 degrees.
Now let's write down the ingredients:
Flour 2 cups
Sour cream 1 cup
Sugar 1 cup
Oil 1 pack
Apples 4-6 pieces
Starch 1 tbsp. spoon
You can also add cinnamon, 2 teaspoons, if you like
Making a children's cake with your own hands is easy! May your holiday be merry!


