You have made dough for buns, pies and pretzels, but you don’t know how to cut the dough so that the baked goods turn out beautiful - see step-by-step photos.
Beautiful buns
Cutting "Orchid": roll out, cut out a square, fold into a triangle, make cuts along the sides, leave a section of dough without a cut, unfold the square, connect the cut strips in the center.
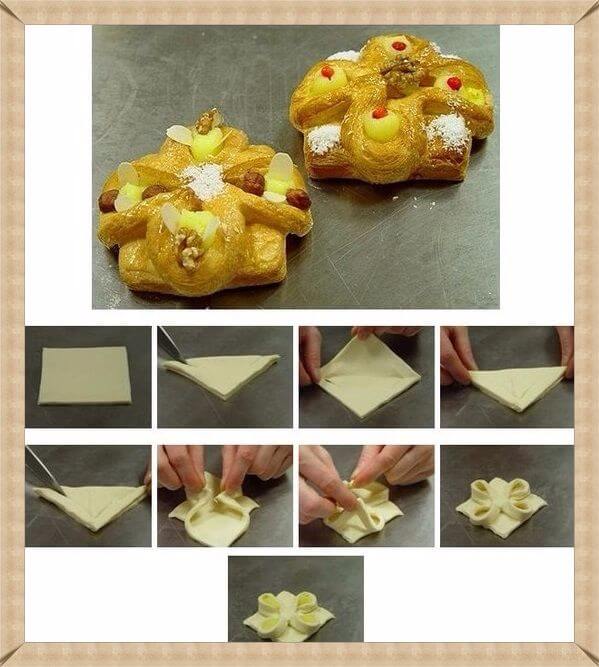
Cutting "Peony": roll out, cut out a square, fold into a triangle, make cuts along the sides, leave a section of dough without a cut, unfold the square, fold the triangle with other corners, make cuts. Unfold the square and connect the cut strips in the center. Place the filling into the flower petals.

Cutting "Curls": roll out the layer, season with filling, roll into rolls on both sides, cut across.

Baking cutter “Rose”: roll a bun, roll out a circle, make 4 cuts at equal intervals, put the filling in the middle, roll the rose petals one by one.

Butter “Bows”: roll into koloboks, roll out circles, fold the circle in half, make 4 external and 3 internal cuts.

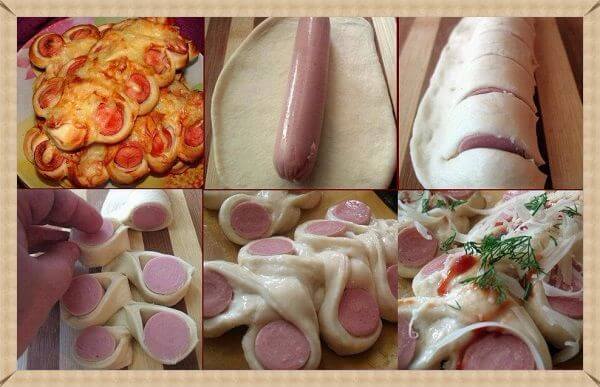
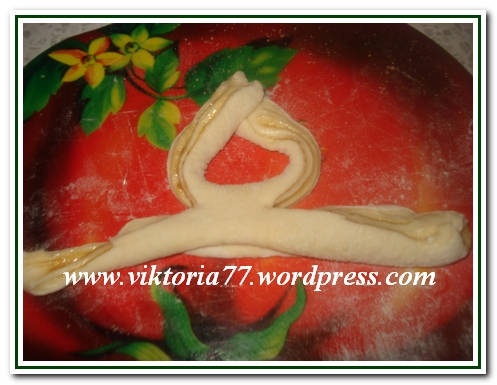
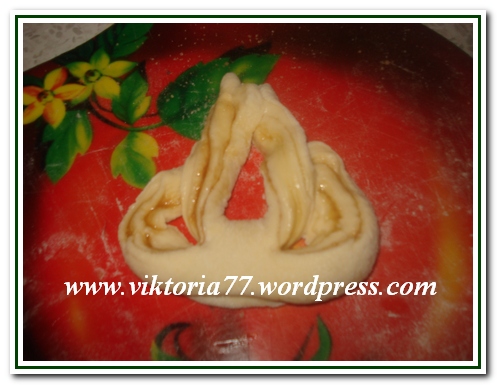
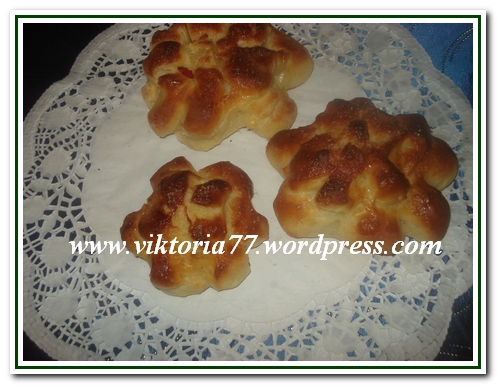
A simple flower made from rich yeast dough: roll the sausages, connect them into rings, put the filling on the two walls inside the ring, connect them in the center, as shown in the photo.

Beautiful puff pastry Kalach: roll a bun out of it, roll out a circle, grease with filling, roll into a roll, cut the roll lengthwise, twist two puff ribbons together, connect the ends to make a roll.

How to make “Piglets” from rich yeast dough. Roll out the circle, make a small cut on top, bend the corners - ears. We sculpt the piglet's piglet at the bottom, bending the edge and flattening it a little. The piglets' eyes are made of raisins.
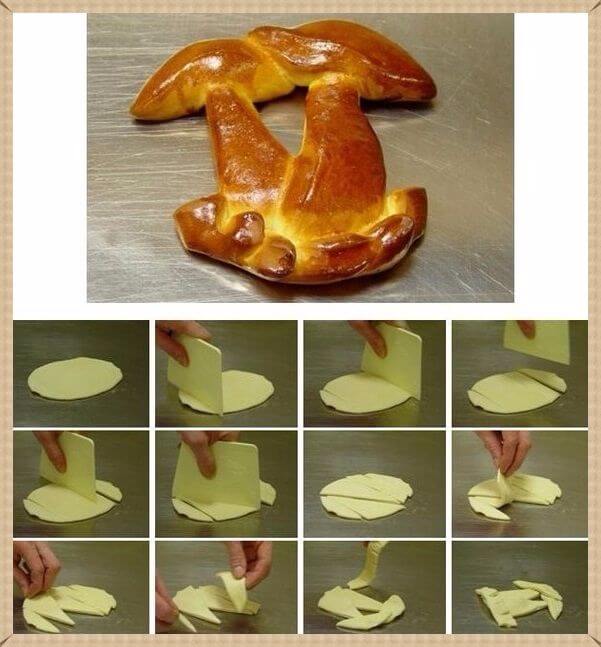
Butter "Mushrooms": A circle is rolled out, which is then cut into pieces (see photo) and laid out in the shape of mushrooms.
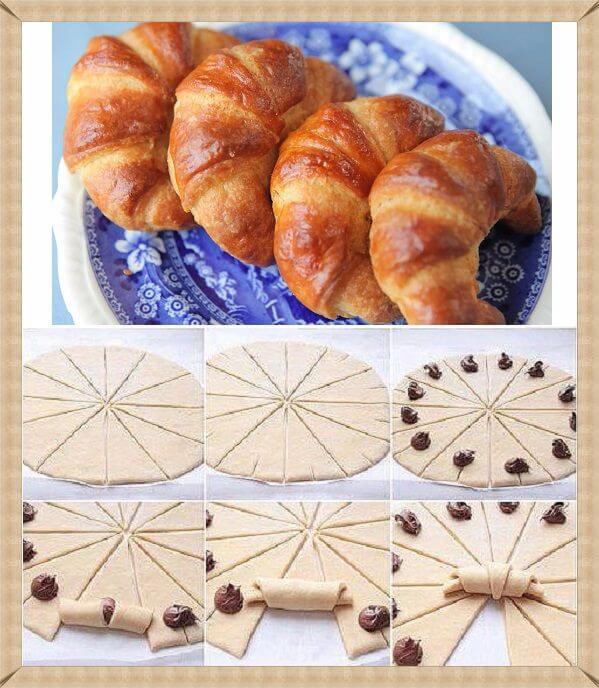
"Croissants". Roll out the circle and cut it into triangles, cutting from the center to the outer edge. A cut is made on the outer side of the triangle in the middle and the filling is laid out at its end. The croissant is rolled up from the outer edge to the center.
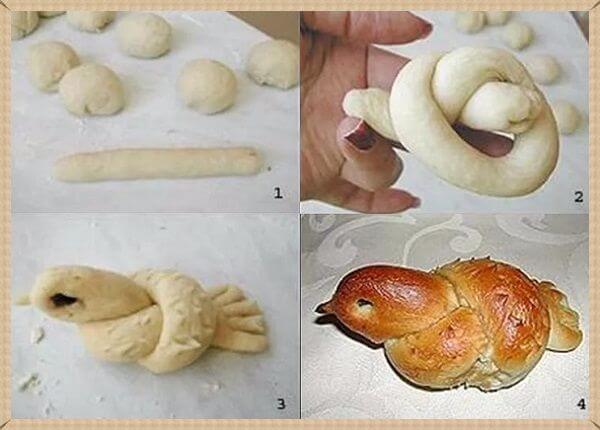
Bun “Bird”: Roll the sausage, wrap one edge around your index finger and thread it into the resulting ring. Using a small pinch, press the dough into a beak shape. The tail needs to be flattened and cuts made, giving the appearance of feathers. The eyes are the highlight.

Here are simple versions of beautiful buns made from sausages. By the way, even a child can make such forms. Involve the little ones in this fun baking process. At the same time, you will develop fine motor skills and imagination.
How to decorate pies
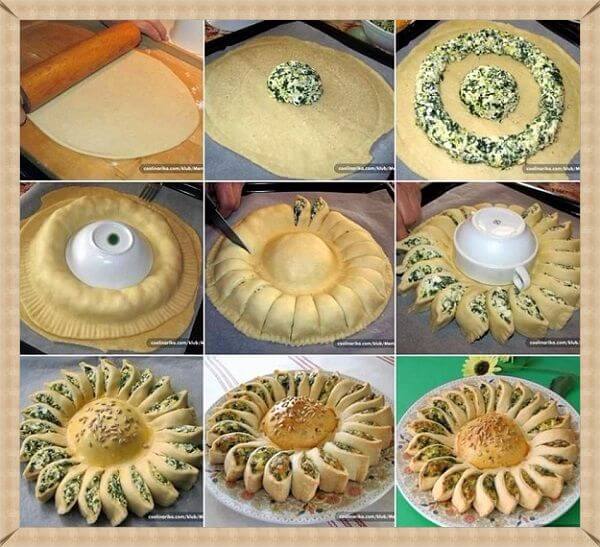
Flower cake decoration: Roll out the layer into a round shape, place a bun of filling in the center. Carefully distribute the rest of the filling around the circle, leaving space from the edges and the central bun. Cover the top with another layer of dough. Using a small bowl or tea cup, press the edges around the center filling. Trim the outer edges with an openwork knife. Then evenly cut the dough with the filling that goes along the outer ring. Turn each “petal” slightly so the filling is facing up.
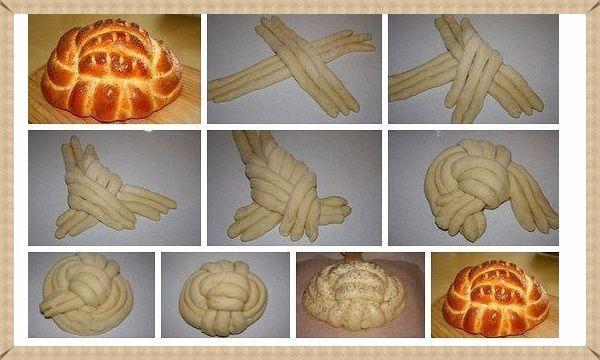
Cutting a loaf of bread. Roll the flagella into sausages and weave them into a loaf, as shown in the step-by-step instructions in the photo.
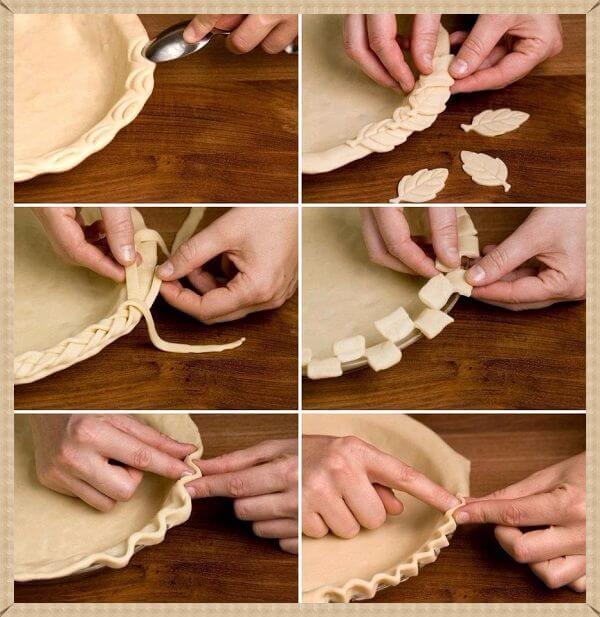
Here are the options for decorating the edge of the pie.
Cutting the dough “Pigtail” or “Spikelet”
The simplest version of “Pigtails”. A rectangle is cut out of the rolled out dough layer and a longitudinal cut is made in the center. Then, one edge is threaded through the resulting hole several times. This way the edges curl into a spiral. The filling is placed in the center.

"Pigtail with sausage". Three sausages are connected at the top edges. Then a slice of sausage is placed between them. Intertwined like a braid. The right harness is placed between the left and the center, then the left is placed between the right (which is now on the left) and the center (which is on the right). Again, a slice of sausage is placed and the braiding continues.
Sausage in “Pigtail” dough. This delicacy is sometimes called “Obzhorka” in culinary shops. The sausage is placed in the center of the dough cake. Then the edges are stuck to each other, and the sausage wrapped in dough is cut into equal parts. Each polka is turned sausage side up and placed one after another on different sides from the middle. Place in the oven when half cooked. Sprinkle cheese, herbs on top, grease with mayonnaise or ketchup (optional). And finish baking until ready.
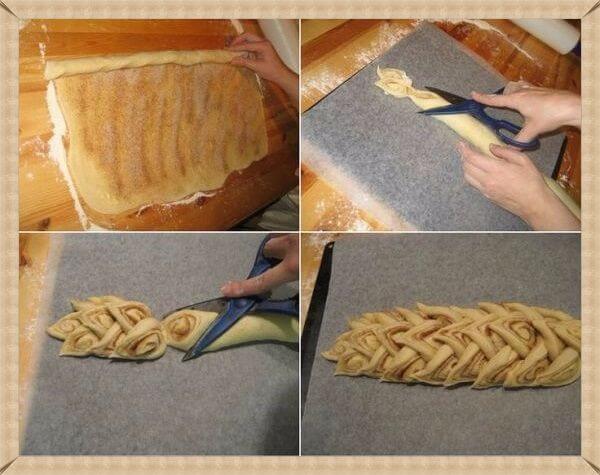
Beautiful bun “Spikelet”. This type of baking is simple to make and looks very beautiful. Roll out a thin layer, grease with vegetable oil or egg, sprinkle with sugar and cinnamon (poppy seeds). We roll the roll, which we then cut with scissors slightly obliquely, as shown in the photo. We put the resulting “spikelets” into one large beautiful bun.
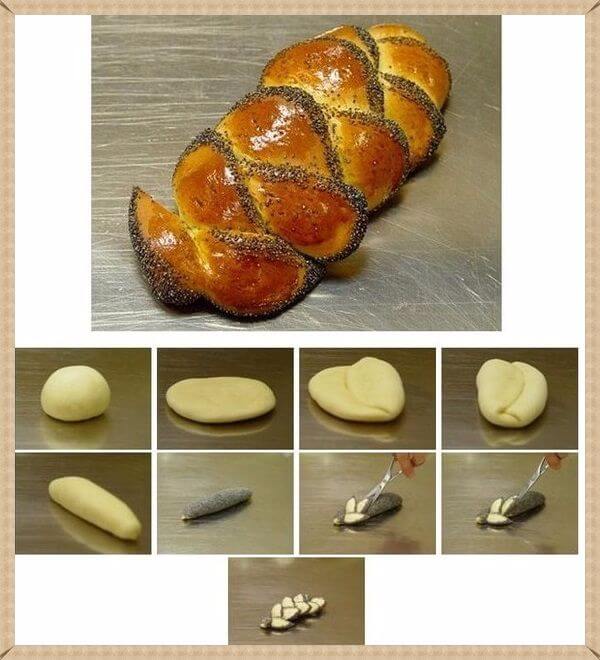
And this is a simple pigtail with poppy seeds. The sausage is covered with poppy seeds and cut with scissors, placing the petals on different sides.
Recently I needed to make a large number of buns, but I really didn’t want to bake just one pan. There needed to be enough variety for the kids to like the buns too. On the Internet I came across a book for a vocational school, “Step-by-step instructions for shaping buns.” I used it to make several types. I think that this material will be useful to someone. I made the buns according to the recipe Magic dough with cream
Swan bun
Form a piece of dough into a ball and roll it into a circle. Fold this circle in half.
Using scissors, cut a thin strip along the fold line at a distance of 3 mm from the fold, without cutting to the end. This will be the neck with the head. Make small cuts along the bottom of the semicircles.
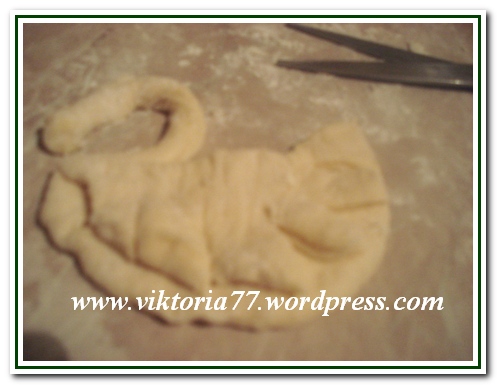
Bun "Mushroom"
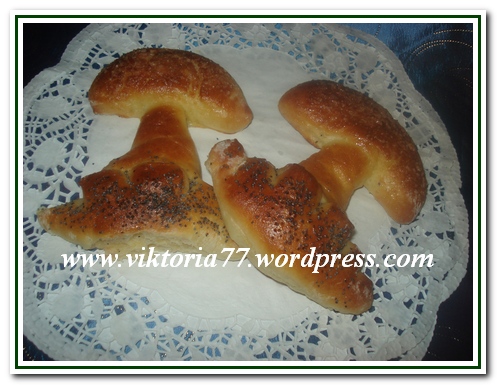
Form a piece of dough into a ball and roll it into a circle. Cut the circle into 3 parts: 1 triangle in the center and 2 half circles.

Place a triangle on the parchment, one semicircle on top of it - a cap, make cuts on the lower semicircle, place it on the base of the fungus and push it apart a little - this will be grass.

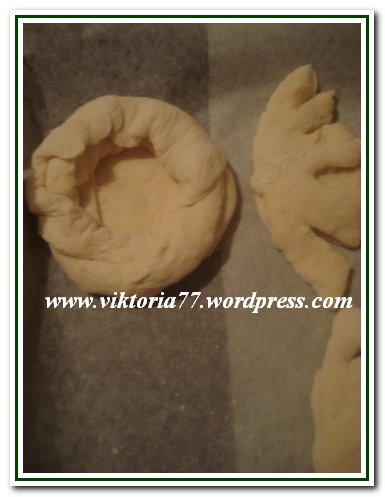
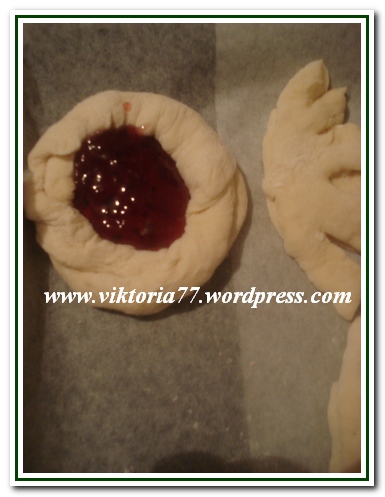
"Buns with jam"
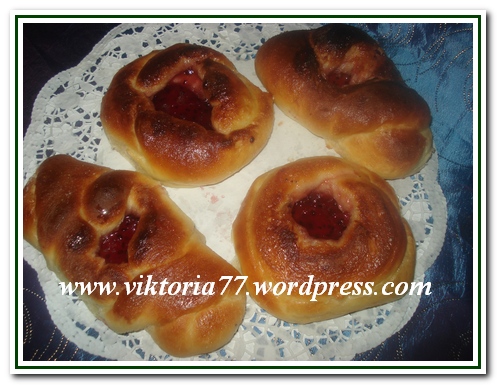
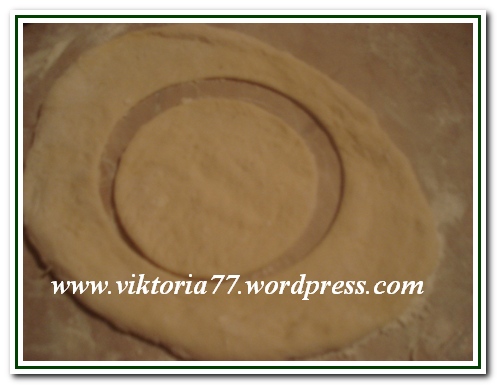
Round open: Roll out a small circle, cut a smaller circle in the middle - this will be the base.
Fold the round strip into a figure eight, then in half and place it on top of the base.

Fill inside with jam.
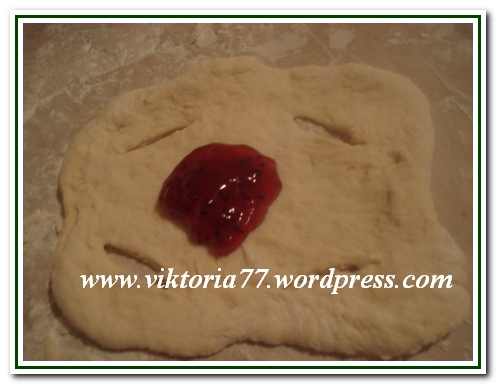
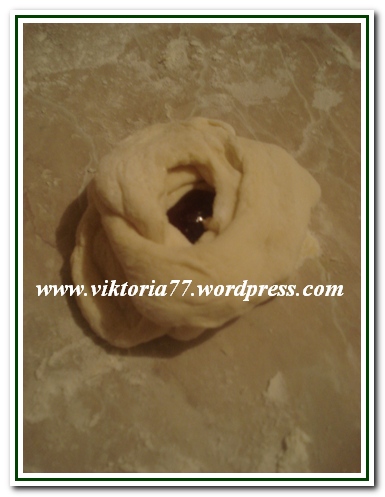
Another option with jam.
Make cuts crosswise, put jam in the middle and close it crosswise, stretching the opposite edges into the cuts.

Bun "Tulip"

Roll out the dough into a rectangle (brush with butter and sprinkle with sugar and cinnamon if desired). Roll it into a roll. Make two through longitudinal cuts in the roll, not cutting 1-2 cm to the middle.

Connect the resulting strips on one side to form a loop.
Unfold the other two ends with the cut side up and place the edge under the resulting loop.
Bun "Chrysanthemum"
Roll the ball of dough into a long rope and roll it into a snail shape.
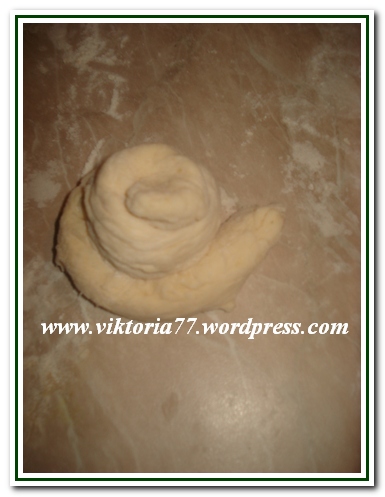
Using scissors, make cuts along the entire “snail”. Sprinkle with sugar if desired.
Buns “Twist”, “Butterfly”, “Scallop”
Roll out the dough into a rectangle (brush with butter and sprinkle with sugar and cinnamon if desired). Roll it into a roll. Make a through cut in the roll from one edge to the other, without cutting 2 cm to the end.
Pull the resulting hole slightly apart.
Pull one end through the hole

Bun "Butterfly"
Roll out the dough into a rectangle (brush with butter and sprinkle with sugar and cinnamon if desired). Roll it into a roll. Fold the edges of the roll towards the center so that they meet in the middle of the roll.

Make cuts at both ends without cutting all the way through.
Turn the workpiece layer up along the cuts.
copied from the site - http://www.good-cook.ru/tort/tort_560.shtml
buns
(page No. 1)
Buns are the greatest invention of Russian cuisine, along with bread, pancakes and pies.
They are small figures made from yeast dough with a layered structure.
I will give some of the most popular ways to form buns. (Continuation of the plush theme on page No. 2 And on page #3 And on page No. 4 .)
COMPOUND
Butter yeast dough is prepared using the same technology as regular yeast dough, but more eggs, butter and sugar are additionally added to it. Because In this case, the dough turns out heavier, then you need to take about 1.5 times more yeast.
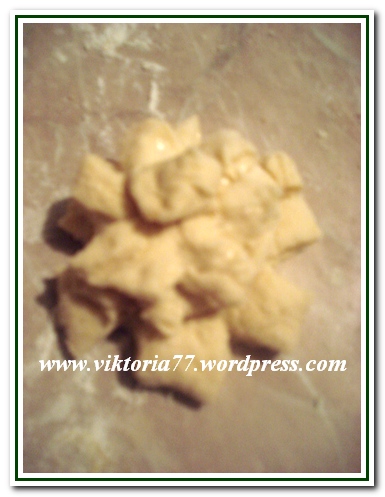
Divide the finished dough into small pieces. The size of the pieces depends on how big the buns need to be. For a medium-sized bun, the weight of one piece is 80~100 grams.
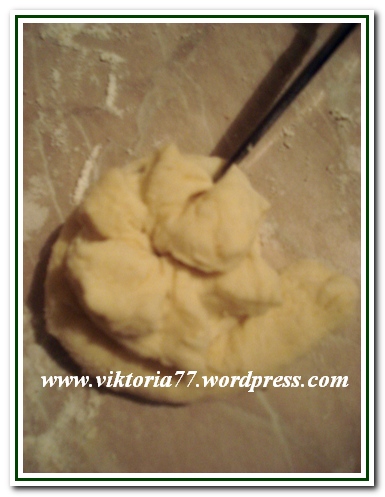
Form the pieces into balls. The balls are not formed by simply rolling between the palms. You need to take a piece of dough with both hands (two thumbs side by side). And with all your fingers, collect the dough to the place where your thumbs are. At this time, your thumbs push the dough inside the piece.
Roll out the resulting balls into a flat cake 4~6mm thick.
In order for the buns to be more magnificent, the balls need to be allowed to rest, and then they should not be rolled out, but kneaded and stretched into a cake with your hands.
If you are making a large number of buns at once, then you need to roll out as many cakes as the number of buns will fit on one baking sheet. The next portion of cakes is prepared in the second batch, when the first baking sheet is in the oven.
Grease the flatbreads with butter and sprinkle evenly with sugar. The more sugar, the “caramel” the bun will be. Usually, for a flat cake with a diameter of 15cm, take 1~1.5 teaspoons of sugar and 1 teaspoon of butter.
For sprinkling, in addition to sugar, the following are used:
- poppy;
- cinnamon;
- small raisins;
- crushed nuts;
- sesame or sunflower seeds.
Roll the prepared cakes into rolls.

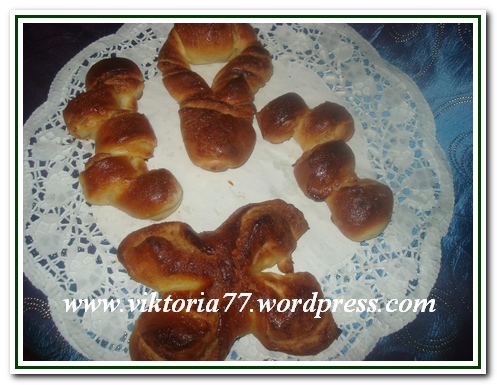
BUN "HEART"

1. Fold the roll in half.
2. The ends of the roll should be joined together.
3. Using a knife, make a through cut along the figure, not reaching the end (the junction of the two ends of the roll) 2~3cm.
4-5. Unfold along the cut line in layers upward.
BUN "HEART", option 2

This bun is formed in exactly the same way as the first one, but the cut is not made all the way through, leaving 1 or 2 layers uncut.
In this case, the bun does not unfold so widely and the cut forms something like a well or depression, into which you can additionally put something, for example, a piece of butter, or add sugar.
BUN "TULIP" or "TREFOIL"

1. Two cuts are made along the workpiece.
2. The workpiece is opened along the cuts - the outer petals are spread apart and unfolded in layers upward. The middle petal either does not move or turns.
BUN "ROSE" or "CURL"

These buns can be made either small or large.
For small buns, small flat cakes and, accordingly, small rolls are made; for large buns, the dough is rolled out into one large layer, which is then rolled into a large roll.
1. Cut the roll into pieces.
2. Pinch one end of the piece.
3. Open the layers from the second end like petals.
BUN "BOW"

1. Cut the roll (without bending) on both sides so that there is an uncut part left in the middle. Make cuts along the roll.
2. Unfold the bun along the cuts.
Place the buns on a baking tray greased or lined with baking paper and leave for 15~30 minutes to proof.
Bake in an oven preheated to t=180~200°C for 15~20 minutes.
buns
(page No. 2)
I continue to show different options for buns.
This page has more “artsy” goodies.
(You can see other options for buns on page No. 1 And on page #3 And on page No. 4 .)
But that's not all, there are still options.

COMPOUND
yeast dough, vegetable or melted butter, sugar
on the first page .
BUN "BOAT"

1. Fold the roll in half.
Make a cut along the figure, not reaching the end (the junction of the two ends of the roll) ~2 cm.
2. Turn the cut workpiece on its side. Bend the top so that it rests on the table.
3. In this case, the fastened ends of the roll appear UNDER the unfolded petals.
BUN "TWIST"

1. Make a through slit in the roll (along the product) from one edge to the other, not reaching the ends ~2cm.
2. Expand the resulting hole.
3. Pull one end of the roll into it.
BUN "ROPE"

This figure is best made from a large roll. If you make small “ropes”, you get only 1-2 weaves and the finished product has a poorer appearance.
1. Stepping back from one end of the roll by 2~4 cm (depending on the size of the roll), make a longitudinal cut to the second end. Unfold the product along the cut, layers up.
2. Twist the two resulting strips together. Connect the ends together and pinch carefully.
BUN "EIGHT"

2. Take the resulting strips to the side and connect them in pairs (to form the number 8).
3. Carefully secure the ends.
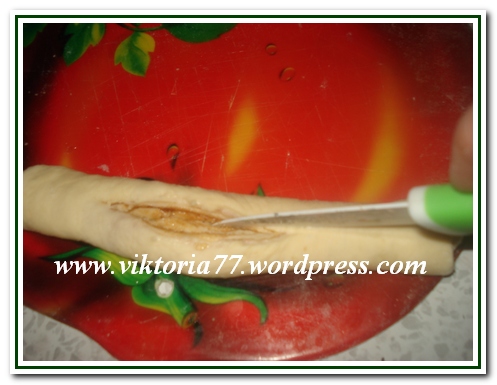
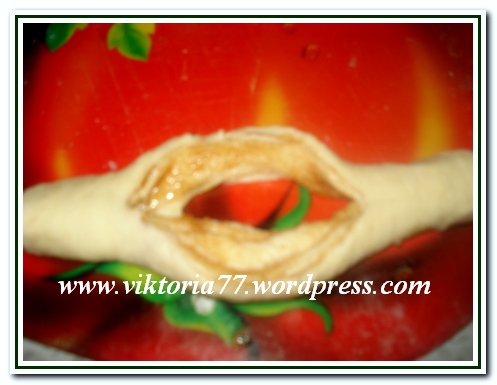
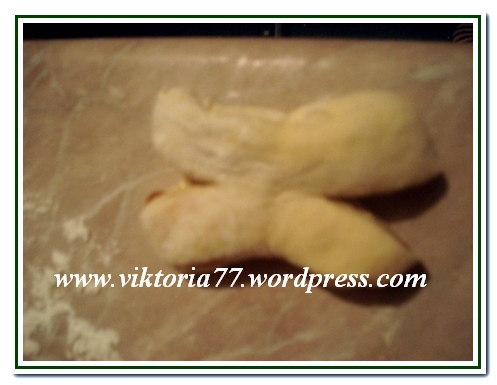
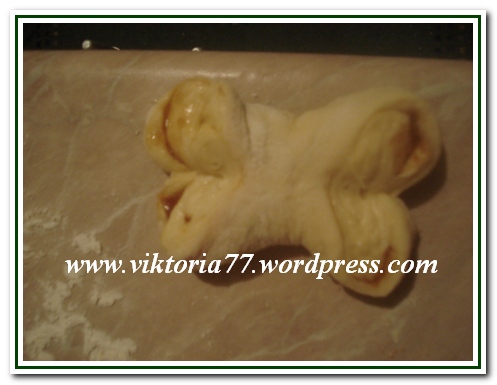
BUTTERFLY BUN

1. Fold both ends of the roll so that they meet in the middle of the roll.
2. Make cuts where there are folds.
3. Open the product along the cuts in layers upward.
BUN "SUN"

1. Cut the roll crosswise. The distance between the cuts is 1~1.5cm.
2. Wrap the roll in a ring, with the slits facing out (this will open the slits).
BUN "SCALLOP"

1.Make the same cuts on the roll as in the “Sun” version.
Turn the roll so that the uncut side is down and the cuts are facing up.
2. Alternately bend the cloves to the left, then to the right.
buns
(page No. 3)
Another page with a description of bun molding.
More common types of moldings can be seen on the previous two pages - and and on page No. 4 .
And that is not all!

COMPOUND
yeast dough, vegetable or melted butter, sugar
Prepare rolls as shown. on the first page .
BUN "CORN"

1. Make a cut to the middle of the roll.
2. Cut the uncut part with a knife in the form of small squares.
The notch should either press through the dough or cut through only one layer of dough.
3. Place the cut ends on the sides of the uncut part, turning them with the cuts facing up.
BUN "DEER ANTLER"

1. Cut the roll crosswise. The cuts should be inclined at 45° to the roll axis.
2. Bend the roll into a semicircle, with the notches facing outward. When folded, the notches will open.
SPIDER BUN

1. Make cuts at both ends of the roll so that there is 1~2cm of uncut space between them.
2. Turn the resulting 4 parts cut side up.
3. Cut each part in half lengthwise again.
You will get 8 “legs” that need to be moved apart so that the product takes on the appearance of a spider.
BUN "TULIP"

1. Make two through longitudinal cuts in the roll so that an uncut part 1~2 cm long remains in the middle.
2. Connect the resulting 2 strips on one side to form a loop.
3. Unfold the remaining two ends with the cut side up and place the edge under the resulting loop.
BROOM BUN

1. Cut the roll in half lengthwise to the middle. Place the cut parts cut side up.
2. Cut each one 1~3 more times to get the appearance of twigs.
3. Cut the uncut part crosswise, cutting through only one layer of dough.
buns
(page No. 4)
I continue to show and tell you how buns can be made.
This time we will make buns not from separate small pieces, but from large rolls.
Buns made from rolls are not inferior in appearance to portioned products, and much less time is spent on them.
Other molding options can be viewed on the previous three pages -
There is a sufficient selection of confectionery products on sale today. Only home-baked goods should not even be compared with purchased products. Lush and ruddy for tea, they are the most popular dessert. They are made from yeast, butter, puff pastry, giving them a variety of shapes, which makes them look even more appetizing.
Braided pastries
One of the popular forms of buns is a variety of braids. They can be made from different types of dough and are made in the form of:
- spindles;
- braids;
- spikelet.
Spindle buns are very easy to make. You need to separate a small part from the dough, roll two sausages out of it, fasten them and twist them together. After this, secure the other ends of the flagella so that they do not come apart during baking.
Advice. To ensure that the buns brown nicely, brush them with a beaten egg before baking. You can also use an egg-milk mixture.
Without much effort, you can also make a braided braid. To do this, you will need to roll three flagella from the dough, connecting each other at one end. Then braid them not too tightly, and then carefully fasten the edges.

Buns braided into a spikelet also look very attractive. To make such weaving, you must first roll out the dough into a rectangle. Then cut the layer into strips from the sides, not reaching the middle. You can put filling (cream, jam or something else) on the uncut part, and then weave the strips together one by one. As a result of these actions, the filling will be inside, and a beautiful weave will cover it on top.
Simple options for buns without filling
Many housewives make cute buns without filling:
- Scallop. Roll out small sausages from the dough, flatten them slightly, and make cuts on one side with a knife at an equal distance from each other.

- Sun. Roll out the sausage a little so that the dough is thinner than in the previous version. Make the notches thinner too. Then connect the edges together, wrapping them in the shape of a circle.
- Herringbone. Roll out the dough into a flat cake, cut it into triangles, and make notches on both sides. Lightly flatten the ends of the resulting strips with your fingers so that they resemble spruce branches.
- Chamomile. Form small cakes, make several cuts from the edges, leaving the center free. You can flatten the middle of the bun, then put jam inside, or bake the product without filling.
- Pretzel. Prepare a thin sausage, wrap both ends inward, then twist each other once or twice and stick to the middle of the product.

Beautiful filled buns
It’s not too difficult to make beautiful pastries with different types of fillings, as well as just poppy seeds, sugar or cinnamon. Among the most popular forms of buns are several:
- Hearts. Grease a small flat cake, rolled out into a square, with butter and sprinkle sugar on top. Then roll it into a roll and fold it in half, connecting the ends. Make a longitudinal cut, but not all the way, then straighten the edges of the bun.

- Butterflies. Just as in the previous version, prepare the roll, but make cuts on both sides, leaving the middle intact. Then carefully unfold the edges. You will get a bun in the shape of a butterfly.
- Roses. Roll out a rectangular cake not too thin, grease its surface with oil, and then sprinkle with poppy seeds. Then roll the layer into a roll and cut into pieces (7-10 cm each). Carefully straighten the edges of each of them, forming roses.

Attention! It is advisable not to roll the dough too tightly. It is better to wrap the layer looser.
- Curls and spirals. For such buns, a rectangular layer is also prepared, poppy seed or other filling is placed on it, but the dough is not wrapped in a roll, but overlapped on both sides in the middle. Then they cut it into strips crosswise and twist it several times - these are the spirals. If you connect them in a ring, you get curls.
- Envelopes. Cut the dough into squares, put cottage cheese or other filling in the middle. Then, forming the bun into an envelope, fold the edges and seal them.
Beautiful and delicious buns can be made in other shapes. There are a lot of possible options. Everything here depends only on the imagination of the hostess and the available skills. You can start with something simpler, and then move on to more complex confectionery products.
What kind of buns do you make?
How to make buns: video
1. Always add diluted potato starch to the dough - buns and pies will be fluffy and soft even the next day.
The main condition for delicious pies is a fluffy, well-risen dough. Flour must always be sifted before kneading dough: it is loosened, foreign impurities are removed from it, and it is enriched with air oxygen
2. In any dough (except for dumplings, puff pastry, choux, shortbread), that is, in the dough for pies, pancakes, bread, pancakes - add a full tablespoon (heaped) of semolina per 1/2 liter of liquid.
The nuns taught: “Previously, the highest quality bread was made from semolina. It did not dry out for a long time and was lush. Now there is no grit. Now add zhmenya (a handful) of semolina and you will always have good baked goods.” This advice is so priceless.
3. In addition to milk, it is useful to add 1/2 cup of carbonated mineral water to the dough.
Dilute a teaspoon of baking soda in 1/2 cup of water and lightly quench it with citric acid or vinegar.
The baked goods turn out great. Even the next day it remains lush.
4. There should be no draft in the room where the dough is cut: it contributes to the formation of a very dense crust on the pie.
5. When kneading yeast dough, all products should be warm or at room temperature; products from the refrigerator will slow down the rise of the dough.
6. For yeast products, the liquid should always be heated to 30-35 o C, since yeast fungi in a liquid that has a lower or higher temperature lose their activity
7. When kneading the dough, your hands should be dry.
8. Before placing yeast dough products in the oven, they are allowed to rest on a baking sheet or in a mold - rise for 15-20 minutes.
Allow the dough to proof completely before baking. If the proofing is not complete, it does not rise well and the pies do not bake for a long time.
9. Bake pies on a baking sheet over medium heat (180-190 o C) so that the filling does not dry out.
10. It is best to add heat-softened (unmelted) butter to the dough (yeast and unleavened butter), since melted butter worsens the structure of the dough.
11. Pies made with milk are more tasty and aromatic, the crust after baking is shiny with a beautiful color.
12. Yeast for dough should be fresh, with a pleasant alcoholic smell. Test the yeast in advance. To do this, prepare a small portion of the dough and sprinkle with a layer of flour. If no cracks appear after 30 minutes, then the quality of the yeast is poor.
13. If there is excess sugar in the dough, the pies quickly “brown” and even burn. Also, excess sugar slows down the fermentation of yeast dough, and the pies turn out less fluffy.
14. Fats, softened in heat to the consistency of sour cream, are added at the end of kneading the dough or when kneading it, this improves the fermentation of the dough.
15. To make the finished pies more tender and crumbly, add only yolks to the dough.
16. Tall pies are baked over low heat so that they cook evenly.
17. The dough for a pie baked on a baking sheet is rolled out as thin as possible so that the taste of the filling can be clearly felt.
18. To keep the bottom of the pie dry, lightly sprinkle the bottom layer of the pie with starch, and then add the filling.
19. Neither the dough nor the dough should be allowed to rest, as this causes peroxidation and deterioration in the quality of the dough. 3 hours is enough, but be sure to keep it warm.
20. Yeast dough pies can be greased with milk and, if desired, sprinkled with salt, poppy seeds, and caraway seeds.
21. Covered pies are brushed with beaten egg, milk, and sugar water before baking. Thanks to this, an appetizing gloss appears on the finished cake. The best shine is obtained when lubricated with yolks.
22. Pies that are sprinkled with powdered sugar are lightly greased with butter before sprinkling - it gives them a pleasant aroma.
23. Pies brushed with egg white or yolk acquire a shiny golden brown crust during baking.
For a brighter color, add a little sugar to the lubricant. Caramelizing during baking, sugar will give the surface of the product a beautiful reddish tint.
Lenten pies can be brushed with very strong sweet tea before baking.
24. The more fat and less liquid in the dough, the more crumbly the products are.
25. If you add soda to the dough, the cake will turn out to be darker in color with an unpleasant odor.
26. It’s easy to roll out thin dough by wrapping the rolling pin in a clean linen rag.
27. If the dough is too wet, place a piece of parchment paper on it and roll it straight through the paper.
28. Shortcrust pastry pies should be removed from pans when cooled.
29. Before adding raisins to the dough, they need to be rolled in flour.
30. Salt is always added to flour only when the dough has already fermented
31. The more fat and less liquid in the dough, the more crumbly the products are.
32. When cutting buns, grease the dough pieces with butter and sprinkle evenly with sugar.
The more sugar, the “caramel” the bun will be. Usually, for a flat cake with a diameter of 15 cm, take 1-1.5 teaspoons of sugar and 1 teaspoon of butter.
For sprinkling, in addition to sugar, the following are used: poppy seeds; cinnamon; small raisins; crushed nuts; sesame or sunflower seeds.
Roll the prepared cakes into rolls. This is the main bun preparation.
Next, cutting buns can be done in different ways.
33. If the dough has already risen and you don’t have time to put it in the oven, cover the dough with well-moistened paper, first shaking off the water.
34. The more fat and less liquid in the dough, the more crumbly the products turn out.
35. It’s better not to cut a hot pie. But if this is necessary, you need to heat the knife in hot water, quickly wipe it and cut it.
36. If the cake does not come off the baking sheet, separate it from the baking sheet with a thread.


